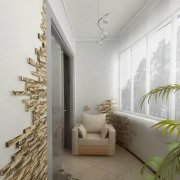
Wooden window cladding: design options

The transition from the use of wooden windows to plastic structures has been going on for quite some time. Most have already switched to plastic, although there are also adherents of wood as an environmentally friendly material.
That is why the cladding of wooden windows is still being carried out. Unlike plastic, wood requires a special approach, because if improperly processed, it can be exposed to rot, fungus and some insects.
The content of the article
Facing a wooden window and its features
In most cases, windows are made to order, since it is not just difficult to find a window of exactly the sizes that you need, but even impossible.
What you need to provide:
- In the selection process, it is necessary to take into account not only the dimensions, but also the number of double-glazed windows, and the presence of sashes and much more.
- Accordingly, the first thing to do before installing a window is to order it. Usually, the inclusion of outsiders in the installation process is completed.
- Installation, and even more so window trim a large number of owners of houses and apartments prefer to engage on their own.
What will you need in order for the windows to be cladded with wooden or some other materials independently:
- Choose which decorative materials are suitable for your case. The choice may depend on what the price of the materials is, on whether you have dealt with them before and so on.
- If the material turns out to be new to you, a photo or video instruction for facing windows will come to your aid.
- Stock up on tools and gradually proceed to facing.
It occurs:
- Plastic
- Stone.
- Gypsum
- Wooden window cladding.
For the simplest finish of a wooden window, the following materials will be required:
- Corners 2.70 m long, 50 × 50 mm in size - 6 pieces,
- Corners 2.70 m long, 10 × 20 mm in size - 6 pieces,
- Stapler
- Scissors.
- Silicone glue,
- Pencil,
- Roulette.
DIY work steps

The first thing you need is to close part of the wooden box under the windowsill (seeHow to finish the windowsill and slopes).
To do this, you need a corner measuring 50 × 50 mm. The length of the corner can be adjusted depending on how wide your window is.
So:
- In order to attach it, you will need silicone glue. They need to smear the inside of both parts of the corner.
Without waiting for the glue to dry, you need to attach a corner to the tree and attach it additionally with brackets using a stapler.
For reference. Staples are necessary only to temporarily fix the corner in the desired position.
Therefore, do not drive them too close. If it is inconvenient or completely impossible to get to the corner with a stapler, resort to clogging small studs. After all, they will still need to be pulled out of the frame anyway.
- After that, you need to sharpen the knife thoroughly (or take a clerical knife) and cut off the frozen mounting foam near the frame, all the remaining foam must be removed from the window.
- Further actions are carried out by analogy with the previous one. Here you need to use a thick or thin corner (it all depends on how wide the wooden slats you are going to process).
- So, for example, you need to take a thin corner (10 × 20 mm), and, leaning it against the window, mark with a pencil the borders along which it is worth trimming the corner. As in the previous case, first the corner is smeared with glue, and then fastened to the window with brackets or cloves.
- Despite the fact that this method of window decoration seems very simple, you need to be very careful here. After all, all corners should be carefully measured and cut out.
In addition, attention should be paid to the fact that the protruding window details that need to be decorated are sometimes quite large. And as a result, even the widest corners will not be enough for such a facing. - In this case, it will be necessary to act in a slightly different way. In addition to the corners, you will need plastic and cashing of the required sizes.
In accordance with these features, it is necessary to adhere to the following algorithm:
- A narrow plastic corner is attached to the outside of the frame, with one edge glued to the wall and the other to the frame. So finish on all sides of the window.
- A strip of plastic is also attached to the back of the frame using silicone glue.
- Since cashing is quite heavy, it must be mounted on liquid nails. It is this stage that will be the final in this window design process.
Wood window cladding and features

A little more complicated is the procedure for decorating a window with wooden materials. The fact is that here you will need to calculate the correct cutouts of boards and battens, which will be faced with a window.
However, in this case there are some tricks, because it is not necessary to completely finish everything with one material. A wooden window cladding can be carried out only in a conspicuous place.
So:
- This decoration option implies that all corners are again made using plastic elements, and the tree is fixed only on the front side of the window. Thus, the cladding of the window with wood begins just like plastic.
First you need to draw all the corners, and the finishing stage is nailing the slats on the face of the window.
For reference.
Here you can use a regular lining, and a special wooden cashing, and even a block house. It all depends on how much time you intend to spend on finishing.
- So, in order to cover the window with a clapboard or block house, you must first measure the size of cashing. In accordance with them, it will be necessary to saw the material into several parts.
- Both the lining and the block house are mounted on a frame in the castle, so you will need to nail them only on one side. Previously wooden material must be treated with an antiseptic.
- This will prevent the development of harmful microorganisms in it, and also will not allow it to burn. For greater convenience, it is recommended to use finish nails for fixing the lining and the block house.
- Lining with these materials is necessary from the bottom up. After the whole window is framed, it will be possible to re-treat it with penotex or varnish.
- Thanks to these materials, you will be able to give the tree exactly the color that will be in harmony with other elements of the home’s interior decoration.
For reference. At the same time, it is rather difficult to finish with wood, it should be noted that this process allows you to correct certain errors that were made, for example, when inserting a window.
- So, before proceeding to facing the window with finishing material, it is recommended to once again evaluate how even all its parts are even. This applies primarily to the window box.
Use the building level to check how accurate horizontal and vertical are. window slopes.
Sometimes it may be necessary to additionally attach rails to them, or vice versa, cutting off the protrusions. Therefore, depending on the state of the window, you will need to proceed to the preliminary processing of the window frame.


The inner lining of a wall with a window is best done not with a house block, but with a wooden panel. First, vertical bars of the frame are attached to the wall, and then horizontal lamellas of the lining are nailed to them with a spike up. They are fastened with nails in a spike so that the heads of the nails are not visible, because the groove of the next board will close them. After facing the walls, dobers are installed on the slopes around the window perimeter, which will cover the ends of the lining, and then platbands are attached to the lining and dobors.