Do-it-yourself saunas from a beam: how to make interior decoration

The bathhouse, which has been serving for a long time for hygienic purposes, has turned into a place for communication with relatives, friends, and simply as a means of healing or a hobby. A familiar picture: winter, cold, and in public transport people with birch brooms go to a stop near a public bath?
The attitude towards them is twofold, some envy their capabilities, others consider them cranks, but if you invite anyone to visit a home bath and take a steam bath, no one will refuse, correct if this is not so.
The content of the article
Which bathhouse to choose for yourself
That is the question and the secret, but I want to have a steam room with the most loyal conditions, so that it is suitable for young children and for elderly parents. All the requirements are met by a Russian bathhouse, the room of which is simply made from timber, which in itself is pleasant.
Wood, like any other material, has its advantages and disadvantages. Modern technologies make it possible to minimize them.
Construction of a bath from a bar with simple connections
The tree itself and the buildings made of it are fire hazardous, but the baths built of glued timber are not. Buying a finished bath is not a troublesome, but expensive pleasure.
Depending on the project, design, materials for construction and bath finishes, the price can reach up to 700 thousand rubles, or even more. This is one of the reasons for building a bath next to the house with your own hands.
For construction, private traders most often choose a wooden beam. Unfinished lumber saunas can be built in a short time, if you look at the shore with all the subtleties of not only construction, but also the selection of material, watch videos and photos on the site.
Wooden beam and its choice
Wood is harvested in the winter and before the timber is made, the tree must be aged for at least a month.
It is necessary to organize the correct storage of the bars:
- They should not be in contact with the ground, be stacked at a distance of 5 cm or more from each other. When buying a finished beam, carefully inspect it.
- It should not have deep cracks, a slight blue, signaling the initial signs of decay, traces of bugs or wormholes. The quality of wood determines the durability of your building.
Attention: It is recommended to choose blanks from conifers that do not rot and produce useful essential oil that enhances the healing effect of bath processes.
- It is preferable to take well-dried material, it does not shrink. High-quality timber has a polished surface, packaging and lies in stacks.
Do not throw money away, if it is not. Harvesting natural moisture (not dried) are cheaper, but there is a nuance in their use.
They must immediately be used in business, otherwise the inevitable occurrence of splits, cracks on the workpiece and even their deformation due to uneven drying, when the middle is still wet and the top layer is already dry. Independent drying takes about a year and there is a method, not acceptable for everyone. - Material is purchased immediately for the entire structure, it is not difficult to calculate its required quantity. Wholesale lots are sold at discounts, only you first need to prepare a site for storing the beam, because in one day all its quantity is not realistic to use.
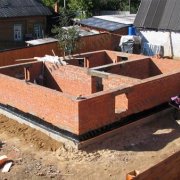
Foundation making
Soil and climate characteristics, soil freezing depth affect the choice of foundation. The instruction for independent construction focuses on the equipment of the strip foundation, as the most reliable and versatile.
The technology of its implementation is beyond the power of unprofessional owners, the only drawback is the large labor costs, which is offset by the savings in the services of specialists.
So:
- A prerequisite is the depth of the dug trench below the freezing zone of 0.2 m or more and up to 80 cm.
- With hard soil, concrete is poured without a pre-arranged wooden formwork into a trench.
- Formwork is constructed by pouring the ground part of the foundation to an approximate height of 20 cm. Filling the trench with one concrete is not a very economical way.
- It is better to prepare a sand pillow at the bottom of the trench, which protects the soil from seasonal movements.
- Sand is used river, fine-grained, well spilled with water and additionally rammed after precipitation.
- A 15-20 cm layer of crushed stone, gravel, broken brick or rubble is poured.
- A “concreting” is carried out from a cement mortar of 5-10 cm, which becomes 50% durable after 5-7 days, and the following work can be performed.
- Concrete foundation is poured with installed “mortgages” (reinforcement bars) for fastening the first crown.
- Reinforcement is made by longitudinal and transverse rods connected by knitting wire. The fittings must have a corrosion-resistant coating.
- The finished foundation is covered with burlap, sawdust or shavings on top and is kept moist to avoid cracking the surface.
The construction of the logs
After two weeks of waiting for the foundation to dry, you can begin to erect the log house. The first crown is installed on a foundation previously spilled with bitumen, on which roofing material is laid, as a waterproofing material.
The most suitable material for the first crown (strapping) is a larch, which does not rot. The horizontal level of laying the first crown is verified by the building level and, if necessary, gets better.
Bars are taken with a cross section of 200x200 mm, the following rows are laid out from cheaper material (pine).
Attention: Builders also recommend laying slats on the foundation surface after 30 cm, and fill the resulting voids with insulation or polyurethane foam, which also protects against decay.
The lower bars are additionally treated with machine oil or an antiseptic, assembly is carried out by several methods.

So:
- The simplest connection is made with a chainsaw in the “paw”.
- Templates for this are prepared in advance for the top of the beam and side.
- The lateral part has the shape of a trapezoid with bases of 200 and 100 mm and parallel sides of 200 mm.
- The upper template has a square shape with 200 mm sides.
- Templates are applied to the end of the beam, circled in pencil and cut with a chainsaw.
- Some do not fix the first crown on the foundation, hoping that the weight of the structure will support it.
- A heater (moss, tow or jute) is laid on it and the second crown is attached with wooden pins, metal pins can be made into holes made of the corresponding diameter.
- On subsequent crowns there is a beam with a section of 150 x. 150 mm and other patterns are used.
- The last two crowns are not attached, but are removed after the shrinkage of the log house to make an insert for the floor beams.
- The roof on the log house is made after the shrinkage of the structure.
- Not edged board with a thickness of 20 mm is used for flooring the rough floor in a bath of timber.
Attention: The tree shrinks in thickness, the beam can shrink by 5-10 cm.
Openings for doors and windows are laid in the loghouse immediately, and they are installed after shrinkage in order to avoid distortions and jamming:
- It is possible to caulk a log house in six months, after its shrinkage with dry moss, tow.
- A hammer and caulk are needed, and a heater twisted by a bundle is clogged in the gap.
- If a jute is selected with a heater, then it is laid and fixed with a stapler on each crown of the log house.
Finishing a beam bath outside may not be performed. If there is a desire, then the walls can be finished with wild stone, brick, siding or plaster. Wooden walls soaked with stain or painted look very good.
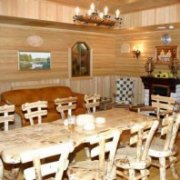
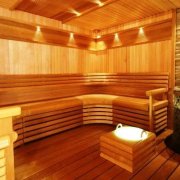
Interior decoration
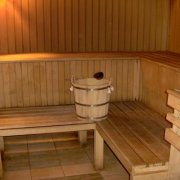
The main recommendations and requirements for the interior decoration of the bath, which will please the eye with a finished look. Finishing the log house inside the bath is best done with wood that meets the sanitary and hygienic requirements of rooms with high temperature and humidity, for example clapboard (see.Finishing the bath lining: do it right).
Heated wood does not emit substances harmful to health, has good thermal characteristics that retain heat, is quite durable and has a low coefficient of thermal expansion. However, the decoration of the bath from the timber is not performed from all types of wood.
For decades, the practice of using wood has been worked out - linden, cedar and larch, the most optimal option for finishing materials, Abashi wood with amazing properties is gaining popularity.
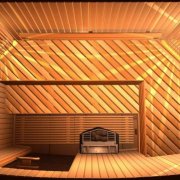
The interior design of the walls with imitation of timber is much more significant and more functional, if you get acquainted with its subtleties. On the one hand, the decoration of the bath with imitation of timber gives the coziness, warmth and comfort inherent in natural wood.
The other side is the simple installation of finished materials that can smooth the surface of the walls.

Baths made of timber trim are divided into monolithic and combined:
- Monolithic - dense and uniform decoration of the ceiling and walls with advantageous properties for the room. The panels are tightly closed with groove-locks, form a single surface and protect the walls of the room.
Refers to more complex work requiring certain building skills and technology. Indoors, there are many protrusions, corners, transitions that need to be repaired with panels. - Combined timber sauna decoration involves ceramic tiles that look more profitable and always individual. The variant with combined decoration is one of the winning ones, which is why we are so loved by designers and just the owners of bathhouses.
The inner walls of the bath are lined with pine lining, an aspen steam room, it all depends on your taste, financial capabilities, the advice of relatives, colleagues and experienced builders. Enjoy Your Bath.

And the main thing is to remove even hints of sharpness and wood chips with a grinder; sometimes they hide well inside the bathhouse.