How to build a wall of drywall with your own hands between rooms

Not always in apartments or purchased houses, new owners like the standard layout of rooms. So the question arises, how to build a wall of drywall with your own hands?
It is rather difficult to build a capital wall; moreover, for multi-apartment buildings, coordination with the relevant authorities will be required. In this case, the easiest way out is to install a drywall partition, and how to do this, the article will tell.
The content of the article
Why drywall
Gypsocraton is a flexible, lightweight and easy-to-use material.

With its help, any room can be given an original and unique look. It could be:
- The wall dividing the room.
- Drywall partition of an inconceivable form.
- Sophisticated decorative design.
To build a wall from drywall, it is necessary to observe the following sequence of works:
- Make the frame of the wall. Usually used for this metal profiles or wooden slats.
Tip: Preference for the frame should be given to metal elements that have greater strength, less susceptibility to external factors, such as: mechanical stress, humidity. In addition, the price of the material is quite affordable, and the profile of the parts is made specifically for this material.
- Sheathe the wall on both sides with sheets of drywall, which can be ordinary, moisture resistant or fireproof, which depends on the purpose of the room where the walls are made of drywall.
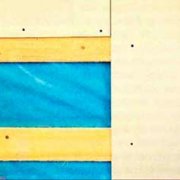
- Fill the space between the canvases. It can be glass wool or mineral wool.
The advantages and disadvantages of installing drywall walls are shown in the table:
| Benefits | disadvantages |
|
|
Materials for the frame
Before building a wall from drywall, a strong and selected frame configuration is made. To do this, use a metal profile specially designed for panels, and a number of auxiliary devices used in its installation.
For this, the following profile sizes are used:
- D - to form the surface on which the drywall will be attached.
- W- for the construction of a common frame of the wall.
- C - reference.
- U - guide. This is a simple U-shaped profile with smooth side walls, a support profile with a special ribbing made by pressing is inserted into it with the end face, which increases the bending stiffness of the element.
The main dimensions of the profiles:
- CD - a supporting frame element with dimensions of 60x27 millimeters.
- UD - a guide for attaching a CD profile, with dimensions of 28x27 millimeters.
- CW - profile for the racks of the wall frame, with dimensions 50x50; 50x75; 50x100 millimeters.
- UW - guide for CW profile, dimensions 50x40; 75x40; 100x40 millimeters.
- UA profile is a variant of the CW profile, but more rigid.
Type profiles and sizes are shown in the photo.

To calculate the approximate amount of materials, a table is presented in which the consumption rates of the necessary materials for the installation of the wall are indicated, the dimensions of which:
- Length - 3.5 meters.
- Width - 2.5 meters.
- Height excluding door openings.

When constructing the frame, it must be borne in mind that:
- For plasterboard walls with a thickness of 5; 7.5 or 10 centimeters, W. profile applied.
- For a thicker partition, a profile of the D series is installed, and the guide elements are fixed in parallel in 2, instead of one standard.
- Any distance between the guides is selected, which depends on the presence of insulation or installation of communications.
Preparing for wall mounting
Instructions for the installation of drywall wall suggests starting work with preparatory operations.
For this:
- The marking is carried out on the floor, ceiling and walls where the installation of the partition is supposed.
- The lines for installing the wall are drawn in relation to the window parallel to two other walls.
- A guiding rigid profile is fastened along the intended perimeter with dowels, which serves as a support for the structure under construction.

When installing a wall from drywall, the following rule must be observed:
- The profile for the racks is deployed with a stiffener to the side where sheet fastening begins.
- If mounting is from right to left, the ribs should be on the right.
- For the partition in which the door is provided, a rigid rack profile must be installed. A detailed video in this article will allow you to see the whole process with your own eyes and understand what kind of prepared design will have.

- On guides with a step of about 50 centimeters rack profiles are distributed.
Tip: Joints of two sheets should be carried out only on the profile. This will increase the strength of the structure.
- In that part of the wall, which is located above the door, additional profiles are inserted to ensure the rigidity of fixation of the sheets.
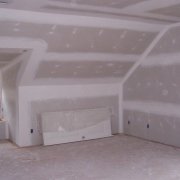
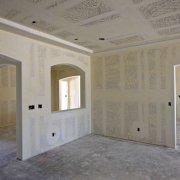
Wall cladding
Before proceeding with the fastening of drywall, it is necessary to choose the right material. The strength and durability of the drywall structure depends on the quality of the material, the correspondence of its operational characteristics to the room in which the wall will be installed.

The basis of drywall is a gypsum core, which is coated on both sides with multilayer cardboard.
Plasterboard sheets (gypsum plasterboard), depending on the constituent elements are divided into:
- GKL - standard drywall sheets used for “sheathing” rooms with normal humidity. It features low fire retardant characteristics. The cost of such material is the lowest.
- Hklo - fireproof drywall. In this case, the gypsum filler contains a fiberglass reinforcement, and the cardboard is impregnated with flame retardants, which reduce the combustibility of the material. Fiberglass delays the spread of flame.
- GKLV - waterproof gypsum board, used for the construction of partitions in wet areas: bathroom, balcony and leveling walls. The ability of gypsum board to absorb moisture minimizes the cardboard layer of GCR, impregnated with hydrophobic compounds.
- GKLVO - a combined type of drywall that combines waterproof fireproof properties. Its cost is the highest.

Depending on the purpose, the thickness of the drywall sheets is selected:
- Wall cladding is best done wall GKL thickness of 12.5 millimeters.
- The ceiling is sheathed with ceiling GKL - 9.5 mm thick (seeFacing the ceiling with drywall: do it right).
- To create a figure on a wall from drywall, you need an arched gypsum board, 7.5-8 millimeters thick.

Tip: When purchasing drywall, it is necessary to carefully examine the sheets for defects on them so that there is no damage to the cardboard and the slanted core.
Drywall Cutting
For cutting material, a construction knife with a set of interchangeable blades is used.
Thereafter:
- The sheet is placed on a flat, necessarily solid surface.
- A cut line is drawn with a pencil or marker.
- The knife cuts the top of the cardboard.
- The sheet moves along the incision line onto the lump of support and breaks neatly.
- The sheet returns to its initial position, unfolds on an edge, and then bends.
- The cardboard is cut from the second side, but not through.
- The canvas is flipped to the other side, shifted to the edge of the support and finally separated.
Tip: In order to ensure a clearance, in order to qualitatively seal the joints subsequently with putty, it is necessary to form a bevel chamfer at the edge of the sheet with an inclination of approximately 22.5 ° degrees with a special plane for drywall.
Sheet fastening
Drywall 3.5x35 millimeters are attached to the metal frame with drywall.
Wherein:
- The corners of the sheet are attached.
- Fasteners are placed in increments of 10 - 25 centimeters along the edges of the sheet and along its midline.
- The screws are screwed in such a way that the caps of the elements are slightly deepened in the GCR, and not protrude above the level of the wall.
Tip: Fixation of sheets should be performed above the floor at a distance of 15 millimeters to ensure the integrity of the structure during operation.
- After attaching the first sheet, the remaining distance to the ceiling is measured and the corresponding GCR section is prepared.
- A chamfer is cut on it to improve the joining of the paintings to the top or bottom sheet and to the ceiling.

- All subsequent sheets are fastened entirely without chamfers, in a checkerboard pattern: after mounting the first row, a whole sheet of drywall is placed under the ceiling, and the bottom is the missing part.

Installation of wiring, sockets, switches:
Soundproofing and wall decoration
Mineral wool is used for soundproofing. In this case, the wall of drywall reduces the penetration of sound from one room to another.
For this:
- Cotton wool fits tightly between the racks of the frame without gaps, without additional fastening.
- Reliability of material laying can be improved by horizontal lintels made of wooden timber, the length of which is selected along the width of the wall, and pieces of mineral wool will be shorter.

- After laying the sound insulation, the second side of the wall is sheathed.
- All end surfaces are filled.
- A mounting net is glued to the joints.
- Applied starting putty.
- The entire surface is processed finishing putty.
- An abrasive mesh and a grater finally level the surface.
- The wall is ready for any suitable coating.
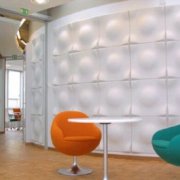
Design solutions
A beautifully designed wall made of drywall creates an original look to any room, and its owner is in a good mood. How to do this will tell the video. How can I make a drywall wall?
A few examples are presented below:
- Walls can be plastered and coated with moisture resistant paint.

- Facing with natural or artificial stone.

- Make a finish of mosaic or tile.

- You can make a picture on the wall of drywall.

- You can make a niche in the room of drywall with LED backlight.

- The drywall fireplace in the wall looks great.

The color scheme can be very different and correspond to the color scheme of the entire room.

In order to do everything correctly, to avoid errors during installation, before you install a wall made of drywall with your own hands, it is better to watch the video. In it, all stages are accompanied by visual instructions.