Gypsum stone for interior decoration: material production

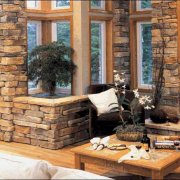
Today, a natural stone has been replaced by a worthy change, a gypsum decorative stone for interior decoration, which has increasingly been used in interior decoration, due to its many positive characteristics. This material can be made independently on the basis of gypsum.
The price of the material is an order of magnitude lower, and installation takes less time.
The content of the article
The characteristic features of artificial stone
If applicable a natural stone, that is, the opportunity to achieve very interesting results and effects. A room in such a decor can be decorated in the Renaissance style or you can get a real palace in the interior, but with all its features, natural stone has several disadvantages.
This may include:
- High cost.
- Shipping costs.
- A huge load on the wall.
- Without special preparation, it is impossible to do the installation yourself.
Note: In order to minimize all the shortcomings that the user encounters when decorating with natural stone, a technology for the production of artificial stone was specially created.

Outwardly, there are no differences between natural and artificial stone. For the preparation of artificial stone, there are a couple of options.
Namely:
- In the first embodiment, sand, water and cement are used for the manufacture.
- And in the second case, gypsum.
- The third involves the use of polymeric substances.
Advantageous characteristics of artificial stone:
- If we consider two apparently similar elements (artificial and natural), then the decorative material will be much lighter in weight. This advantage can be used for facing fragile partitions.
- Decorative material is processed much easier and is made with thin plates in order to reduce weight.
Note. In the presence of light weight, loss of strength and reliability is not observed, even during transportation.
- The stone can be produced on site, while eliminating losses during transportation.
- Gypsum stone can be made initially with a smooth surface, then this will reduce the cost of processing the material.
- The material is not afraid of external negative influences, which cannot be said about natural material.
- The gypsum stone for interior decoration is perfectly washable and practically resistant to pollution.
- Artificial stone decoration can be done arbitrarily.
- Gypsum material has a wide range of colors.
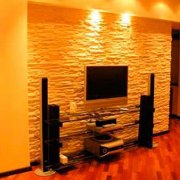
- Given the variety of choices, the stone is suitable for finishing any room.
In terms of its external characteristics, an artificial stone can be:
- Chipped when the sensation that the edges are beaten off with a hammer.
- Butovoy, the material is similar to boulders.
- Decorative, designed to create various ensembles in the interior.
- Sawn when smooth uneven edges.
- Arbitrary, fantasies are realized in the form of the material.
How to make gypsum decorative stone for interior decoration, make forms

Properly cook yourself decorative rock gypsum for interior decoration is not difficult, using specific instructions. Thanks to such finishing materials, the house is filled with comfort and beauty.
Before starting work, it is necessary to prepare the necessary tools and materials:
- Water.
- Sand.
- Anhydride.
- Capacity made of plastic.
- Polyethylene.
- Forms.
- Electric drill.
- Corrugated glass.
- Pallet.
- Coloring compounds on the water.
A large platform is not needed for the production of gypsum stone, and the manufacturing instructions are not complicated. Gypsum mortar is made from anhydride, water and gypsum.
How are stone forms created?
Attention! It should be remembered that it is the forms that must be given due attention before proceeding with the manufacture.
Let's consider in more detail:
- A decorative stone for gypsum interior decoration is best made in a silicone container.
- Many prefer forms of metal, wood or plastic.
Note. But such forms do not give a clear structure to gypsum. In other words, they do not repeat the exact shape of bends and reliefs.
- As a rule, decorative stone for interior decoration from gypsum begins to be made with the determination of size. It is best to purchase a sample for production from the beginning in the store.
- For casting artificial stone, silicone molds and a special box of a suitable size are prepared. It should be slightly larger than the sample stone, which will be the formwork.
- The sample stone and the box are pre-lubricated with solid oil, after which the stone is laid at the very bottom of the box, see photo.

- To make the decorative stone for gypsum interior decoration better performance, it will be necessary to prepare several forms and formwork. If you have several forms, you can make much more stones.
- Next, silicone is poured and compacted with a brush to seal. After the mold is filled with silicone, the entire surface is leveled with a spatula.
- Finished molds dry in a few weeks.
- Then the formwork is broken and the sample stone is pulled out.
Tip. If some defects are found on the surface, they should be repaired with silicone.
We make gypsum stone
After the forms are completed, the decorative stone itself is made of gypsum for interior decoration. Before you start manufacturing, it is recommended to watch the training video.
So:
- In order to save, make sure that the amount of solution is equal to the number of forms. Gypsum dough itself hardens very quickly, so you should hurry up.
- The proportional ratio of water and gypsum is determined independently.
- After the water enters the container, gypsum itself is poured and the solution is gradually stirred until it becomes thick.
Note. The solution should be thick, so the liquid solution dries longer and does not have sufficient strength.
- To achieve a more durable material, another 10% sand is added. Further, the working surfaces are lubricated with wax, this is necessary in order to easily remove the material from the tank.
- The mixture is made like a water bath to enable the dissolution of wax.
- To prevent material from sinks, liquid gypsum is applied to the surface.
- To give the material a color, the right paint is mixed together with the gypsum (when the gypsum dough is kneaded).
- Next, we turn to pouring the main part of the gypsum into a stone mold. And with the help of a spatula, the substance is leveled.
- After that, the forms are covered with embossed glass, and vibration is produced for even styling.
- Full solidification occurs after 20 minutes. Then the glass is carefully removed, and the forms are finally dried out in the open air.
After the above listed works, the stone can be painted. Here you will need a brush and special paint.
The paint is applied several times on a pre-treated surface.
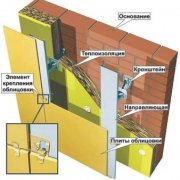
How to mount gypsum on the surface

After completing all the work, it will be useful to learn how to mount to the surface.
So:
- This material can be installed on any surface, with the exception of wood and drywall.
Tip. If the surface is wooden, then it is recommended to install an additional lathing and waterproofing.
- For a concrete and brick surface, thorough preparation is not needed, it will be enough to level the surface before installation.
Note. Before laying a stone, remember that the surface must be degreased and even.
- Next, do the markings on the wall. The first row is set strictly according to the level.
Using the level, you need to determine the upper point of the floor. A floor plinth is sometimes taken as a fulcrum.
A line is drawn from the top point along the entire length, where the gypsum stone will be installed. - If there is some distance from the bottom point to the line, then you can leave it as it is (no more than 5 mm). This gap can simply be puttied and painted.
The gap is more than 5 mm, it is recommended to cut the stones with a hacksaw.

- Before installation, it is recommended to make a selection on the floor and, if necessary, to change the geometric parameters.
- Further, the prepared base is treated with a primer or gypsum plaster. After that, cement-adhesive mortar is applied to the wall using a notched trowel.
- Using the same means, a stone is attached to the wall. Mastic, sealant, mounting glue are suitable here.
You can also make a mixture of PVA and gypsum. - Stone finish You can do it in several ways: with and without layout. If a method with a joint is taken, then make sure that the gap does not exceed 2.5 cm, which can be covered with a special grout.
This method is considered more economical, but not suitable for all cases. - The adhesive composition is prepared in an amount that can be used for 20 minutes, the thickness of the adhesive should resemble a toothpaste. The solution is applied with a spatula, a layer of up to 4 mm.
The area of the glue smear should be no more than a square meter (since it dries quickly). - Laying starts with corners and with window and doorways. Then the rows are executed horizontally.
Between the rows for evenness it is recommended to lay the same pieces of fiberboard, after drying they are completely removed. The approximate row width is 10 mm.
Gypsum stone must be laid so that excess adhesive is squeezed out from under the elements. Make sure during installation that the adhesive does not get on the front side.
The rows can be made not perfectly even, so the laying provides a certain curvature and can be asymmetric. If there is humidity in the room, then the material can be a special composition for greater durability.