Facing stoves with tiles: the right choice and facing

Cladding a fireplace with tiles is the best of the cladding options. The cost of the work is quite high, which is associated with its great complexity. Tiles facing the fireplace can be done completely with your own hands.
This article will talk about how tiles are laid when facing a fireplace and how facing of fireplaces with tiles is done correctly. Also, instructions on how to complete the decoration will be offered.
Before you start work, you should study the photos and videos on the topic, choose the design of the future design.
The content of the article
The reason why tiles are chosen
The trading network has many materials for decoration, at times it is difficult for the buyer to make the right choice. Before you prefer a particular material, find out how they stand out from other materials for cladding.
So:
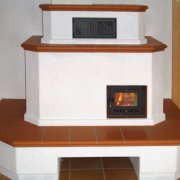
- Facing with tiles of a fireplace heats up quickly enough and keeps heat for a long time. This is his main advantage. For this reason, if your house is not constantly heated, this finish is best.
- Facing with tiles of fireplaces lasts a long time - several decades. In addition, the material is environmentally friendly, it does not spread harmful odors when heated.
- This material is suitable for those rooms where there is no constant heating. It is perfectly adapted to high humidity and temperature changes.
You can also use any fuel, elevated temperatures will not harm the finishes. - Fireplace decoration tiles can give the design additional reliability. Tiles - the material is quite durable.
- You can close all structural defects.
Completing of the work
The process of doing work is not even as complicated as painstaking. Everything must be done quite correctly and accurately.
All work takes several stages:
- Surface preparation, the quality of fastening and durability of the structure will depend on this;
- Tile fitting, which should be performed efficiently. Remember that a deviation of one mm over several rows can significantly distort the entire plane;
- Preparation of the solution, the quality of adhesion will completely depend on this;
- The correct installation.
Let's look at where to start and how to do the work.
Choose the types of tiles
For fireplace trim use different forms and types of tiles. Before starting work, you should correctly calculate the amount of material and then buy tiles.
What is the difference between this material, we will consider in more detail, since you will need it to calculate the required amount for work.

So:
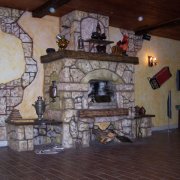
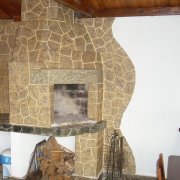
- For facing the fireplace, special corner tiles are used.
- For facing the plane of the fireplace, flat tiles are used, they are best suited for this.
- To trim the bulges and sharp corners, shaped tiles are used.
- The lower part of the fireplace is finished with basement tiles, which are made as a plinth, they emphasize the bottom of the structure.
A typical set of tiles looks like this:
- 20/20 cm or 22/22 cm for a square product;
- 20.5X13 cm is suitable for a rectangular design;
- for all types, a thickness of 5 mm is used.
In addition, you should not lose sight of other elements: a shelf, a crown, stucco molding, all kinds of stripes to decorate the plane.
Surface preparation
Decorating the fireplace with tiles is done on a high-quality surface, which should be prepared in advance.This will determine the reliability of fastening and the service life of the structure.
So:
- Inspect the plane and clean its surface from the old finish. For this purpose, a metal brush is used. Try to delete everything.
- Then we deepen the seams. This will allow to connect the surface with the solution in a high-quality manner. We make a 1 cm deepening and for this purpose we use a hammer and a chisel.
- After we hang on the plane a building grid, which will provide the plane with an additional level of rigidity. For this purpose, we drive nails into the seam.
In the case when the masonry is strong, a punch is used. Holes should be made, where then it is necessary to screw the screws, only screw them not completely. - Can be applied to the surface of the primer. A primer will help in good adhesion. Use a spray gun or brush for this.
- Then we hang a construction grid. Keep in mind that when installing it, it is necessary to put washers on the heads of the screws, they will hold the grid.
- Now take the level and plumb line and determine the evenness of the finish. Do not forget to install beacons that provide orientation during the work.
Solution preparation
Facing the fireplace with tiles is carried out on a properly prepared solution. Two types of mortar are used: clay and cement.
Both the first and second options are used. However, it must be borne in mind that the construction using a mixture of clay will become the most durable and heat consuming.
Clay solution
This material must be prepared correctly, in which case it will justify the expended forces. First, buy the right amount of clay.
So:
- Before cooking, we pass the clay through a sieve to get rid of stones and clots. Tiles are not large in shape, so for their proper placement it is necessary to prepare a solution without stones and clots.
- Then we determine the amount of sand that we need to add. To this end, we need to determine the fat content of clay. We will make ten balls the size of one centimeter, adding sand in them in different proportions.
Note: Fix in which of the balls and how much sand, because then you can just forget it. To prepare a high-quality mixture, it is better to use mountain sand, not river sand, since it gives less shrinkage, it will be stronger when it dries.
- When the balls are completely dry, drop them on a hard surface from a meter high. A ball that does not deform and does not break will be prepared from the correct solution.
- Then take the clay and fill it with water for a day to make it sour and infuse. During the day, it will become necessary elasticity.
- Then we add sand to it. You should get a liquid mixture that has the composition like a thick sour cream and has the necessary elasticity.
Attention: If you intend to heat the fireplace with solid fuel, then add fireclay powder to the composition of the mixture - about ten percent. This material will significantly improve the performance of the solution, which will allow you to use absolutely any type of fuel. If you do not, then after some time cracks may appear at the seams of the structure.
Cement mortar
You can use a cement mortar. However, in this case, it will not be possible to often use coal in the fireplace. This composition can withstand temperature, but its service life will be less than in the first embodiment.
So:
- First you need to pour cement for kneading into the tank.
- Then add sand to the solution - for the M 300 we use a one to three ratio.
- Stir the solution to ensure uniformity of composition.
- Add water while stirring. For complete homogeneity of the composition, use a drill with a nozzle. This will make the cement mortar completely homogeneous.
Caution: With this solution, shrinkage occurs quite quickly. To prevent this from happening, add a pinch of any detergent to the solution.This will make it more elastic, and it will not sit so fast.
Tiled finish
There are certain rules for tiling a fireplace with tiles, which you must follow if you intend to do the job efficiently. The tile on the reverse side has a cavity called rump.
During fastening, it should be completely filled with a solution so that no air bubbles remain.

So:
- Lay the tiles first on the floor to calculate the amount of material and install them correctly.
- Then we soak the tiles in water. Many people think that this is not necessary. This opinion is erroneous.
In that case, if you are finishing an existing fireplace, then you can lay on dry material without soaking it. If you plan to use solid fuel, this should be done.
Let us explain: clay is a natural material as well as tiles. Drying after soaking, adhesion of materials occurs better, moisture should be present in the mixture and in the material. - Do not apply the solution to the tiles, if you did not measure it dry in advance, you need to measure more than one detail, but see how to place the entire row and carefully fit all the elements.
- We begin to mount from the corner of the structure. Having installed the corner elements, draw a line that we check with the help of a level. The line must be placed correctly.
Marking is the main thing in tiling. If the row is not laid out in the correct way, then the entire plane will not be placed in the correct geometric plane. It is necessary to monitor this at all stages of fastening. - Then take the tiles. They should be tried on, adjusted. We apply the solution around the rump, while making sure that air pockets do not form.
Attention: If you will apply the mixture with a thickness of more than two centimeters, then add a shallow brick fight to it. This will improve the quality of the material. But do not use silicate brick combat. It just ruins everything.
- Insert metal pins vertically into the holes of the rumps. Bend the top edges of the pins to improve grip.

- Screw the wire to the edges of the pins, fasten it to the screws in the masonry and to the grid.
Attention: It is better to install the tiles during the masonry itself, and then the pins are fixed in the masonry. We are talking about how to clad an existing fireplace. Some believe that this is difficult to do, and only a specialist can handle this task. But in practice we prove the opposite.
- If you do the masonry, then you can twist the wire into a pigtail and fix it into the masonry. During stove lining fasten the wire to the installed grid. The mount must be of high quality.

- After installing the rumps, fasten them together using cattle made of steel. Mounting is carried out both horizontally and vertically.
- Then completely fill the space around the rump.
- Now you can make a full fireplace lining with this method.
- When attaching, avoid seams, especially vertical ones, as they weaken the structure.
- If you cannot make the plane seamless, this means that you are too lazy to fit each part, then do not make them wider than 1 mm for vertical joints and not more than 3 mm for horizontal ones.
The fireplace is tiled to the very end. Some recommend plastering the joints. However, in practice it is proved that this is better not to do.
Such a finish quickly crumbles. Different composition of the mass is poorly fixed to each other.
For this reason, if you want to change color, you can add dye to the clay solution. Do not spoil the entire finish.
Now you understand that you can do everything. The most important thing is not to rush and correctly and carefully adjust all structural elements.