How to putty the ceiling - the basics of craftsmanship

Continuing the theme of finishing the premises, in this article we will talk about how to properly putty the ceiling of drywall or plastered concrete slabs. Despite the emergence of many other methods of ceiling decoration, this is still the most popular.
And the point is not so much in the budget for such a repair, but in the universality of its result: a perfectly flat white surface fits any style, it can be repainted, pasted with wallpaper or ceiling tiles, painted, etc.
The content of the article
Getting ready for putty
Putty is a finishing, leveling and smoothing roughness layer, on which decorative finish. For example, painting or sticker wallpaper.
Surface preparation
Putty is applied to an already prepared base. In the case of concrete ceilings, this is plaster, gypsum board only needs to seal joints between the sheets.
So:
- The plastered base should be as even as possible. This refers to giving it a horizontal level, and the quality of the surface.
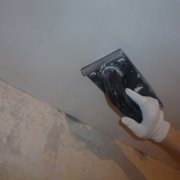
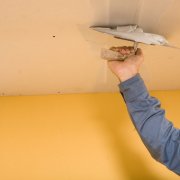
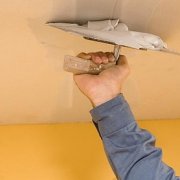
It should not have sagging, tubercles, dimples larger than 3-5 mm. Such flaws before puttying are corrected with a plaster mixture or coarse putty. - Before properly plastering the ceiling from drywall, it is necessary to glue the mesh-sickle joints of the sheets and seal them with putty. She also goes through the hats of self-tapping screws, recessed in the GCR.

After eliminating all these defects, the solution is allowed to dry, after which, if necessary, they grind and cover the entire surface of the ceiling with a primer layer of deep penetration (seeHow to primer the ceiling: we understand in stages) It will make it more durable and monolithic, improve the adhesion of materials.
In addition, the film created by the primer will not allow water from the putty to be actively absorbed into the base material, providing a normal drying regime and the absence of shrinkage.
Tip. It is most convenient to apply soil with a velor roller. When working with a brush, too much time and effort is expended, and the spray gun has an unreasonably high consumption of funds, which, moreover, in the absence of proper experience, lies unevenly.
The choice of putty
Hard putties are coarse - for rough preliminary leveling, and fine - for the finish. The first is used only if the quality of the plastered base is not good enough. Otherwise, as well as for drywall substrates, finely dispersed putty is used immediately, which is applied in one or two layers.
Also, ready-made formulations and dry mixes are distinguished, which are diluted with water immediately before work. Which option to choose?
To do this, weigh the advantages and disadvantages of each type:
- Ready putty. The disadvantages include a high price and a short shelf life.
But it is sold in plastic containers of different capacities, and you can easily calculate by consumption how much mixture you need to finish. But the finished putty in a closed container does not lose its properties for a long time, it has an optimal consistency for application, does not require time and labor for mixing.

- Dry mixes are cheaper, their shelf life is higher. But after dilution they must be used immediately, otherwise the putty will harden and lose its properties.
For its preparation, a separate large container and a mixing tool are required. This takes a lot of time, requires care and experience to ensure normal plasticity and uniformity of the mixture.

So it's up to you to decide which type of putty to choose. Focus on your financial capabilities and willingness to spend extra time on preparatory work.
Tool preparation
So, what do you need for the primer and putty on the ceiling with your own hands in addition to the materials themselves:
- Tray with an inclined ribbed wall for the primer;
- Velor roller on a long handle and a brush for processing corners and inaccessible places;
- A set of spatulas: working 35-40 cm wide, auxiliary 8-10 cm wide and small 3-4 cm wide for putting putty in the corners, around risers, columns and other obstacles;

- High capacity of 10-20 liters and a drill with a mixer - for kneading putty in case of using a dry mixture.
Tip. You will also need a stepladder or goats for ease of use and an electric torch to illuminate the finished surface for flaws.
Putty ceiling
After you have primed the base and it has dried, you can proceed to the main stage of work. How to putty properly plasterboard ceiling, written a lot, but not a sin and repeat.
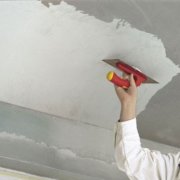
The main rule: the layer should be as thin as possible, not more than half a millimeter thick. This can be achieved only with perfect readiness of the base and normal consistency of the solution, which is determined empirically.
The work is done like this:
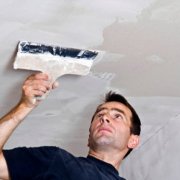
- Using an auxiliary spatula, draw a little solution from the container and transfer it with a sliding movement to the worker so that it is evenly distributed along its edge;

- Bring the working spatula to the ceiling, holding it at a slight angle to the surface, gently press and lead in one direction, then in the transverse, to fill all the pores and bumps;

- Perform such cross-movements until all the putty is on the ceiling. If it slides to the base of the spatula, assemble it with an auxiliary tool and transfer it to the edge again;
- Treat the surface in small areas, trying to act with uniform pressure and constantly monitoring quality. Straighten the strips left by the spatula, after drying it will be difficult to remove them.
Having finished filling the ceiling, let it dry. Drying time depends on the thickness of the layer, humidity and temperature conditions in the room, but not less than 4-6 hours.
Note. Air temperature should not be lower than +10 degrees, and humidity not more than 70%. In extreme heat it is also better not to work so that the putty does not dry too quickly.
For gypsum plasterboard ceilings that have a perfectly flat surface, one coat of putty is enough. But for plastered instructions requires applying another layer.
It is carried out using the same technology to eliminate flaws in the first and final surface leveling. The layer should be even thinner. It is desirable that the total thickness of the putty on the ceiling does not exceed one millimeter, then it will not fall off and crumble under its own weight.
3-4 hours after the end of work, arm yourself with a flashlight and, sequentially directing a ray of light along the surface, check its quality. If you find minor flaws, locally fix them with liquid putty.
After a day, the ceiling can be sanded and painted, or exposed to any other type of decorative design.

Conclusion
Reading the description or watching the video in this article, you might think that everyone can putty the ceiling.With great desire and some experience, this is possible, but not at all simple. You can gain such experience by training on the putty of walls and other vertical surfaces.
If it doesn’t work out very well, then working with the ceiling will be much more difficult. In this case, it is better to use the services of experienced craftsmen.