How to putty the ceiling with your own hands correctly

The plane of the ceiling is quite large, and therefore the slightest flaw will immediately be evident. Especially if you make a ceiling for painting. Today we look at the rules for doing this work. You will receive recommendations that will help you do everything correctly and efficiently.
The content of the article
Work Execution Rules
All work is done according to certain rules, which we will give below. For work, it is better to use quality materials from trusted brands. Then you will save yourself from many problems and the work will be done efficiently and quickly.
Caution: Never buy putty on the street in the winter. It freezes and then curls up at work. You simply will not be able to correctly bring out the plane.
Preparatory stage
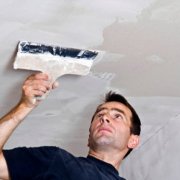
Professionals say that putty walls not easy enough. It is understandable, since during the ceiling work the hands are constantly raised up and the neck is numb to everything else. But the putty of the ceiling is performed in the same way as the decoration of the walls.
So:
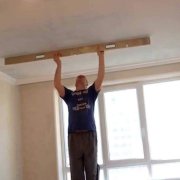
- First you need to make sure that there are no large swings on the ceiling. To do this, simply attach the rail to its plane. If there are even minor recesses (up to one centimeter), they must be leveled, using putty for these purposes. If there are protrusions, they can be aligned only if they protrude no more than 1 cm, otherwise the hill will remain.
- If the difference is more than two cm. Then it will be necessary to level the surface. For this, it is best to use drywall. Weight will not be big. You can also immediately make insulation of the plane.
- Of the materials you need to stock up starting putty (approximate consumption: three kilograms per square meter). You will also need a primer. Without it, the first layer of putty will not seize on the surface of the ceiling. The solution will immediately dry out and slide under the spatula. Because of this, it is not recommended to reduce the cost of the primer.
- If you have a plasterboard suspended ceiling, then prepare the bandage base in advance. If the ceiling was plastered, then, most likely, there are flaws in it. They are also reinforced with banding tape. In old buildings, where a large number of cracks appeared on the ceiling from time to time, it is necessary to glue the bandage net over the entire area. Therefore, if this is the case, then get a special kapron network.
- To trim the ceiling around the perimeter, cornices made of polystyrene foam are needed. In this case, it will have a complete and neat look.
Caution: The issue of preparation is quite important. Durability will depend on this. Never make a layer more than two cm. It will be heavy and may crack over time.
What tools are puttying
So:
- Prepare a bucket for water, as well as a container for rinsing the container and mixer. It will also require a container where the putty mortar will be mixed. Its volumes should be such that the solution you diluted is produced in thirty minutes.
- If you are new to the construction business, it is best to take a bucket of three to five liters. The container must be clean. To knead the solution, it is best to use a drill equipped with a mixer nozzle.
- To put putty on the ceiling, you need two spatulas - ten and thirty centimeters. For painting and priming, purchase a roller.All work is best done with gloves on.
- To seal small sinks, it is better to use a rubber spatula. It will also be needed for finishing.
- You will also need grids. They will need to be sanded. Take with a large cell for preliminary grinding and with a small one for carrying out the final.
- It will be great if there is a grinding machine. It will allow you to withstand the plane and make the surface quality.
Ceiling putty by own efforts
All work is done in several stages. Each of them is important. Therefore, do not neglect.
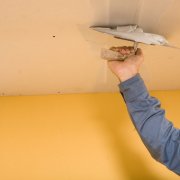
 Training Preparing the ceiling for putty | At this stage, we look at the ceiling and identify errors:
|
 Apply soil to the ceiling Primer | Everything is quite simple here: we pour from the canister and spread the ceiling. Keep in mind that the primer is extremely difficult to clean. If you cannot avoid splashing on your face, wash your face every ten minutes while you work.
|
 Putting starting putty
 on the ceiling |
|
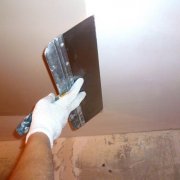
 Application of the finish We put the finish | As soon as the starting putty dries up (by the way, most masters advise applying it in several layers), walk with a wide spatula on the ceiling, like a scraper. This will help get rid of all the bumps.
|
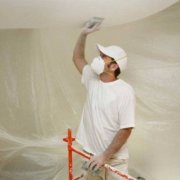
 We do the grinding of the plane The final step is grinding | As soon as the finish layer dries, it is processed by grinding. This is quite a dusty job, so it is necessary to use glasses and a respirator to protect the respiratory tract from harmful putty dust.
|
The necessary recommendations
In some cases, so-called putty sagging may occur. This most often occurs at the very beginning of the movement of the instrument, on which there is a lot of solution, with insufficient pressure on it from the side of a person.
- To avoid this, you need to gradually change the angle of inclination of the blade itself.
- If the spatula was started at an angle of fifty degrees, then it should end with twenty degrees. Putty next to the layer, which is already aligned, while the spatula should move to a level surface, and not away from it.
- If you stand under this layer and look in the direction not aligned, moving the spatula towards you, then the influx can be considered without problems. Possible influx can be smoothed out during the next call.
- To get rid of them, with a spray gun we moisten that part of the ceiling that was leveled before you start processing the next part. When applying putty, the putty knife should go a little on the even moistened part.
Caution: Puttying a large plane is best done in good light, angled. Then you will see all the flaws of the surface.
In this work, the main thing is not to rush and to qualitatively prepare the base plane. Never apply the next coat until the first is dry. Then everything will turn out qualitatively.