How to putty walls - getting a perfectly smooth surface

How to putty walls - this is the question most people ask themselves who plan to carry out repairs in any room. It is always more profitable to do with your own hands at least part of the work. A thorough preparation of the walls for subsequent finishing work involves obtaining a perfectly smooth surface, without flaws and roughness. The article will tell you how to do it right.
The content of the article
Why putty walls
It is not always necessary to putty the walls to absolute smoothness. For example, this should not be done if the wallpaper, after decorating the surface, hides small scratches from stripping. Putty allows you to remove cracks and pits on the wall, align it well and, if necessary, bring it to a perfectly smooth state.
Thereafter:
- Wallpaper gluing on smooth walls is much easier than on curves. In this case, the glue will be absorbed evenly, and the risk of wrinkling of the paintings will be minimized.
- Putty removed from the plastered walls different tubercles, visible in sunlight, which makes the surface pimply.
Tip: The instructions for puttying the walls indicate: if the old puttying, after removing the wallpaper glued to it, crumbles, it must be completely removed and the surface repacked.
Putty Tools
Before you begin to putty the walls, you need to purchase a minimum set of tools for work:
- Electric drill with mixer nozzle. Usually, putty is supplied in the form of a dry mixture into which liquid is poured in the required quantities - ordinary pure water. For perfect mixing of the putty mixture, a special mixer is used, which will make it possible to obtain a homogeneous, sufficient density mass without lumps and pieces.

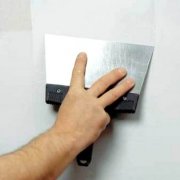
- Set of spatulas of different widths. In the process of performing work, you will need a large and small tool. In hard-to-reach places it is impossible to get a high-quality plastered wall with a large tool, here it is required to use spatulas of small width.
- Brushes and rollers for applying a primer to the wall surface. This step cannot be skipped. After the primer, a thin film appears on the walls, which significantly increases the strength of the wall and provides high-quality adhesion to the treated walls, regardless of the type of facing material.
- The rule. It may be necessary due to large irregularities of the walls when applying putty with a very thick layer. For high-quality leveling of the putty layer of large thickness it is convenient to use the metal long rule.
- The construction level is laser or alcohol. Wall surfaces are often far from perfect. Before you put the walls yourself, test beacons are installed, with constant monitoring of the laser or alcohol level.
- Sandpaper. To obtain a beautiful and very even surface so that it would be nice to look at it, a very fine sandpaper should be used when finishing mashing, the ideal result would be the treatment of the skin of two hundred and forty numbers. To mash the initial starting putty, grout should be done with a large coarse emery cloth.
- Hand skinner. When using such a tool, sanding up becomes more convenient. This is a special device, on the handle of which there are clips for fixing the skin, as seen in the photo.

- Tanks for the preparation of putty.
- Brushes and rollers for priming walls.
Tip: The primer of the walls should always be done. It provides a very thin film on the wall, which significantly increases its strength and improves the adhesion of materials.
How to choose the right putty
What putty is better to putty walls?
In composition they are:
- Cement They are characterized by greater moisture resistance, but their big disadvantage is too high a level of shrinkage.
- Acrylic (cm.Acrylic putty - types, features, application) They have excellent base adhesion.
- Polymer. They have good moisture resistance, they do not have shrinkage. The use of polymer putty allows you to get a high quality area after processing the wall. A great price is a significant material shortage.
- Plaster cast (cm.Gypsum putty: its advantages and problems of use) Such coatings do not shrink, their cost is low, they lend themselves well to leveling, but they have low moisture resistance, which limits the area of their use.
According to the purpose of putty, there are:
- Leveling or starting. Have:
- excellent adhesion of materials;
- increased strength;
- sufficiently large grit.
Coarse material is used for their manufacture. This putty is quite convenient to use to remove large differences on the surface of the walls, hide existing holes, strobes. For the first time, you can easily apply a layer up to one and a half centimeters thick.
Repeated coatings are applied after the previous ones have completely dried. The maximum result can be achieved after installation of a special masking net, for uniform distribution of putty.
The advantages of this technology - allows you to lay the putty layers perfectly evenly. In this case, the surface will be smoother and more durable. The coarser the material of the paint net, the more even the surface of the walls is after processing.
- Lighthouses. Such materials are not much different from leveling putty. The only difference is the use of beacons. A lighthouse is a rail made from:
- gypsum;
- metal;
- tree.
The part is set strictly vertically, which is controlled by the level. Lighthouses to the walls are fixed on the gypsum mixture, which dries quickly enough, and then puttying is carried out directly. So the alignment of the wall and horizontal lines. To level the applied layers of putty, a rule is used.

Using such recommendations, after the start of work, you can get a flat surface, which is controlled by the level. Due to the high cost, this type of putty is rarely used, and visually they hardly differ.
- Universal. Combine the positive properties of starting and decorative mixtures. Their cost is relatively high, but the properties are inferior to other coatings. It is better to use for leveling walls that do not have large defects.
- Finishing or decorative(cm.DIY stucco: how to do it right) After applying the lighthouse or starter composition, the finish coating is performed, which gives the surfaces perfect smoothness, eliminates pores, tiny cracks.
Tip: In order for the putty finish to perfectly coincide with the previously prepared surface on the plane, it should be applied with a very thin layer. A poorly executed lighthouse or starting putty, fix with a finish solution, will not work.
When applying the material does not require much effort. The coating layer can reach four millimeters. In today's market, you can purchase dry and ready-to-use materials.
The advantages of dry putty:
- Affordable cost.
- Long shelf life.
Ready compositions:
- More convenient to use.
- You do not need to work with a mixer to prepare a homogeneous consistency.
- The time period is saved and there is practically no dust during operation.
The disadvantages of the material include:
- Higher cost.
- Gives strong shrinkage.
Tip: If necessary, apply a layer of more than two millimeters; ready-made mixtures should not be used. In addition, they can not be stored for a long time.
How to prepare the walls for putty
Before you putty the walls, they need to be properly prepared. Surfaces must be perfectly clean.
They are not allowed to have:
- Soot stains.
- Inks.
- Fat.
Everything must be carefully removed. There should not be weakly adhering layers of plaster, residues of applied wax, available scale or formwork elements. Do not allow freezing of the ceiling and walls.

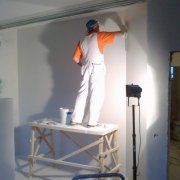
Before you putty the walls, you must coat them with a primer to ensure good adhesion of the walls and putty. The walls are primed with a special roller. The solution must be applied evenly, without the slightest omission. Usually one layer is enough.
How is putty applied to walls?
Before you putty the walls yourself, you need to properly prepare the putty mixture.
For this:
- The right amount of clean water is poured into the container.
- Dry putty is added.
- Stir thoroughly with a simple spatula.
- With an electric drill with a mixer, the solution is stirred, so that as a result a homogeneous mass is obtained, if necessary, water is added.
How to quickly putty the walls? First of all, the readiness of the mixture for putty is determined by its consistency. The solution should be flexible and adhere to the tool slightly. If the material drains - it is too liquid, it is necessary to fill up the dry mixture and stir. The presence of lumps in the composition indicates that it is very thick, you need to add water and mix thoroughly with a drill with a mixer.
Further:
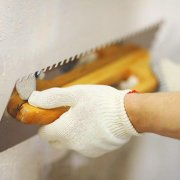
- Putty putty is applied. What is the best way to putty walls? For this, a large spatula is applied in medium portions, and then the prepared mixture is evenly spread on the surface. The spatula must be held at a certain angle, approximately thirty degrees.
- In one motion, putty is laid diagonally.
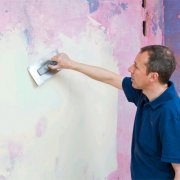
- Each subsequent coating is lapped, which makes it possible to avoid the presence of transitions and bumps.
How and how to putty in the corners?
The smooth corners of the walls should be treated with a corner trowel.

Puttying procedure:
- With a small spatula, a small layer of mortar is applied to the corner over the entire slope height on the wall or corner.
- Very accurately the surface is leveled with an angular spatula.
- The putty layer remains for a day to dry.
- Finishing putty is applied.
How to learn how to putty walls, how to prepare a mortar, what tools will be needed, shows the video in this article.


As for me, there is nothing complicated in puttying. Even for an unprepared person. But some difficulties may still arise. For me personally, the hardest thing is to make the right solution. It should not be too liquid, but also too dry also does not fit.If the solution is perfect, then it lays on the walls easily and simply. But I'm talking about starting putty. Finishing is a bit more difficult to work with, as it should be laid perfectly on the wall, especially if the walls are putty for painting. There will be bumps or roughness - it will be very noticeable after painting. In general, it is not difficult to putty, but some difficulties arise.
I agree! if a good putty such as Acrylic Putz, then a beginner will cope!
Denis, without humiliating your skill, you saw putty only on the Internet, in order to get the surface under EURO you need to pass more than one thousand square meters. It is very difficult for a beginner to bring out a surface, for a pro it is normal. And the basics of technology are very correct. GOOD LUCK