Technology for wall insulation with foam: do it right

Penoplex for wall insulation is used quite often. Today we will consider how to properly insulate the walls of the house with foam and how to prevent mistakes. After all, all work must be done according to technology and the rules of work. The video in this article and photos will also be presented that will help to do everything right.
The content of the article
How much penoplex is suitable
It is not difficult to purchase a foam insulation for walls; it is in any hardware store. But immediately you need to decide how much it will suit you.

After all, there are both positive and negative points:
| Advantages | disadvantages |
Among the advantages of this type of insulation can be identified:
| Consider the negative sides: Along with the advantages, foam sheets also have a number of disadvantages that should not be overlooked when choosing the type of insulation material:
|
Work Rules
The rules of insulation will depend on where the material will be applied. It is one thing to insulate the foam with walls from the inside and another outside.
The process itself is no different, you just need to choose a cladding for exterior decoration, it should be for external surfaces, for this, the instructions are read and there this indicator is indicated.

Preparing walls for work
Warming the walls from the outside with foam and from the inside begins with the preparation of the walls. The structure of the prepared surface can be of various quality and degree of evenness.

Caution: The original goal will be wall alignment. It is very important to properly level the surface. The outcome of your efforts will depend on this.
So:
- For example, if you skip a small section of the wall, leave it untouched, cover it with polystyrene, then there will be a void under it, which means that with the slightest blow the insulation will break.
- The same story with bulging surface areas. If foam is applied to a similar area, voids will form underneath in flat places. The wall must be prepared in such a way that the amplitude of the oscillations in the degree of evenness does not exceed 1.5 cm.
- Next, you need to concentrate on the surface of the facade of the house and think about how the adhesive will stick to it.
If the facade has been painted for a long time and the paint flies off “feathers”, then it must be cleaned (seeHow to remove paint from the walls: the secrets of the masters).
After stripping, you need to find out the following:
- If after touching the wall nothing remains on the hand, then the wall is allowed not to be primed. But to do this is desirable. Primer properties positively affect the quality and evenness of the prepared surface;
- If after touching the wall on the palm of your hand there is a trace similar to spraying, then the wall must be primed without fail;
- If at the slightest touch on the wall, it begins to crumble, like sand, it needs to be cleaned until it stops crumbling. After this, a primer coat is required (seePrimer walls and all for that matter).
- Often there are times when the surface still crumbles, no matter how many hours are spent on cleaning it. In this case, such actions should be stopped. It is necessary to thoroughly putty, or plaster the facade with the addition of PVA glue, initially spraying putty from the spray gun.

- You can primer with any primer available to you. This procedure can be carried out in two ways: with a brush or spray. But the implementation of this work with a brush is most effective. With this method, the facade surface will be cleaned again. For heavily crumbling walls, a spray gun is recommended.
Penoplex in the modern construction market of thermal insulation materials is in fairly high demand. Despite the constant appearance of newer, modernized finishing methods, foam sheets are still quite popular, and are often used for insulation.
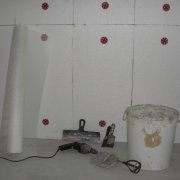
Sticker of insulation sheets
The wall heater Penoplex is attached after finishing the material with slopes and installing window sills, only after that it is worth starting the decoration of the walls.

The most correct technology for fixing insulation material is its simultaneous gluing and nailing. This is the most faithful installation method, which many times will prove itself when used.
Start from below:
- At the very bottom we set the starting bar. You can start mounting without a starting bar, but with its use it will be more qualitative and accurate. Moreover, without fastening such a strip, the glued material, until the adhesive composition completely dries, can move (up to 10 cm) along the plane of the facade wall. Therefore, the starting bar is used so that the first row of glued insulation does not have the opportunity to slide somewhere.
- It is necessary to stock up with two spatulas. A small width of up to 100 mm is used as a spatula when laying out the adhesive composition on a 20 cm tool. Apply it to align the glue on a plane. If the wall looks flat, and its curvature does not exceed a centimeter, a scraper is used or it is also called a comb.
- Glue can be laid directly on the plane or directly on the sheet. However, it would be more correct to lay out on a plane, so that, if necessary, with the help of glue to align defects. In the case of laying an even layer of the mixture on the sheet, part of the sheet may remain unadhesive.
Apply the mixture according to the following rules:
- 9 “blunders” of various sizes are thrown onto the plane. The main purpose of laying the mixture is to maximize the smoothing of plane defects. If the plane is visually curved, then the mixture can be laid and more, filling in the existing defects. If bulges are found on the wall plane, they must first be knocked down or trimmed with foam sheets;
- On convex parts of the plane glue is applied as thin as possible. In addition to “bloopers”, you can apply the mixture with a small spatula around the perimeter. When pressed with a sheet, the mixture will creep and go under other sheets, thus strengthening the joints between them.
- The quarters in the material can significantly reduce the cold bridge. Penoplex has a flat surface and does not possess this property.Extruded polystyrene foam, which is stronger than foam and has a quarter, will be all the more preferable. The main disadvantages of polystyrene foam are the inability to adjust it to surface defects and the need to roughen before gluing to the surface.
Attention: It is important to arrange the sheets so that a junction in the shape of the letter "T" is formed. That is, the rows should be glued literally in a checkerboard pattern.
- Another important point is the gap between sticking and nailing the material to the surface. According to technology, it should be at least three days so that the adhesive composition is completely dry, and the material settles in place.
Ideally, when warming your own home, it would be necessary to paste over the entire facade with a heater, and then proceed to nailing.
But such an option is unlikely to be possible:
- Firstly because the scaffolds from which it is necessary to fix the upper rows of insulation must be dragged several times from place to place, which is extremely inconvenient.
- And secondlyglued sheets should not be exposed to sunlight or moisture for a long time, this will adversely affect their performance. Therefore, most likely, it is necessary to carry out work in parts.
Nailing insulation
This is how wall insulation with penoplex is done outside. The fastening of the material to the wall plane should be carried out, as already mentioned, having stood three days after gluing.
If you start nailing the finish earlier, with glue that has not yet dried, the material may simply not stick to the surface. In addition, having failed to meet the deadlines, it is possible to achieve only that the fasteners will fall into unevenness and raise the edges of the sheet. Then you have to nail the edges of the sheet with additional fasteners, but evenness will no longer be achieved.

So:
- The insulation is fixed with fungi, special plastic caps with a sleeve into which a plastic or metal nail is driven. The best option may be a plastic nail, since a metal nail is more expensive and will become an extra conductor of cold in the facade design. You should also avoid savings and take more expensive plastic fasteners. Unlike cheap analogues, they drive well into the wall and do not deform.
- Holes are drilled on the facade section with a drill with a drill 1 cm in diameter. The depth of the armhole should be two centimeters longer than the length of the fungus. If you drill a hole equal to the length of the fungus, then the litter that has fallen out during drilling will not allow the fungus to be properly clogged into the prepared armhole.
- The length of the fungus is determined as follows: calculate the thickness of the insulation material and add 1 cm to it (this is the thickness of the remaining layers), and then add another 4 - 5 cm of the wall.
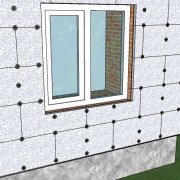
Location of holes and fungi
Experienced craftsmen who have been repairing and decorating premises for a long time advise placing holes on the surface as follows: prepared armholes and fasteners should be in sheet joints, and one more is attached directly to the center.

Attention: If there is a need for additional fastening, you can make a larger number of points.
- This situation is advantageous in that the fungus, located at the junction, compresses it, and the sheet adheres tightly to the plane, making the surface smoother. After all, the walls, as a rule, are not perfectly smooth, which can be easily seen when attaching the first fungus in the center of the sheet. At the same time, the edges slightly move away from the wall, indicating that it is uneven.
- It is important to remember that regardless of the position of the fasteners on the sheet plane, within the same surface, the insulation is mounted on the indentation of about 10 centimeters from the corner of the facade.
- Plastic mushrooms begin to hammer into the drilled armholes without using nails. Fasteners clog with a hammer, although they are easy to install manually.The fasteners are clogged, taking into account the positioning of the cap on the level of the insulation plane. If the fungus does not go into the wall to the desired depth, then either the hole is not drilled, or the fungus does not pass through the diameter, a drill may be drained. In this case, the fungus is removed from the armhole, a new armhole is drilled and the fasteners are inserted again.
- Having scored all the fasteners in the prepared places, we proceed to fasten the cloves inside the fungi. When hammering nails, the fungi move slightly inside the insulation surface, this is quite by technology.
Caution: Immersion of the fungus should be no more than two millimeters. When the nail head protrudes, it is possible to cut it off with pliers, without fear of spoiling the structure.
Finishing sheet borders and fasteners
So, the site of the facade surface is prepared, the insulation sheets are glued and nailed by fixtures.

So:
- Now you should carefully inspect the insulated wall for enlarged joints between sheets that exceed 5 mm. This happens with curved walls or the use of foam. If any, they should be foamed with foam. If the joints exceed 5 mm, then pieces of insulation should be laid in them and also foamed.
- The drying time for the mounting foam is 4 - 5 hours, after which its excess can be cut with a sharp knife.
- At the same time, provided that the foam material is the insulation material, you can make adjustments to the protruding joints of the sheets. Apply a grater on the foam, which remove the bulging parts.
- Grater is able to remove protruding parts at the joints of sheets of insulation, making it smoother. Expanded polystyrene cannot be corrected in this way; it cannot be scraped off as polystyrene. It will be possible to align the joints at the joints of polystyrene foam only at the stage of leveling the surface. You can also try using a clerical knife, but this method is not quite effective.
- Then, all the joints of the sheets and the protruding hats of the fungi are plastered with a wide spatula using a special adhesive mixture. The “hauling” of the sheets should be even. If protruding parts form, they must be wiped or cleaned after drying. The surface is cleaned with sandpaper or special abrasives.
Now you know how to insulate the wall with foam. We will talk about the following articles about the insulation of timber walls with foam.