Insulation for the exterior walls of the house: which one to choose

For a comfortable stay in their home in the winter, many carry out its external insulation. In addition, it improves the thermal insulation of the room in the summer, prevents the walls from overheating. What is better to use insulation for the walls of the house outside, their features will tell the article.
The content of the article
Characteristics of external insulation
Before making insulation of the external walls, it is worth getting acquainted with its characteristics and main advantages.
Insulation of the walls of a private house outside allows you to:
- Save useful space indoors.
- Protect the house from freezing.
- To increase the overall operational resource of the building, without additional load on its design and foundation.
- Improve the degree of protection against freezing. This is because the insulation of the outer wall of the house allows you to shift the point of condensation formation towards the heat-insulating layer. There is no risk of mold and mildew.
- Do not cool the walls insulated from the outside, and for a long time keep the heat inside the building, without its loss.
- Insulators for the exterior walls of a house outside quickly lose moisture without changing their basic characteristics.
- Provide high soundproofing facilities.
Before you insulate the walls of the house outside, you need to pay attention to such material characteristics as:
- Steam and moisture permeability.
- The degree of absorption of air and moisture.
- Thermal conductivity.
- Resistance to temperature changes.
- Biological stability.
- Resistance to chemicals.
- Coefficient of conservation of temperature.
- Lack of shrinkage and esthetics.
- Light weight.
- Easy to do it yourself, so that there are no butt joints.
Some characteristics of the most popular materials for thermal insulation of walls outside are presented in the table:

Tip: In any case, the external thermal insulation of the walls of the house should create a rational warm design. In this case, all external factors should be taken into account: rain, snow, a strong temperature drop, which the insulation must withstand.
Types of materials
At choosing a heater for a house wallFirst of all, the material of the building should be taken into account.
The most popular types of insulation and their characteristics are presented in the table:
| Benefits | disadvantages |
 Styrofoam | |
|
|
 Penoplex | |
|
|
 Polyurethane foam | |
|
|
 Mineral wool | |
|
|
 Basalt insulation | |
|
|
 Liquid insulation | |
|
|
Calculation of the thickness of the insulation layer
Of great importance for high-quality insulation of the building is the correct heat calculation of the outer wall of the apartment building.
This should take into account:
- Insulation thickness. Too small can cause the walls to freeze, transfer the "dew point" inside the room. This will lead to an excess of moisture in the house, the formation of condensation on the walls. With an increase in the thickness of the insulating layer more than necessary, it will not bring significant improvements, but will only add additional financial costs.
Tip: Only correctly calculated insulation thickness for the house will save money and maintain normal thermal conditions in the house.
- Thermal resistance of the material for insulation - R. This is a coefficient representing: the temperature difference along the edges of the insulation / by the value of the heat flux passing through it. This value reflects the properties of the insulation and is determined by: density of the material / thermal conductivity.
With an increase in R, the thermal insulation properties of the material improve. Formula for calculation: R = wall thickness in meters / coefficient inherent in the thermal insulation of a particular material.
- Value R can be selected for different climatic zones according to the corresponding tables.
For example, the calculation selected home insulation foam 100 millimeters thick, with silicate brick walls 51 centimeters thick.
For this:
- The coefficients of thermal resistance R for the wall and foam are calculated.
- Two resulting values add up.
- Wall thickness 0.51 meters / per coefficient of thermal conductivity of the wall material 0.87 W / (m • ° С) = 0.58 (m2• ° C) / W.
- The result was the heat transfer resistance of the brick wall R = 0.58 (m2• ° C) / W.
- The value of R is calculated for a foam of 0.1 meters thick.
- It is divided by the coefficient of thermal conductivity corresponding to the foam, equal to 0.043 W / (m • ° С).
- The result is R = 0.1 / 0.043 = 2.32 (m2• ° C) / W.
- The resulting R coefficients for silicate brick and foam are added up: R = 0.58 + 2.32 = 2.9 (m2• ° C) / W.
- The value is compared with the required coefficient values for the external walls at different climatic zones.
Analyzing the result, we can conclude that the building must be insulated with a heater with a thickness of at least 10 centimeters.
External wall insulation

After choosing the material, before you insulate the outer wall of the house, you need to prepare the surfaces for further work.
For this:
- If necessary, the remaining layer of plaster is removed to the very bottom. The result is a flat surface.
- In the presence of significant level differences on the wall, recesses or protrusions of more than one centimeter, they are sealed with a solution or combed.
- The surface is cleaned of dirt and dust.
- The wall is primed. The primer is best used with deep penetration.
- To obtain an even layer of insulation, a system of beacons and plumb lines is pre-mounted. These elements determine the plane of the outer edge of the insulation, facilitating installation.
- On the walls of the anchor or screws installed along the upper edge, threads of great strength are attached and lowered plumb to the bottom.
- Horizontal threads are tied.
- According to the obtained control grid, you can navigate when installing a heat insulator or frame.
- Further technology for warming the exterior walls of the house for each material is slightly different.
To ensure that all processes are performed correctly, it is better to get acquainted with the video in this article first.
Foam insulation

Instructions for the work is as follows:
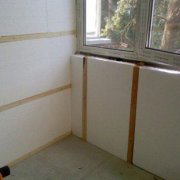
- After preparing the surface, window sills are installed outside and the slopes are insulated.
- Low tides are attached to the window itself or to an additional profile.
- The window sill is taken out taking into account wall insulation - one centimeter is added to the thickness of the insulation. In this case, the window sill will protrude beyond the finished wall by 4 centimeters.

- The starting profile is mounted below, which will give reliability to the insulation fixing from below.
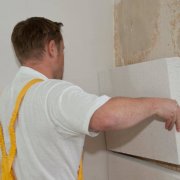
- The mixture is applied to the wall.
Tip: Do not apply the solution on the foam. Otherwise, when gluing parts to the wall, voids may form between the even plane of the foam and the uneven wall.
- Along the perimeter of the sheet, the solution is distributed in a dashed strip. This strip, upon contact of the foam sheets and the wall, will extend under the edges of adjacent sheets, which will increase the strength of the joints.
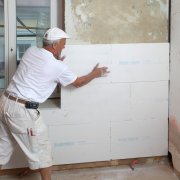
- A sheet is glued onto the mixture, gently exposed and pressed in with effort.
Tip: The installation of foam on the wall should be staggered.
- Three days after sticking the sheets, they are nailed to the wall with special fungi or hats with a plastic sleeve.

- After attaching the fungus, a nail made of plastic or metal is hammered into its sleeve.
- About 5 fungi should be placed on the sheet, departing from the corner of the wall about 10 centimeters.
- The joints between the foam sheets are carefully examined for gaps. If they are more than 5 millimeters, they should be filled with foam.
- Strips of insulation are additionally inserted into gaps of more than 1.5 centimeters and blown with foam.

- After 5 hours, the protruding parts are cut with a knife.
- The joints are adjusted with a grater on the foam.
- All butt joints and mushroom caps are glued with an adhesive mixture.
- A grid is glued to corners and walls.

- The mixture is rubbed with sandpaper.
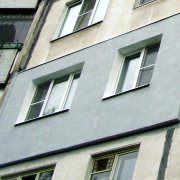
- The facade is primed.
- Finishing in progress facade wall decoration.
Mineral wool insulation
Before, how to insulate the wall of the house outside with mineral wool, it is necessary to prepare the walls correctly.
For this:
- Wooden structures are impregnated with an antiseptic to prevent damage to the log house by microorganisms.
- Damaged sections of the walls with rot, fungus or mold are thoroughly cleaned and impregnated with appropriate solutions.
- Walls made of brick and foam concrete are exempted from exfoliating paint, plaster.

- Wet walls are thoroughly dried.
- Slopes and window frames are dismantled.
- All decorative and fasteners that can harm vapor barrier and insulation are removed from the walls.
Further:
- A layer of vapor-permeable membrane is laid under the insulation. In this case, the film is vapor-permeable side to the wall of the house, and smooth - to the insulation. The role of the membrane is to ensure the removal of water vapor from the surfaces of the walls of the building through the insulation.

- Guide rails are attached with screws or dowels, or a metal profile for fixing drywall. The step between the rails is taken 2 centimeters less than the width of the insulation elements used, and the thickness of the rails is equal to the thickness of the insulation.
- Reiki are fixed from the corner of the house.
Tip: When using insulation in the form of mats, you should additionally fix the horizontal rail at the bottom of the wall to install the lower insulation mat.
- Mats or rolls of mineral wool are placed between the guide rails: the mats are laid from below, and the rolls from above, fixing materials on the wall between the rails at a time, or using a wide dowel dowel.
- To brick or block surfaces, the plate material is attached without a gap to a special glue, for a tight fit of the insulation.
- First, whole pieces of insulation are laid, then the remaining sections around the door and window openings are filled.

- Another layer of film is laid for wind protection and waterproofing.
- The material must be vapor-permeable, for unhindered removal of moisture from the insulation to the outside.
- The film is attached to the rails with brackets without interference.
- The entire layer of insulation and vapor barrier is additionally fixed to the wall with dowels with a wide hat.
- For better waterproofing, the attachment points are glued with metallic tape.

- An important stage of wall insulation is the installation of a ventilated facade. In this case, the ventilation gap should be more than 5 centimeters. To do this, additional counter-rails are stuffed on the guides, and a ventilated facade is mounted on them. It can be: siding, block house or other materials.

- With external insulation of walls, their thickness increases, which will require the installation of new window slopes, window sills, platbands and trim elements.

External insulation of building walls with mineral wool is one of the most popular methods used for thermal insulation of buildings.
These are just some recommendations on how to properly insulate walls outside the house, from the most used types of material. When performing work, you need to be guided by your desires and capabilities, and most importantly, strictly observe the rules for installing a specific heater.