Facing exterior walls with ceramic material: assembly of facade systems and adhesive mounting

Ceramic products for exterior and interior cladding, for many decades do not lose their popularity. On the contrary, manufacturers bring to our attention more and more new types of finishing materials from clay: from small-format tiles to three-meter ceramic panels.
About the types and properties of these products, as well as how to install them, will tell our instructions, as well as the video in this article.
The content of the article
Ceramics for facades
ABOUT ceramic tile everyone knows, and many do not even know about the existence of decorative facade panels made of ceramics. Nevertheless, they are, and the range of these products is so wide that it allows to clad a building of any configuration, even round.
For this, there are curved ceramic products for external cladding:
- Ceramics for ventilated facades are always offered to the consumer as a set. It includes the main and additional panels, as well as perforated elements. Perforation on the panels is necessary for the flow of air into the ventilated space. They are usually mounted on the lower perimeter of the walls, which we see in the photo above.

- In addition, the facade ceramic system includes frame elements and fasteners, because all panels are different in shape, size, and weight. Systems are designed for specific loads, designs of fasteners and lock joints are individually developed.
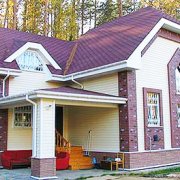
- At the same time, all the parts fit perfectly, which is difficult to achieve by independently selecting profiles and brackets, and even from different manufacturers. Facing the exterior walls with ceramic tiles or panels mounted on a system of ventilated facades is often an integral part of the building design.

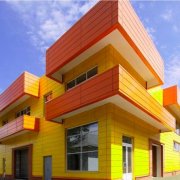
- In such cases, the design of the coating is developed taking into account its design features. And these are not only non-standard color solutions that you can see in the examples we have proposed, but also the individual configuration of the elements.
In such a project, various decors can be provided for cornices, gables, columns, parapets - and even facade blinds. - An order for ceramic cladding can be placed with the manufacturer and an existing building. For facade decoration large area, large-format panels are more often used.
They, in general, are not intended for decoration of private houses. It is impossible to install them alone, usually a team of three or four people works at such facilities.

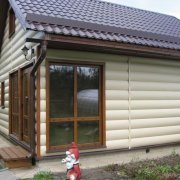
- But, facing the outer walls with ceramic tiles of a small size, which can also be mounted on the crate, is quite possible for everyone - there would be a desire. Thanks to the decorative ceramic coating of the facade, even the most modest house in appearance will seem like a royal dwelling.
- Many manufacturers offer universal options for decorative coatings. That is, ceramic products for exterior and interior cladding look equally good both on the facade and in the interior.
Thanks to non-standard forms and high esthetics of the front surface, they can show off not only on the walls of the bathroom, but also decorate, for example, the lobby or living room.

- In the production of facade ceramics, high-quality clays and mixtures are used that give them the necessary properties: fire resistance, frost resistance, strength. As for the decorative qualities of such products, they can be such that at first glance you can’t even understand what the wall is lined with: stone, brick or wood.
- There are plates with a metallic sheen, and with a craquelure effect, antique. The price of such products is quite high, but beauty, as you know, requires sacrifice. By the way, ceramic panels imitating a brushed parquet board look great as floor coverings in residential premises, even bedrooms.

- In the manufacture of ceramic facing products, there are no specific standards for sizes. For example, the French manufacturer TERREAL, offers the consumer more than 300 variations for facades and interiors. These are single-layer and two-layer panels with different types of surfaces, and more than 20 types of decor for them.
- In addition to decorative ceramics, there are special-purpose products: soundproof plates and bricks, whole speakers. There are also sun-protection systems: baguettes and blinds with the functions of protective grilles on the windows.
- For low-rise and cottage construction, the consumer is offered clinker tiles of manual molding, brick tiles, decors, shaped elements for window and doorways.

The house, decorated with ceramics, acquires a respectable appearance, without requiring major repairs for many years. It automatically goes into a higher price category in case of sale. Reasons for choosing this particular option for decorating exterior walls, as they say, are obvious. It remains to choose the material suitable for a particular building, and to understand the technology of its installation.
Ventilated Ceramic Facade
Whatever material is used for the arrangement ventilated facade, its basic concept always remains unchanged: the decorative surface should be at a certain distance from the base wall. The cladding elements are fixed on the supporting profile, which, in turn, is rigidly fixed to the consoles.
They are designed to provide the necessary clearance.
So:
- Depending on the climatic conditions of the area, and in accordance with the heat engineering calculation, a layer of insulation can be placed in the space between the wall and the lining. In this case, the volume of the internal space of the structure must take into account the thickness of the insulation boards.

- Facade systems may include open joints, which, in theory, should contribute to good ventilation inside the structure. But, despite this, an air gap between the decorative wall and the base must still be provided - for the simple reason that not only condensation can accumulate inside.
- When there is slanting rain, moisture can get behind the cladding even with closed joints, and the gap will provide it with unhindered outflow. Typically, its size is determined based on the height of the wall: at least 4 mm, for buildings of one or two floors. Maximum - 6 cm, with a wall height of more than 10 meters.
- The ventilated facade, as such, can be arranged on a wooden crate, but ceramic panels are quite heavy. Therefore, they are mounted only on a metal frame - from aluminum or stainless steel. Only brackets and fasteners can be made of galvanized steel.

The sequence of work during installation of the cladding is as follows:
| The list of technological operations performed during the installation of ceramic cladding | |
| 1. | On the prepared and waterproofed wall surface, in accordance with the standard size of the mounted tiles or panels, the cells of the frame are marked. |
| 2. | Holes are drilled in the wall and brackets are installed. |
| 3. | On the console, vertical frame belts are mounted. |
| 4. | Heat-insulating plates are laid, which are fixed with disk (plate) dowels. |
| 5. | Electrical work is being carried out, for example, for arranging street lighting, or installing a video camera. |
| 6. | Then, marking the horizontal rows of the cladding, installing the transverse profile, installing the clamps. |
| 7. | Installation of cladding elements and cleaning of the mounted surface. |
Note! It is important to remember that it is forbidden to hide gas pipes behind the facade cladding. Pipes can pass through the ceramic surface perpendicularly, and even then, must be protected by a sleeve.
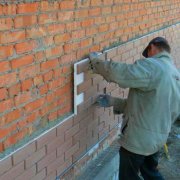
- There are various mounting options for ceramic cladding elements. They can be installed on the frame using special clamps (kleimers); fixed through the drilled hole with a dowel; fastened with a clip.
- And yet, clamps as fasteners for ceramic tiles are used most often. They provide the most even gaps, and make it easy to adjust the position of an element. During installation, the kleimer is first put on glue, and then fixed with a rivet or screw.
- The gap between the fastener and the tile is also filled with glue or silicone sealant. It is applied with a mounting gun along a horizontal seam.
This allows the clamps to be more rigidly fixed, not allowing them to move under the wind load, while making noise. This installation method is the most reliable, but if necessary, it is quite difficult to replace one element of the decorative surface.
Wet tiling
Installation of ceramic tiles on glue does not allow to hide surface irregularities. Therefore, work begins with hanging it with a plumb line.
In principle, this must be done in advance, even before purchasing the material and deciding on the method of its installation.
- To make the glue, the surface must be level. For this, the bulges are cut down, the notches are plastered.
Just remember that the layer of plaster under the tile can not be thicker than 2 cm. And not every wall can be cut down, and if you can not make a good leveling, it is better to mount the tile on the frame. - Do not think that the wall can be leveled due to the thickness of the adhesive layer - after all, this is not the floor in the house, but a vertical surface that is constantly exposed to atmospheric effects. If everything is not so bad, the wall is primed and leveled with cement-based plaster, without smoothing and grouting the screed.

- If the wall is even and there is no need to plaster, notches are made on it, or a reinforcing mesh is mounted. To work with tiles you need a certain set of tools. In addition to the plumb line and the rules, it is a scraper, a notched trowel, a rubber hammer, a trowel, a squeegee (for grouting), a tile cutter or a diamond glass cutter.
- If you do not have a grinding machine, you can use an abrasive wheel to machine the edges of the cut tiles. Sometimes tiles have to be sorted, if not by size, so by color - this is done in advance.
- As for the adhesive composition, then the choice is quite large. These are ready-made: casein-cement, polyvinyl acetate, or lime-bitumen mastics; dry mixes that just need to be diluted with water - as well as a plasticized, self-made plastic mortar.

- If you mix the solution yourself, then you need to keep in mind that its brand should not be higher than M50, therefore, Portland cement should not be used for this.The problem is that they set when shrinking, and the screed, decreasing in volume, will contribute to impaired adhesion.
- For facing work with tiles and stone, it is necessary to use non-shrinking, or expanding cements (VBC and VRTS). In addition, plasticizing additives must be present in the solution. This can be either a lime dough or a liquid modifying composition, which can be bought at any hardware store.

- By making the solution yourself, you will not save so much, and troubles are enough: look for all the ingredients for it separately, and also make sure that they contain the same amount in each batch. It is much easier to use ready-made dry composition. The manufacturer has already taken care of everything - you add water, as indicated in the instructions, and work.
- Glue mastic does not need to be prepared at all, just open the packaging. Its use of thirty percent reduces the complexity of the work, and the adhesion is much higher.
But in order to use mastic, the surface to be coated must not only be smooth, but also smooth. In this case, the best foundation is concrete wall panels.

- It is not necessary to soak the tile in water before laying, it is enough to moisten the wall with cement milk, if it has not been previously primed. The solution is applied to the tile with a thin layer, and a relief is made with a notched trowel.
Tiles are laid from bottom to top in horizontal rows, the first of which must rest on the starting bar.
To make the seams the same, plastic wedges or brackets are inserted between the tiles. The thickness of horizontal seams usually does not exceed 2 mm, and vertical seams should be wider, up to 1 cm - so the lined wall will breathe.
After the solution has hardened, the wedges are removed, the joints are filled with grout, removing excess and cleaning the surface of the tiles. That, in fact, is the whole science.