Wall decoration in the kitchen: the choice of material

Starting such a difficult event as repair, you need to think about what material the walls will be finished in the kitchen. There are a lot of options, eyes run wide, what to do and what to choose?
First of all, you need to understand that not every decoration material is suitable for the kitchen. High humidity and temperature changes, which are facilitated by a stove or oven, do not affect some materials in the best way.
The content of the article
Overview of materials for wall decoration in the kitchen
To make life easier during repairs, you need to understand what types of wall decoration in the kitchen are.
Plastic panels
The second name is polyvinyl chloride lining, wall decoration in the kitchen with this material has both positive and negative aspects. The strips are mounted on the frame (metal or wooden).
To close the corners, edges and joints of panels, special profiles are used:
- A profile of type L is applied at the beginning and at the end of the work;
- A profile of type F is used as an angular joint;
- A profile of type H is for panel joints.
Frame mounting
If the choice fell on the PVC panel, it is worthwhile to be ready for the construction of the frame (due to the frame, the room area is slightly, but will decrease). As already mentioned, the frame can consist of wood or metal.
Also, the construction of the frame depends on the type of panels, for panels installed horizontally and the frame is made horizontally on the wall, vertical panels are mounted on a vertically installed frame.
Tip. Before you begin, you need to understand how to finish the walls in the kitchen with PVC panels.
Using a thread with a load on the wall, you need to draw lines (we are talking about vertical panels) at a distance of 60 cm. Staples are installed on these lines, the fastening of which occurs with the help of dowels made of plastic or screws.
A wooden rail is installed in the brackets, after which it is fixed with wood screws. Reiki must be installed strictly on the level of the wall.
Tip. Wall decoration in the kitchen with panels can also occur with the installation of a metal frame.

Sheathing
A profile of type L is attached to the rails over the entire surface of the wall. An external, angular or internal profile is attached to the corners of the wall. Next, you need to measure the distance of the outer sides of the profile and subtract 5 mm, this is the required length.
Before installing the first panel, you need to trim the starting chamfer, only in this case the panel will fit snugly to the profile.
After the first panel is installed, you need to nail it with brackets using a construction stapler. If a metal frame was installed, then the lining is fixed with metal screws.
The next panel is also trimmed and installed in the same way.
When the turn has reached the installation of the last strip, you need to measure the distance from the outer profile edge to the edge of the previous panel. The resulting distance will be the width of the last sheet.
If the panel requires cropping, it is trimmed, and then inserted into the chamfer of the adjacent panel. Often the top and bottom of the wall has a not very attractive appearance, then profile L will come to the rescue.
Using Tile
Tiled walls in the kitchen is the best option. Tile is precisely the material that will withstand all the negative aspects of the kitchen environment.
This is explained by the characteristics of the material:
- minimal care;
- almost unlimited service life;
- water tightness;
- environmentally friendly;
- high esthetic qualities.
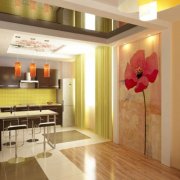
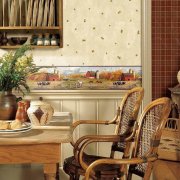
If desired, not all the walls of the kitchen can be finished with tiles, but only until the middle, that is, the working part, which is most susceptible to damage. For the upper part of the walls, you can use any other material, see photo.

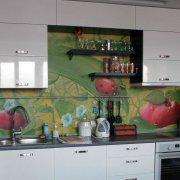
During the repair, it is necessary to select material not only for the walls, but also to know how to finish the working wall in the kitchen. For these purposes, tile also works well, which is easily washed from grease and no temperature changes in this area will harm this material.
The steps for tiling kitchen walls.
Laying tiles can be done in several ways:
- herringbone;
- staggered;
- basic;
- kaleidoscope;
- diagonal
- lines.
Tip. Using the size of the tile and color, you can both expand the space and visually reduce it.
Tiling the walls of the kitchen involves rough work, or rather, it is necessary to prepare the foundation well. If the walls have significant irregularities, it is worth using leveling mixtures.
When the surface of the walls is prepared, you need to do a test laying of the tiles to determine the pattern, it is more convenient to do this on the floor.
You need to start laying tiles from the middle of the wall, so that whole tiles lie in the center, and the cropped ones are in the corner and do not catch the eye. The tile is laid from below, gradually moving towards the ceiling.
After the bottom row is installed, it is necessary to allow it to dry, then the upper rows will not slip under their weight.
If there is already tile on the walls, you can give it a fresh look if necessary. To do this, use the spatula to knock out the old joint grout and apply a new one.
Broken tiles to replace with new ones.
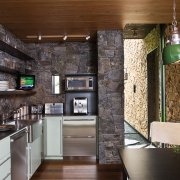
Brick mimicking material
If you have a desire to create something new, a method will come to the rescue, such as brick wall decoration in the kitchen. There are a lot of options for creating brickwork, or rather, its imitation, one of them is the use of gypsum plaster.
The price of this plaster is quite reasonable, and the result will be as with the original brick. In this case, it is possible to choose what size the bricks will be.
To do this, it is recommended to do a test plastering on a small section of the wall.
Tip. Before proceeding directly to the finish, you need to remove the old finish from the wall. There is no need to level the surface, the plaster will hide all the flaws. The main thing is to make sure that the surface is clean and dry. After which the wall is primed.
The main stage of work
To prepare gypsum plaster, you must strictly follow the rules that the instruction contains. The material must be applied in small fragments; a trowel is used for application.
The layer of plaster should not exceed 1 cm. You can smooth out irregularities on the plaster with the back of the spatula.
So:
- As soon as the entire wall is covered with material, the creative part of the work begins - the creation of the bricks themselves, or rather a drawing. For a better understanding of the process of creating a drawing, it will be useful to watch a video on this topic.
- First you need to draw lines horizontally it will be the width of the brick, then the vertical lines in this case you need to remember what the brickwork looks like, otherwise you will get ordinary squares. How to make lines depends on their desired size, for thin lines you can use a wand, if you want to make the lines wider then your finger will do.

When the kitchen wall decoration is finished and all the bricks are painted, you need to let all this creativity dry. Further, with the help of the same spatula, large irregularities are removed and the seams are cleaned.
At the end, the surface must be cleaned with a piece of rags. And the final point is the coating of the surface with a primer.
Such decorative masonry is obtained in white, if there is a desire, you can paint the surface in any other color.
Glass in the interior of the kitchen
As strange as it may sound, glass is often used to decorate kitchen walls. This is due to the fact that such glass is several times stronger than usual, can withstand high temperatures, a special film deposited on the glass surface will not allow fragments to fly apart with a strong impact.
But not everything is so cloudless, the material has its drawbacks:
- tempered glass cannot be drilled, so you need to think about places for sockets and other little things in advance;
- if glass is used as a kitchen apron, where life always boils, cracks may appear after some time;
- on the surface of the glass not only fingerprints and stains will be visible, but also drops of fat, however, this is a drawback of any glossy material.
Installation of glass panels
Finishing a kitchen wall with glass panels begins with the alignment of this wall. Further marking is done, it is needed in order to mark places for sockets and for fixing accessories.
Now for the accessories you need to drill holes into which dowels are clogged:

- A glass panel must be attached to these dowels to prevent the panel from touching the fasteners, special protective gaskets made of plastic are pre-installed.
Tip. The structure is mounted, after which decorative plugs are installed. The last stage - sockets and other elements of the glass panel are mounted.
- The kitchen, the wall decoration of which is made of glass elements, is automatically transformed and looks as noble as possible.
- In addition, such panels can be attached to the wall using polymer glue or self-tapping screws.
The use of self-tapping screws as a fastener takes a little time, if it becomes necessary to remove the panel, this will not create difficulties. But this method is possible only on very smooth walls. - You can also pay attention to glass tiles. It is a darkened glass through which you can see the pattern applied on the back side.
The tile does not fade and does not deform, is easy to clean and looks unusual. You can choose a glass tile with imitation of granite, silver, marble or stone.
Of course, the choice of material for wall decoration is a matter of taste, but do not forget that for the kitchen you need to choose the highest quality and durable material.