Drywall putty: practical tips and useful information

GKL and GVL sheets are truly universal material with which you can level the surface, install a suspended ceiling, erect a partition, build a cabinet or arch - you only need to master all the intricacies of working with this material. It is very important to carry out the installation without errors, but the finish plastering of drywall must also be performed correctly.
A violation of technology can negate all the work, especially when the interior is to be painted. Therefore, before you get down to business, watch the video in this article.
The content of the article
Why and how plasterboard is putty
Drywall preparation of the surface is carried out in accordance with the chosen option decorative finishes. If wallpapering is planned, then plastering plasterboard may look like it is shown in the photo above - that is, only joints between sheets are closed.
So:
- In order to stain, such preparation is not enough. The surface of the walls or ceilings should be plastered over the entire area - otherwise, the joints will stand out in relief. Do it yourself is much easier to do the first option, and more economical in finance.
- Just need to keep in mind that changing the wallpaper in this case will be problematic. If the entire surface of the walls was not plastered before gluing, when removing the roll coating, the cardboard cover of the drywall will certainly be damaged - it will tear off with pieces of wallpaper. So, if you do not want to putty right away, you have to do it later, or even completely, you have to change the skin.
Putty for drywall
To putty the surface sheathed with sheets of gypsum plaster, use gypsum-based mixtures intended for finish finish interiors. The components in such compositions have the finest dispersion, are able to fill even the smallest pores, and allow you to get the most smooth surface.
So:
- There are ready-to-use putties on sale that are sold in plastic cans and buckets - you open the container and work. With large volumes of work, it is much easier to use a dry composition, and mix small portions of the solution directly in place. The amount of liquid per 1 kg of the mixture is regulated by the manufacturer's instructions.

- Putty consumption per 1 m2 of drywall does not depend on which option you used: ready-made or dry. Simply, the cost of the finished product is always higher than the semi-finished product, and when decorating large areas, the difference can be significant. When buying material, ask: how much does one and the other option cost.
- And also, pay attention to universal mixes. They contain polymer resins and other additives that improve their properties.
Such putties are superelastic, and can be used both for facade and interior work. They are applied on almost any basis - this is precisely their advantage over conventional formulations.

- On a bag with such a mixture, it will be obligatory indicated: "putty is universal." And don't let the slightly higher price bother you: 225 rubles. for a bag weighing 10 kg - against 180 rubles. for the same package of ordinary gypsum plaster.
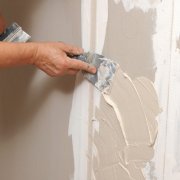
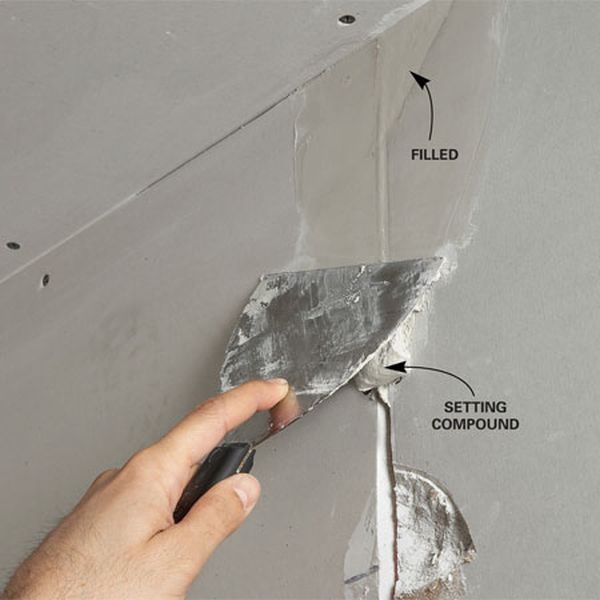
The difference is fully offset by the cost-effectiveness of this material.For example, if the consumption of putty on gypsum board, per 1 m2 for sealing joints is 300 g, then for a universal mixture this figure does not exceed 250 g. - In addition, the universal putty has a higher strength, which allows you to use these compounds as glue when installing gypsum plaster in a frameless way. It is also suitable for sealing damaged sheets. This happens quite often during installation, and here's a suitable picture to confirm these words.
Choosing the finishing plaster for GKL, you need to think about how to process drywall before puttying. Best if both putty and primer (seePrimer before puttying walls - is it needed), will be one manufacturer.
Identical components in their compositions guarantee their compatibility and high-quality adhesion. In any case, the container with a primer should indicate that it is intended for gypsum surfaces.
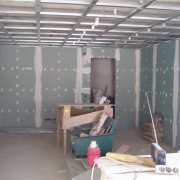
GKL preparation for finishing
After the installation of drywall is completed, its surface must be cleaned of dust, but without moisture. After that, the entire surface, using a roller, brush, or spray, should be primed.
In this case, special attention should be paid to the joints, and the places of fastening of the sheets:
- While the primer dries, prepare the solution, unless, of course, you have preferred the finished option. In order to avoid lumps entering the mixture, which happens quite often, it is advisable to sift the dry component through a sieve. It is poured into a plastic or enameled container with cold and clean water.

- The ratio of ingredients may vary, but about 2 liters of water per 2.5 kg of the mixture. After filling the dry component, you need to wait a few minutes for it to moisten, after which you can start stirring with a trowel, and even better - with a mixer.
- Tools and mortar containers must be clean, otherwise the mixture will harden faster than it should. The consistency of the solution should be such that the putty on the drywall is smeared like soft butter on the bread. It is very important not to introduce any additives into the solution that are not provided for by the manufacturer's instructions.
You should not also try to reanimate a hardening solution by adding water to it - this will not work. Just try to knead a portion that you can work out in 30 minutes. After this time, almost all putties begin to set.
Joints between sheets
When performing work related to the implementation of various screeds, the air temperature in the room should be at least ten degrees with a plus. If finishing work is carried out in the winter, in a newly built unheated house, the room in which you will putty the walls and ceilings must be isolated from drafts.
And you can provide the required temperature with a heater:
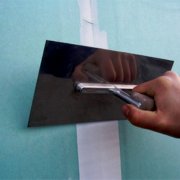
- Even if the putty will be carried out over the entire area, you need to start with sealing joints. For this you need a serpentine tape and two types of spatulas. Take one tool with steel, 150 mm wide. The second spatula should be wide, rubber - without it, it is difficult to seal internal corners.

- As for the outer corners, for their formation you need to use a perforated plaster corner. In addition to making an angle with a clear geometry, it will still be reliably protected from damage.
Such a corner may be needed when plastering plasterboard partitions, multi-level ceilings, and other voluminous structures. - Thanks to the beveled edges, grooves are formed between the sheets of drywall, the walls of which expand upward - and they have to be repaired. But first, you need to check the quality of fastening sheets. The heads of the screws should be flush with the surface of the gypsum plaster.

- The self-tapping screw tapping out must be carefully screwed. If the fasteners are excessively recessed into the thickness of the sheet, it should be unscrewed, and, having retreated a few centimeters, make a new fastening. This is important, because in the presence of the indicated installation defects, it will be impossible to make the joint invisible.
- Their sealing has the following sequence: first, the seam is filled only to half, then, without waiting for the putty to set, it is glued with a reinforcing tape. Serpyanka can be paper, or fiberglass - it is simply pressed into the unhardened mixture with a spatula.

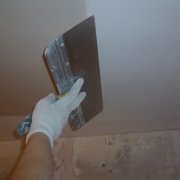
Sticker tape must be carefully smoothed to prevent the formation of blisters and creases. After this, the putty needs to be given time for hardening, and only after that it is possible to start applying the upper, leveling layer.
It is designed to level the interface with the surface of drywall. After drying, it will only be polished with a fine mesh or sandpaper.
Filling over the entire area
If the surface sheathed with drywall is prepared for painting, it will not work to be limited only by sealing joints - putty should be applied over the entire area.
For this, it is most convenient to use a rubber spatula, which was mentioned above:
- You can start performing a continuous screed after the joints are glued with a sickle, and the solution in them hardened. That is, the leveling layer at the joints is applied simultaneously with the plastering of the drywall itself. By the way, it is also putty in two stages: first the base layer, then the topcoat.

- When preparing drywall for high-quality painting, the number of putty layers can be even more, since two layers of screed do not always manage to mask all errors. On a painted surface, they are immediately detected, especially if the paint is glossy.
- But you just need to keep in mind that the finished layer must completely dry before a new one is applied. The thickness of one layer should not exceed 1 mm. It does not make sense to describe the process of working with a spatula, it is much easier to watch the video once, and practice a little on an unnecessary piece of drywall.
- Primer between screed layers can be omitted, since the same composition with the same dispersion is used for their application. But after the hardening of the finish layer, soil treatment is required. Before you perform it, you need to grind the entire putty surface, and remove the dust with a vacuum cleaner.

As soon as the soil dries, you can start painting. And if all the work was done without errors, and the materials used were only high-quality, interior decoration with drywall constructions cannot but please you.