Do-it-yourself plasterboard putty for finishing

Putty is an obligatory step in preparing walls and ceiling for painting or wallpapering. Putty mixture equalizes the surface, removes all defects and imperfections on it. Puttying drywall with your own hands is an uncomplicated but painstaking process. Some features of materials, process technology and rules will be considered in the article.
The content of the article
The choice of putty
Despite the even surface of the sheets, after installation there remains a large number of joints and fixation points requiring sealing. For this, it is important, first of all, to choose the right material for repair.
Drywall mixes for plasterboard are:
- Starting. They have a large granularity and are used for leveling surfaces (seeAligning the walls with putty in accordance with all the rules).
- Finish. They have fine granularity and are used for applying the last layer, creating a perfectly smooth surface for painting or sticker wallpaper.
- Universal. These are leveling and decorative materials. But they are used only in the absence of large defects on the surface.
The main compositions and their features are presented in the table:
| Type of putty | Features |
 Gypsum |
Lack of composition: It can not be used with high humidity in the room, due to its solubility in water |
 Cement |
|
 Polymer | This is a new material for wall decoration. It differs from the previous ones:
Disadvantage: higher price than gypsum and cement coatings |
Putty can be ready to use or dry mix.

Puttying drywall with your own hands is best done with solutions prepared independently from dry mixes.
There are several reasons for this:
- Long stored.
- The quality of the material is not affected by temperature fluctuations.
- Can be bred and used in specific volumes.
How to choose and spread putty is shown in detail in the video in this article.
Surface preparation
This stage includes the following operations:
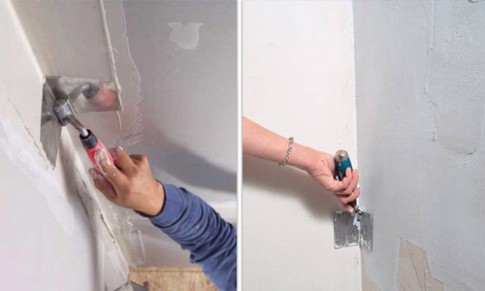
- The protruding heads of the fasteners are twisted to failure or flush with the surface.
Tip: The heads of self-tapping screws must not be immersed in drywall to avoid getting holes. If this happens, you need to unscrew the element, and in its place twist another, longer length.
- If there is delamination of the paper from the gypsum filling, in the places where the sheets of drywall are joined, the paper should be carefully torn off until it is securely fastened, and the place should be cleaned with sandpaper. Otherwise, the putty will peel off with loose paper, which will cause cracks.
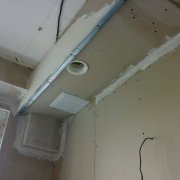
- Joints on drywall sheets are sewn, as in the photo. To do this, using a sharp paint knife, at an angle of 45 °, it is necessary to cut off an edge of about 5 millimeters from each sheet. This will increase the area where the putty is adjacent to the butt joint and will make adhesion much more effective.

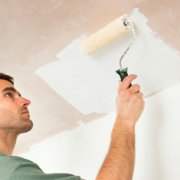
- The surface is primed. For this, a special primer is purchased, diluted according to the instructions in the bucket.

The roller is applied evenly over the entire surface of the ceiling and from top to bottom on all walls. The primer layer must be at least 0.03 mm thick. This is necessary in order to prevent the penetration of wallpaper glue or paint into the inner layer of drywall. Otherwise, the cardboard outer layer will become deformed.
The primer coating forms a moisture-resistant film that prevents the absorption of paint or glue. After 12 hours or complete drying of the surfaces, you can close the butt joints between the sheets of drywall.
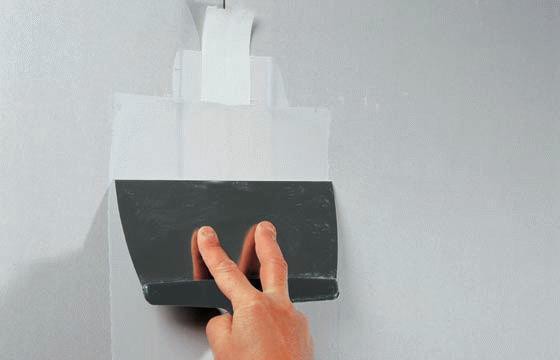
Joint sealing
After surface preparation, do-it-yourself plasterboard is putty done. Puttying of the material begins with the sealing of the butt joints (see Putty of drywall joints - how to do it).
For this:
- A serpentine tape or fiberglass mesh is glued to all corners and joints so that the joint is clear in the center of the tape.

- Only joints between drywall sheets are closed. The process is carried out using two spatulas: medium - 12 centimeters wide and wide - 30 centimeters wide. Putty is applied evenly along the entire seam.

To facilitate work on a narrow spatula, a small amount of mortar is collected and applied to the joint, and then the putty is stretched to the maximum distance with a wide spatula.

- Seams are sealed with paper tape.
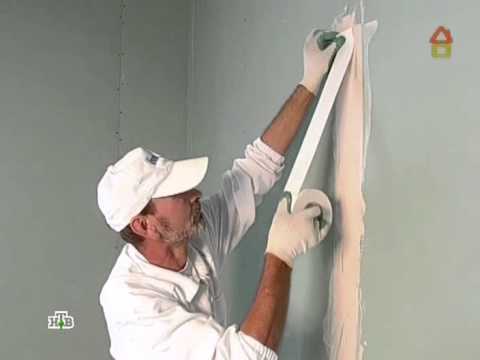
- On top of the tape is applied a leveling layer of putty.
Sealing corners
When we put gypsum plasterboard on our own, special attention should be paid to the decoration of the corners.
Wherein:
- Walls adjacent to each other are putty in sequence.
- A spatula is applied to the wall and the mixture is distributed over the entire height of the surface.
- After the solution has dried, another wall is treated.
- An even spatula is used to evenly distribute the solution.
- All corners are putty in turn.
Slope handling
The processing of slopes is carried out using metal corners, which are fixed to the wall at the finish or starting putty.
The proposed instruction will help to deal with this stage of work:
- Two walls are covered with a continuous layer of mortar.
Tip: When laying a corner, it is necessary to prevent the formation of voids and gaps.

- Corner mount. With a little effort, the corner is pressed into the solution, leveled with a level.

- The putty mixture leveled out through the holes is leveled. This will allow to achieve high stiffness of the angle, providing increased strength and resistance to mechanical stress.

- The layer remains to dry. At this stage, it is not worth achieving an ideally even surface; the main wall finishing work will be carried out further.
- Plastering places of sheets of drywall to the doorway and window frame are putty.

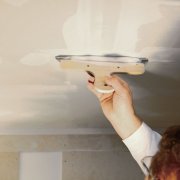
Drywall finishing putty
The final stage is the application of the finishing layer of putty on drywall.Its main feature is to obtain the most even surface for subsequent finishing.
Before this stage should be:
- Putty all corners.
- Neatly sealed joints of drywall sheets.
- Coated screws.
- Primed surfaces.
- Existing roughnesses and protrusions are eliminated by sanding with sandpaper attached to the bar.

Tip: Do not skip the step of cleaning the surface. This procedure improves adhesion to the wall of the finishing mixture. During work, the respiratory system should be protected with a respirator.
- The wall is cleaned with a wide spatula with finishing putty.

When choosing a putty technology, you need to focus on the finishing material: will it be paint or wallpaper. The number of layers of putty also depends on this. Usually, 1-3 layers are applied, with each layer being sanded.
When using wallpaper materials, the top coat is not necessary. For painting, a final putty is needed. For reliability and durability, the composition must be laid in three layers, and fiberglass can be pre-installed.

The application of the finish layer should be carried out by the composition of the consistency of thin sour cream, then the putty will lay down in an even and thin layer.
The final stage of plasterboard putty should be carried out according to the following rules:
- Use a wide spatula.
- Putty putty on the surface in small portions, immediately performing alignment.
- Applying the mixture over a large area can lead to voids and lumps.
- Each subsequent layer of finishing is applied after the previous one has completely dried.
The finish usually dries in about 24 hours. White color on the surface indicates the drying of the mixture, which means that you can proceed to further decoration of the room.

Puttying drywall with your own hands to apply the final coating, you can be sure that it will be firmly and firmly fixed. In addition, the trimmed sheets of drywall will be easier to clean from the old wallpaper. Nothing will fall off and crack. By removing the old wallpaper, you can easily paste new ones. At the same time, plasterboard walls do not need to be repacked.