Wall putty technology in different versions

The technology of filling walls for painting or wallpaper gives recommendations on the sequence of work, in order to get a high-quality result in the decoration of the room. Putty can perfectly level the surface of the walls, prepare them for the finish coating. What does the putty of the walls offer, the article will tell.
The content of the article
Features of puttying walls
The main purpose of putty is to level the surface after plastering. The process of filling walls for painting is quite easy to do with your own hands, before that, having studied the recommendations and the technology of the work.

There are a lot of options for preparing putty, its choice depends on the type of walls, the characteristics of the room, the presence of high humidity in it.
Tip: Choosing any type of putty, you should consider the individual characteristics of the room during its operation.
In addition to the decoration of the room, there is material for external work. Its difference in additional resistance to temperature changes, moisture and solar radiation.
Advantages of using putty:
- The finishing process is quick and easy.
- Reasonable price of materials.
- The ability to obtain a flat and absolutely smooth surface.
- The variety of compositions for their intended use.
What tools are needed when filling the surface of the walls
Drywall Putty Technology (see Drywall putty: practical tips and useful information) or other materials indicates the correct choice of the tool that is used in the process.
In this case, you will need:
- An electric drill, with a special mixer nozzle, which will be needed to mix the solution to the desired consistency. A special nozzle allows you to get a high-quality mixture, without lumps and additional inclusions.
- Set of spatulas. Several spatulas are required to perform certain functions. For example, work with a small spatula is carried out in hard-to-reach places, they also apply material to a large spatula, the width of which is 35-50 centimeters.
- A set of brushes and rollers for applying a primer. This is a mandatory process that is performed before and after puttying. The primer solution gives the surface an antiseptic effect, which prevents the appearance of fungus and mold on the walls. In addition, the coating improves adhesion between the base of the wall and the putty.
- To align the walls will require a rule to determine and eliminate all existing irregularities.
- To control the roughness of the walls, if any, an alcohol or laser level is used.
- Sanding paper is required when sanding the surface to give it perfect smoothness (see How is sanding walls after puttying) After applying the starting putty, it is recommended to use skins of medium grain size, and after the finish - very fine.
- To speed up the process of grinding the wall, you will need a manual skater.
- A capacity of approximately 10 liters is required to mix the putty.
Tip: This list of tools should be purchased before filling the walls.

How to choose materials for puttying walls
Putty is a paste-like material that allows you to prepare the base of the wall for its finishing.
According to the degree of readiness, the material can be:
- Dry composition requiring additional dilution with water (cm. How to breed putty with self-repair) The advantages of such a mixture:
- affordable cost;
- the ability to prepare the composition of any consistency;
- ease of breeding;
- just transported;
- long shelf life.
Lack of material:
- the presence of additional operations to prepare the solution before application, which increases the time of work;
- the finished composition has a limited period of use, it must be bred in small portions.
Tip: Before starting the dilution of the mixture, the instructions should be carefully studied, and when preparing all its recommendations should be strictly observed. Otherwise, the quality of the finished putty will be worse.
- Ready to apply to the surface. The basis for the manufacture of the composition is latex. Material packaging - buckets or small tanks.
The advantages of the solution:
- the finished solution can be applied for a long period of time without drying out;
- there is no need for the additional time required to prepare the solution. But, its cost is much higher than dry mixes.
In relation to the main substance that is used for the manufacture of putty, the compositions can be:
- Cement-based putty. It has good moisture resistance and excellent performance. Material disadvantages:
- gives a slight shrinkage after drying;
- not a high level of elasticity of the coating;
- after drying, small cracks appear.
- Gypsum based (cm. Gypsum putty: its advantages and problems of use) It is characterized by the absence of shrinkage and great elasticity. The disadvantages include:
- dries quickly;
- low resistance to sudden changes in temperature and moisture.
- Polymer based putty. Despite the high cost, it is used often enough, which is associated with obtaining a high-quality surface after puttying.
Tip: When choosing a putty for walls, you need to pay attention to the size of its fractions. The smaller they are, the surface will be flatter and smoother after finishing.
By purpose, putty is:
- Starting. Is different:
- high strength;
- Affordable price
- it is used in the initial period for leveling the walls, the thickness of the layer can reach twenty millimeters.
- Decorative or finish. Designed to complete the putty process. It is inherent in:
- White color;
- small graininess;
- high durability.
- Universal. Combines the starting and finishing squads. It is used if there are small flaws on the walls.
In the process of filling any surface between operations, a primer is always necessary (see Primer before puttying walls - is it needed).
Wherein:
- Walls get rid of dust, dirt.
- Their adhesion or bonding with putty improves.
Tip: Primer surfaces always and everywhere, when applying adhesives or wet solutions. The walls are primed before laying the starting layer, after cleaning the putty with an abrasive mesh.
How to putty the walls

Before puttying plastered walls, surfaces should be prepared:
- Cleansed of grease stains, traces of wallpaper or paint.
- The walls must be completely dry.
- It is inadmissible to putty on frozen surfaces.
- Primed planes.
To better keep the putty on the wall, it is recommended to use a special reinforcing mesh.
Puttying the walls can be performed:
- Beacon way. In this case, beacons are used, which are rails made of:
- a tree;
- gypsum;
- metal.
Elements are exposed in the vertical direction, and are mounted on the wall with gypsum mortar. In the same way, the walls should be aligned horizontally.When performing this step, the rule is used. As a result, the surface of the walls is flawless.
- A cheaper way is to apply a starting putty.
After the initial coating is dried, decorative coating of the walls with special finishing compounds is performed, which allows the surface to give an ideal plane, without cracks and other defects. The topcoat is applied in a very thin layer.
Tip: To fix a poor-quality starting layer, finishing putty will not be able. It is carried out only after perfect alignment of the surfaces.
The technology for preparing and applying putty on the wall includes:
- When using dry compositions, a solution is prepared. To do this, the mixture combines with water, mixes thoroughly until a homogeneous composition is obtained; by consistency, it should adhere to the spatula.
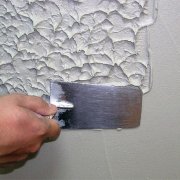
- The starting putty is applied to the wall with a wide spatula and is evenly distributed on the surface in vertical, horizontal and diagonal directions. To avoid the appearance of bumps, putty should be applied with a slight overlap.
- To improve the quality of work, the solution needs to be prepared in small portions, otherwise dried parts may form on the wall. One coat of putty dries in about 24 hours.
- To finish the corners, special spatulas are used.
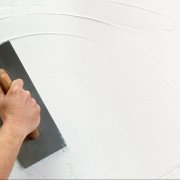
- After drying the starting layer, a finish coating is applied, the thickness of which does not exceed two millimeters.
In the process of performing work:
- When filling the walls with your own hands, the putty knife to the wall is located at an angle of 30 °.
- To get the perfect angle, a little mortar is applied to the corner trowel and evenly distributed over the entire surface.
- Before filling the walls under the wallpaper, it is necessary to determine their thickness and type. These indicators affect the thickness of the leveling putty mortar applied to the wall.
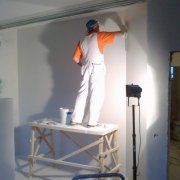
With the subsequent painting of the walls, the preparation of surfaces is performed more carefully, an example is presented in the photo.

After applying the paint, even the slightest bumps and other defects will be visible. The leveling layer is applied very thinly.
To determine the required amount of putty, the area of the walls is initially measured, and then the mass of material is calculated based on its needs per square meter. It is more economical to use dry mixes. But, more convenient when using - ready-made compounds.
The choice of putty option depends on the preferences of the owner and his material capabilities. How plasterboard putty is applied, the technology for preparing the solution and the entire cycle of work is shown in the video in this article.