Textured putty: how to do it yourself

Textured putty for walls is an extraordinary way of decorating walls in a living room. Despite the large number of interesting decisions in the design of rooms, it is the textured putty that makes the traditional interior original, attractive, original and memorable.
The article tells what putty can be for textured putty, and what can happen after a competent approach to finishing work.
The content of the article
Features and types of textured putty
For interior decoration, several types of textured textures are used:
- In the form of a rock.
- Remind me of rain.
- Bark beetle, corroded wood by a bark beetle.
- Surface imitating stone.
- With silk effect.
- Venetian plaster.
- With marble chips.
Tip: When making your own walls with textured putty, the advantages should be given to the textures of “cliff” and “rain”. They are the easiest to make.
The advantages of the material are:
- High strength and reliability of the coating, not inferior to simple plaster.
- Simple and convenient to care for when operating the finish.
- A wide selection of colors and textures, allowing you to choose the best option for any interior.
- Aesthetic feature.
The disadvantages of textured putty is the significant complexity in the performance of work, due to which its price increases. However, with independent plastering of the room, you can save decent money.

Textured plaster of putty can be applied to the walls of the room in different ways, which depends on the type of surfaces that can be:
- Equaldecorated with colored stains and spots.
- Smooth, with the image on them.
- Texturedhaving any arbitrary relief.
Tip: To obtain a guaranteed result after finishing the room, you should determine in advance the whole style of the room, its individual elements. In addition, when texturing the walls, a pronounced relief is obtained, a lot of dust often accumulates in its recesses. This does not allow the use of such decoration in the kitchen. Otherwise, the wall will become covered with microparticles of fat, and its appearance will lose its beauty.
In addition, textured putty absorbs moisture, which requires coating the walls with a layer of varnish.
Preparation of materials and tools
Before filling, you must purchase:
- Rollers of different sizes.
- Tassels.
- The rule.
- Special plastering trowel.
- Ironing.
- The usual grater.
- Spatulas, the width of their working part is 10 and 30 centimeters.
- The pallet is angular.
- Construction plumb.
- Building water level.
Prepare the necessary materials:
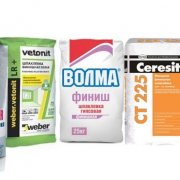
- Plaster compositions.
- Pigment colors.
- Different primers.
- Protective coatings - paint or polymer.
When applying textured plaster, a certain technological process must be followed.
How to prepare the surface
The instructions for preparing the walls for applying textured putty are as follows:
- All old decoration materials are dismantled from the wall.
- The previously plastered surface is inspected for reliability and adhesion of the material. If it has a loose base and pours, the coating must be removed from the wall. With a reliable majority of the coating on the surface, everything remains as it is.
- The plane is leveled, the level difference should not exceed one centimeter.
- The leveled surface is primed (seeTypes of construction primers and their scope) and is dried.
Tip: To ensure optimal adhesion of the relief plaster, a special deep penetration primer must be used.
To prepare the textured plaster, you must prepare:
- Large capacious container or bucket for mixing ingredients.
- Electric drill with mixer.
- Sandpaper of different grit.
- A special grater for leveling the layer after applying the material.
- Spatulas of different widths.
- Smoothing, for structuring the surface.
- Brushes and rollers (seePaint rollers: consider in detail) for painting plaster.
- Sponge for different effects when applied to the wall.
Textured plaster can be prepared from any putty that allows you to create the necessary consistency of the mortar to obtain the desired design idea.
In this case, you should prepare:
- Putty.
- Mix for sealing joints, in the presence of sheets of drywall.
- Acrylic primer white.
- Acrylic varnish.
- Paint the right color.
- Glaze, which additionally decorates the surface.
When preparing the mixture:
- In the tank are mixed:
- putty;
- means for sealing joints;
- cold water.
- All materials except water are taken in equal proportions,
- Water is added gradually, while regulating the consistency of the solution: the plaster should not be so liquid that it flows down the surface, but its density ensures the formation of the desired relief on the wall.
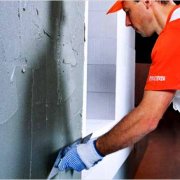
How to apply decorative putty:
After preparing the surface, it is covered with putty. In this case, a spatula and other devices are used, the wall can be decorated with some kind of relief. Plaster on the wall is applied in several ways. Movements are performed:
- Horizontally.
- Circular.
- Scarring.
- Vertically.
The required relief can be formed on the walls by several methods:
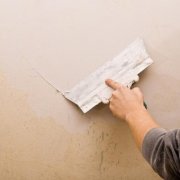
- First, the wall area is covered with a thin layer of the mixture, a thickness of not more than four millimeters. After that, the smoothing machine, in which the edges should be rounded, is slightly pressed into the wet putty and sharply released. In this case, a roughness will be obtained at the place of the tool.
- Finishing material on the wall is applied with a spatula in movements in different directions, as seen in the photo. They can be chaotic strokes or traced by any shapes.

- A spatula with a serrated edge on the wall creates an unusual relief image.
- The original texture is obtained with a sponge or a special roller.
- Create a pattern on the surface of the textured putty that imitates pink buds. For this:
- heavy paper is taken;
- crumpled into a ball;
- the ball is wrapped in cellophane to prevent it from getting wet;
- when you press the paper into a soft putty, you get a pattern resembling a beautiful rose.
It must be borne in mind that the drying period of textured putty is about 25 minutes, and during this time you need to have time to create a beautiful pattern.
Tip: To perform work only on freshly applied material, you need to cover the composition with a small fragment of the wall.
After processing all the walls, they should dry completely, and then wipe the surface with sandpaper, which will give the picture more smoothness, without large bulges.
How to create a surface with a relief under the "rock"

The popular relief under the "rock" is applied in the following sequence:
- A suitable finishing putty is purchased. It can be cement and gypsum.
- A wall cleaned from old coatings, debris and dust is covered with a primer layer and left to dry.
- A thin layer of putty is applied to the surface and remains until completely dry.
- Wall decoration is in progress.About half a square meter of area is evenly covered, with a putty thickness of about three millimeters.
- The material is rubbed on the surface with a smoothing iron.
- After leveling the composition, the ironer is wiped off, and the remaining material is cleaned from it.
- The tool leans against the freshly applied putty, and then moves to the side by 15 centimeters. Air bubbles formed under the surface of the ironer will give the surface the desired texture. Movements must be performed randomly, which will give the surface a natural look.
- At the end of the treated section of the wall, the tool gradually breaks away from the solution to avoid a clear trace on the edge of the residue. When performing movements, it is necessary to slightly increase the angle between the wall and the tool. The size of this angle should be approximately 15-20 °.
- After finishing in one area, the tool is cleaned of putty residues and the decoration of a new area begins.
How to create a relief surface under the "rain"

Such a picture on the wall is a little more difficult to do as described above, but the result is quite beautiful.
At the same time, "rain jets" can be directed:
- Strictly upright.
- Inclined.
- Horizontally.
The step-by-step process of performing textured plaster:
- Markings are applied to the wall, under which strokes will be made. Marking is drawn over the entire surface - from the ceiling to the floor level in increments equal to the width of the three trowels. Drawing lines should not be interrupted at the outer and inner corners.
- A strip of masking tape is pasted onto each marking line. It is advisable to start the work from the upper right corner of the surface, and the lower edge of the tape should be placed on the drawing.
- Putty is put on a wall with a layer, three millimeters thick. The width of the section during processing should be equal to the width of the tool, and the length is approximately one meter.
- To get rain drops simulated on the wall, the trowel is pressed against the wet putty, and then the tool detaches from the wall. So the entire plot is processed.
- After finishing work, spines form on the wall, which need to be smoothed out a little. To do this, the remnants of the putty are removed from the tool, the trowel is leaned against the fresh plaster and with it a strip is drawn in the right direction.
Tip: Do not completely apply the ironer to the solution; it should be slightly raised from one edge. The future relief on the wall depends on the amount of pressure and the thickness of the applied layer of material.
- After processing one surface area, you can proceed to the next. The second strip on the first is put a little overlap.
- To obtain a smooth texture, you can not quit work, until the design of the entire wall. Otherwise, the difference in adjacent layers will become noticeable on the surface.
- After the putty is completely dry, excess irregularities and protruding corners are corrected, the wall is rubbed with fine sandpaper or an abrasive mesh.
In detail, all the nuances of applying textured putty are shown in the video in this article.