Gypsum putty: technical specifications

Gypsum finish putty is often used to finish concrete, GKL, GVL bases. The material is well breathable, environmentally friendly. These properties are provided by the presence of gypsum in the manufacture of the solution. Details of the characteristics of putty and methods of applying it with your own hands, the article will tell.
The content of the article
Types and features of puttying compounds
Gypsum putty is a paste-like or powdery mixture, its basis is gypsum.
The composition of the material includes:
- Snow-white gypsum, but many domestic manufacturers use gypsum available in local deposits, which is characterized by a yellowish tint.
- Modified polymer water-soluble additives.
- Modifiers and plasticizers. These components protect the solution, after coating it on the walls, from premature drying, and then shedding, protect them from cracking.
- Mineral fillers. It can be:
- marble flour. It has very small sizes of fractional particles that make up fractions of a millimeter;
- white quartz sand.
The size of the fractions of these elements determines the features of applying the composition: with a decrease in the size of the filler particles, a thinner layer of plaster is applied to the surface to be treated.
The particle size of the filler allows you to classify the putty on:
- Starting (see Starting putty for walls: types, purpose, application). This type of material is more likely to relate to plaster mixes, and is intended for leveling and smoothing the plaster layer.
- Home (see Finishing putty for finishing). With its help, a thin leveling layer is created on even flat surfaces.
- Universal gypsum putty. In addition to the minimum particle sizes, the material is distinguished by the peculiarities of a gypsum binder base, which is used in its composition. These unique characteristics allow you to apply a thick layer of plaster. She can:
- close up joints between plasterboard plates;
- close cracks and deformations;
- pre-plaster concrete surfaces.
By the correct combination of polymer additives and other components in the putty compounding, a really high-quality and reliable mixture is created that dries quickly and forms a strong, smooth film on the surface, which makes it possible to further reduce the consumption of facing materials. Natural safe for human components in the composition of the putty give it other positive properties.
Such as:
- Resistance to cracking, which provides a sufficient level of ductility.
- Vapor permeability, the ability to create a good microclimate.
- Easy to coat and sand; no tears on the surface.
- High hardness, strength, durability.
- Application in various fields:
- for alignment;
- for sealing cracks, butt joints of drywall.
- Excellent adhesion with many materials.
The only drawback: finishing gypsum putty is not suitable for finishing surfaces in wet rooms. It is used inside buildings.
Comparison of acrylic and gypsum putties
Gypsum putties are very popular, their main advantage is an affordable price.
Tip: When planning a repair, you should determine the type of finishing material in advance, clarify its pros and cons, and then purchase the most suitable option.
For example, the table compares gypsum and polymer putties:
| Polymer putty | Gypsum putty |
| Universal acrylic compositions can be used to decorate the facades of houses | Most often used for indoor surfaces. |
| Both types of materials are perfect for leveling surfaces, sealing cracks, cracks, all kinds of voids | |
| It is a waterproof material that protects the wall from moisture and moisture. | It easily absorbs water, which does not allow its use in rooms where there is high humidity, but only in sufficiently dry |
| Great ductility, can tolerate a sharp change in temperature, does not lose its strength and does not crack | It has less reliability, does not withstand large temperature drops, otherwise cracks will appear on the surface and the solution will begin to crumble |
| Vapor permeability worse | Better vapor permeability. When decorating the room with gypsum putty, it retains optimal humidity, dampness does not appear on the walls |
| Easier to use, easier to apply on the wall and easier to sand | |
| This is a natural substance, without artificially created components. It is completely environmentally friendly and safe. | |
| Higher price. But the composition is more reliable and durable, which justifies the high cost | Prefer people who are not high affluence. The cost of the material is several times lower |
| It can be applied only in a thin layer. With significant changes in the relief, the site needs to be processed several times | You can immediately apply a thick layer, which allows all surface defects to be repaired at a time |
| When sanding both coatings, airway protection is required. | |
Tip: Choosing the material to decorate your room, everyone decides which putty is better to use gypsum or polymer. It all depends on the preferences of the owner and his wealth.
How to prepare for applying gypsum putty
Before starting wall decoration, it is necessary to determine the consumption of gypsum putty per 1 m2. For this, the sum of the areas of all walls and ceilings to be finished is determined, the thickness of the finishing layer is selected. Multiplying the initial data, which will be the amount of material consumption by the coating area.
With an approximate thickness of the applied layer of one millimeter, with a ceiling area of 3 × 4 m = 12 m², the mixture will need: 12 m2 × 1.2 kg x 1 mm = 14.4 kg.
If the coating layer is an average of 3 millimeters, the result obtained is multiplied by 3 and a mixture consumption of 43.2 kg is obtained. Typically, the approximate consumption of material is indicated on the packaging of the mixture.
Tip: It should be borne in mind that the mass of gypsum putty, one volume with cement, is significantly less.
With a large difference in the levels of the top and bottom of the wall, with gypsum putty, you can apply only one layer with a thickness of up to 60 millimeters, and there is practically no risk of peeling, cracking, or shell effect. When performing work, the temperature inside the room and the base of the wall should range from (+ 5 ° C) to (+ 30 ° C).
To prepare the surface for putty it is necessary:
- To clear a wall of dirt.
- Remove dust.
- Remove layering.
- Remove old coating and other dirt on the wall.
- Remove metal hooks, staples.
- Pull out the nails.
- Cover the remaining metal parts with anticorrosive protection, and then be primed, which will increase the adhesion of the solution.
- Substrates that strongly absorb moisture must be primed with great care. It:
- foam and aerated concrete surfaces;
- brickwork;
- cement-lime plaster.
The procedure for preparing the solution is as follows:
- The contents of the bag are neatly poured into a container of water. For this, about 0.6 liters of water is taken per kilogram of dry composition. So for a bag of 30 kilograms you need 18 liters of water.
- Everything is well mixed to a homogeneous consistency manually, with a construction mixer or an electric drill with a nozzle.

- The solution settles for up to 5 minutes.
- Mixing is repeated.
- The solution obtained in this way must be consumed 30 minutes after dilution with water.
Tip: You can not add extraneous components to the resulting mixture.
How to apply gypsum putty
The instruction for applying the material offers:
- Apply the solution prepared in advance on the walls in one layer up to 50 millimeters thick, or locally up to 80 millimeters.
- Gypsum putty is applied to the walls in the direction from the bottom up, and when applied to the ceiling - on itself.
- When covering the ceiling with a putty layer of more than 20 millimeters, it is better to use a galvanized mesh for reinforcement.
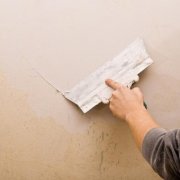
- The applied mixture is aligned with zigzag movements of the h-shaped rule. About an hour after applying the composition and the beginning of its setting, excess material is cut with a trapezoidal rule, as in the photo, and all remaining irregularities are filled with the mixture.

- To remove traces of the trapezoidal rule, after trimming the excess solution, the surface is smoothed with a wide spatula.
- After 20 minutes, you can begin to finish the surface.
Next, the surface is prepared for finishing:
- The wall is abundantly wetted by water.
- A pause is maintained until the surface of the wall becomes dull.
- The plane is rubbed with circular motions, with a plastic grater (see How is sanding walls after puttying).
- The surface is smoothed with a wide spatula.
- To obtain a perfectly smooth plane, it is necessary not earlier than 6 hours after the mixture has completely hardened, pour the plastered surface abundantly with water, and then smooth it again with a spatula.
- Thus, the surface is prepared for wallpaper or painting (see How to prepare walls for painting) It does not require further puttying of the surface.

- Optimum conditions are provided for normal hydration of the solution, better setting, and stable adhesion to the base.
Tip: Until the surface is completely dry, drafts are not allowed in the room, the putty can not be intensively dried and exposed to sunlight.
- At the end of drying, the room is ventilated, which will remove excess moisture from the drying putty.
What is gypsum putty, technical characteristics of the material, method of application, the video in this article shows in detail.
Despite the fact that applying such a coating is quite simple, plasterers require skills, and special care when performing certain stages of work. After the correct application of gypsum putty, the surface is smooth, closed, homogeneous, without smudges, scratches, bubbles and spots.