How to prepare walls for painting

The technology for preparing walls for painting depends on the quality of the surface. Basically, alignment is done first and then putty.
Today we will tell you how to prepare the walls for painting and how to do it right. Also in the video in this article you can see a lot of useful and necessary information on this issue.
The content of the article
What are we going to paint
You can use painting for almost all types of surfaces that you plan to ennoble.
These may be the following surfaces:
- Smooth plastered and plastered surfaces.
- Textured surfaces.
- Painting of surfaces finished with facing material.
- Embossed building surface.
Each of the options involves preparatory work:
- The first step is to determine the application layer. To do this, just pull the fishing line along the diagonals of the plane.
- After that, we apply the level and see how much we need to put the plasters to align (see. Alignment of walls with plaster according to all the rules).
Attention: Special attention should be paid to the preparation of walls for painting, including the processes of leveling the walls and their putty. In this case, it makes sense to draw up a work order in more detail and the instruction will be as follows:
Prepare the surface
Stage 1: wall alignment and processing
Preparation of walls for painting do it yourself with their own hands. Even a simple painting of the walls requires a very careful elimination of all existing flaws and irregularities.
Based on high requirements, you can resort to the use of the following options:

| Grinding this coating | The first option can be applied if the old base is not damaged and strong enough. In this case, you can limit yourself to removing the old coating using sandpaper or an grinding wheel. After that, all old surfaces should be treated with an antiseptic and primed (see Primer for walls for painting - types and tasks) After all the preparatory operations, the differences in irregularities should not exceed 2 mm. Only then can we proceed to further work. |
| Plastering surfaces | In that case, if the old plane is quite uneven and not reliable, it makes sense to replace the old plaster with a new one or sheathe the surface with drywall. In this case, all the old, poorly stucco plaster is removed, and which option to resort to in the future depends on financial capabilities and personal preferences. |
| Aligning walls with drywall | If you need to overlay a layer of more than 3 cm, then it is better to align with drywall (see Gypsum plasterboard technology: installation methods) After this, only putty can be done. In this case, the price of work will be much cheaper. This option is often used when decorating a room in a new building. |
Attention: After the preliminary work (especially plastering), the surfaces need to dry well, after which it can be primed and allowed to dry again.
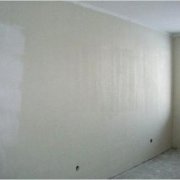
Stage 2: application of the starting putty
By themselves, surfaces such as a layer of plaster or sheets of drywall are not suitable for painting, so they need to be coated with putty.Particularly relevant is the issue of painting plaster surfaces.

So:
- As a rule, unlike gypsum plasterboard surfaces, plastered surfaces have to be covered not only with finish, but also with starting putty. This is due to the fact that the plastered surfaces contain irregularities that should be smoothed out, and the drywall surfaces are considered absolutely flat and ready to be applied to the finish layer. This is precisely the advantage of drywall systems.
- If painting is planned, it is better to use a reinforcing mesh with a mesh size of 2 mm. The reinforcing mesh is laid on a plane with the first layer of starting putty. When the first layer sets, you can begin to apply the second. As a rule, in such cases they cost two layers of starting putty. After that, putty is allowed to dry normally.
- After that, you can "walk" on the surface with a coarse abrasive mesh with grain No. 120 to remove various influxes and small irregularities. Despite this, the surface is not suitable for painting, since the starting putty has a certain granularity, which allows it to be used to create a rough coat, as well as to smooth the walls, due to the fact that it can be applied with a layer of up to 5 cm.
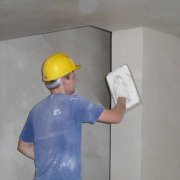
Stage 3: applying finishing putty
Due to the fact that in finishing putty there is high ductility and there is no granularity, with its help it is possible to obtain a surface that can be painted.

- The method of applying finishing putty is the same as the method application of putty, but the thickness of the working layer should not exceed 1.5-2 mm. As a rule, it is enough to apply 2 layers of such putty, then polish the surface and you can get a perfectly even and smooth base for painting. To polish the finish layer, fine-grained abrasive materials with grain No. 80-No. 100 are used.
- In this case, such a technological step as grinding for painting should be done very carefully, otherwise after the painting all the flaws will "come out" to the surface.
Stage No. 4: final preparatory stage of painting
After grinding work, the surface should be very thoroughly cleaned of dust. To do this, you can use a broom or vacuum cleaner. Each dust particle left on the surface will make itself felt after painting.
Well, if this place is out of sight. After removing the dust, the surface is covered with one layer of primer. After complete drying, you can start painting.

Features of the preparation of other surfaces:
- Particular attention should be paid to the preparation of wooden surfaces. They are ground and, if necessary, putty putty on wood. This should be done in cases where there are serious cracks on a wooden surface, especially in places where there are knots. After that, the tree is covered with protective solutions or covered with stain. And only after all the necessary preparatory operations have been done, can wooden surfaces be varnished or painted.
- Relief or textured surfaces are sufficient to cover with a layer of deep-penetrating primer. Wallpaper for painting is primed with adhesive compounds.
Paint Type Selection

The preparation of the walls for wallpaper for painting is done, now you need to pick up the paint. In construction stores, you can find several types of paint that differ among themselves in both characteristics and composition.
As a rule, all this is indicated on the packaging and you only need to carefully read the available information, the information received can become the basis for choosing the type of paint and applying it in certain conditions. Instructions are on each package.
| Emulsion paints | They are also called water-based paints, since the main solvent is ordinary water.In this regard, they are also environmentally friendly, which means that they can be used in non-residential and residential buildings. |
| Emulsion paint | They are widely used due to their low cost, ease of application and obtaining of high-quality painted surfaces.
|
| Acrylic paints | The basis of acrylic paints is acrylic resin. It provides high-quality coating of building surfaces and forms a smooth surface layer.
|
| Latex paint | The main filler of such paints is latex rubber, due to which, as a result, a very smooth and high-quality surface is obtained.
|
| Vinyl paints | After application, they form a smooth, vapor-permeable surface that quickly gets dirty, but at the same time, it is easy to clean. Such paints are recommended for use in places or rooms where there is high humidity. Such premises include: bathrooms, laundries, kitchens, cellars, toilets, etc. |
| Mixed paints | Such paints can be more attributed to universal, as they have the characteristics of several types of paints. Acrylic latex is very popular.
|
Conclusion
So:
- In conclusion, we can say that the most promising area of application of water-based, acrylic and latex paints is wall cladding in public and office buildings.
- As for the residential sector, he prefers wallpapering. This is primarily due to the possibility of obtaining original design solutions, thanks to a very wide selection of finishing materials such as wallpaper. At the same time, warm surfaces are obtained, creating additional comfort in the house.
- Another thing is when it is necessary to veneer the premises of a cafe, night club, bar, shop, etc., then there is practically no alternative to painting. Indicators such as the ability to wash after contamination are most ideal for these types of rooms. Equally important is such a factor as the mechanical strength of the applied paint layer. In places where there is heavy traffic, this indicator can play a decisive role.
Caution: When choosing a particular paint, special attention should be paid to such an indicator as vapor permeability.If there is a vapor-permeable facade, then it is impossible to use vapor-permeable paints for decoration, as this can lead to the destruction of the structural material of the facade of the building.
Preparing the plastered walls for painting is not difficult, but if you want to do everything efficiently, then you will need to work. The cost will not be high, especially if you do it yourself. And looking at the photo it’s fashionable to do everything.