How is the preparation for painting the ceiling

When it comes to ceilings, one cannot but agree that, despite the abundance of finishing materials, paint occupies a leading position. Whatever the ceiling is leveled, it is it that makes it possible to give the surface a finished look, to beautifully decorate the ceiling surface.
In order for the result to please for many years, preparation for painting the ceiling should be done without errors. How to avoid them, and what to pay special attention to? You will learn about this by watching the video in this article.
The content of the article
The better to level the surface.
Everyone knows that there are two ways to level the surface of the ceiling: plastering and hemming. Plastering the ceiling can be considered a traditional option, and for many decades it was almost the only one. With the growing popularity of suspended ceilings, wet screed, many began to prefer dry plaster.
- The reason for this is not the price of the material, since the costs are approximately the same. Drywall allows you to hide such surface imperfections that it is impossible to hide under the plaster (see Facing the ceiling with drywall: do it right) In addition, it is possible to insulate and isolate the ceiling from noisy neighbors from above, and most importantly - to mount lighting fixtures in it, evenly distributing lighting throughout the room.

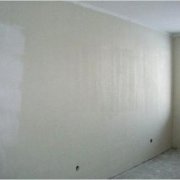
- The stucco ceiling, which we see in the photo above, is the best choice for rooms with a small height. Basically, these are apartments in Soviet-built houses. In some of them, the ceiling height is only 2.45 m, and this generally contradicts all the existing standards today.
- Owners of such housing do not have to dream about the fixtures built into the ceiling, since at the same time it is necessary to take at least 10 cm of height from the room. In most modern residential buildings, both multi-unit and private, there is no such drawback. So, it is possible to make a choice in favor of one or another option based on the quality of the base foundation and the design of the room as a whole.
- In favor of drywall, we give one more weighty argument. With its help, it is easy to change the configuration of the ceiling, make several levels, painting them in different, but well-combined colors. Thus, the interior gets a certain personality.

It is worth saying that when creating a suspended ceiling in two levels, the hem and plaster methods are often combined. But this is not the topic of the article today. Our task is to explain to readers how to prepare the ceiling for painting with your own hands.
Preparatory work before leveling
Work on leveling the ceiling should begin with an assessment of the state of its surface. Depending on whether it is primary decoration or repair of the old premises, the preparation stage may consist of the following technological operations.
For concrete floors, these are:
- Cleaning the surface from the old decorative coating
- Removing loose screed
- Sealing joints between floors
- Termination of technological holes
- Removing soot, rust, mold, oil, etc. from concrete
- Floor waterproofing
- Adhesive primer application
When the building is old and the ceilings are in poor condition, it is often necessary to complete this list of work completely - this is if you prepare the ceiling for “wet” alignment. It is definitely not necessary to prime with gypsum plasterboard, but as for stain removal, you need to think carefully.

Note! If there is mold or rust on the concrete, measures must be taken to eliminate them, regardless of the leveling method chosen. First of all, this indicates the presence of moisture, and if you just cover it all with drywall, over time you will have the same picture on its surface.
After all, rust does not come from nowhere. There is reinforcement inside the floor slabs, and very often there are microcracks in concrete. Once moisture penetrates into its thickness, the metal oxidation process begins - the result you see in the picture above.
In this case, you need to not only remove the rust, which with the capabilities of modern household chemicals is quite easy to do, but also waterproof the floor.
Ceiling protection against moisture
The only effective and simple way of protection is to use one of the deep penetrating penetrating formulations, which are now offered in a huge assortment by manufacturers. This is a special kind of primer (see Types of construction primers and their scope), which are applied in exactly the same way with a roller or spray on the surface of concrete.
- They just have a slightly different principle of action. Waterproofing impregnations not only provide good adhesion to the plaster, but also, penetrating deep into the concrete, block the moisture present in it, crystallizing it in the pores. Well, since the pores are already filled, there is no access to newly incoming moisture.

- For large-scale work, such impregnations are carried out in a concentrated form and are sold in large packages. For ordinary home repairs, there are commercially available compositions in normal concentration in bottles and jars with a capacity of 1-5l. When using such an impregnation, it is not necessary to prime the overlap before plastering.
If you plan to sheathe the ceiling with drywall, the waterproofing membrane can also not be glued. Although, you need to navigate according to the situation: if the apartment is located on the top floor, where the roof leaks regularly, an additional layer of insulation will not hurt.
As a preventative measure, this can also be done in a new apartment, which is under an uncracked ceiling.
How to seal joints between floors
The sealing of joints between ceilings and openings through which communications pass, is important not only for the aesthetics of the ceiling surface. Even if it is covered with drywall, the seams and cracks should not remain open. Firstly, water easily penetrates through them, and secondly, drafts form.
- To seal significant cracks and joints, you should not use gypsum mortar - even if the ceiling is plastered with it. Recesses in concrete, open seams and holes need to be closed only with cement paste. This is not a simple mortar of cement and sand, but a modified mixture.
- You can buy a ready-made repair composition for concrete, you can even use tile glue for this purpose. It is usually made on the basis of self-expanding cement, with plasticizing additives, which perfectly fills the smallest cracks and pores on the surface.

- The embedment process looks like this. First, the seam should be tried to be freed from the old filling by hollowing out the solution and sweeping out its remains with a brush. Then it needs to be primed, and while the impregnation dries up, prepare filling for it. For maximum cork strength, large joints and process holes are recommended to be filled with coarse material.
- These can be pieces of broken brick, gravel, expanded clay granules, as well as a self-expanding tape or harness, which builders usually use to seal joints between panels. First, fill the prepared seam with cement paste.
- After that, recess the cord or pebbles into it - you just need to do this so that they do not protrude above the surface of the plate. Remove excess solution with a spatula and let it harden. If the ceiling is plastered, its entire surface is primed.

- By the way, design is now in fashion, which was called "art concrete." Its main concept: decoration directly on the concrete surface, without plaster. In this case, all the cracks are closed, but the joints between the plates can play the role of decor - they stand out in relief, but, of course, they should not be through.
In this design option, even if there are no seams, they can be drawn. Art concrete is one of the modern ceiling finishes and most often used in the design of premises in the loft style. For those who are interested in this technology, there is always a manual.
Preparation for painting the plaster surface
Preparation for painting with water-based paint, which is mainly used for interior decoration, consists of several stages, and the final result depends on each of them.
In fact, two sets of preparatory work are being carried out. One of them is made on the basis and precedes the application of the leveling layer, and the second is already done on this layer, immediately before painting.
- It is clear that not only preparation is important, but also the high-quality performance of work related to the leveling process - whether it be plaster or plasterboard lining. Mistakes made at this stage are fraught with the fact that cracks appear, and the paint peels and crumbles. And it is worth noting that the ceiling is not always cleaned to the slab, and often they are painted with an old screed.

- You can do this, but only after you have examined the surface of the ceiling and made sure of the strength of the old plaster. Even if the base layer has retained strength, it is necessary to clean the surface by removing whitewash or wallpaper, depending on what was there. Together with them, the covering layer, which will have to be restored through putty, is almost completely removed.
- For residential premises, gypsum-based compounds are usually used. This can be ready-to-use putty, packaged in cans or pails, or a dry mixture that needs to be diluted in a certain proportion. Before applying it, be sure to soak the base.

- The soil will remove dust from the screed and improve the adhesion of the layers. When buying, see that the composition was intended for gypsum surfaces or was universal. The same primers should also be used in the case when it is necessary to putty the plasterboard lining - for painting it is putty throughout.
Advice! If you chose acrylic paint for decoration, it is desirable that both the primer and the putty should also be based on the same substance. And even better, that all this was from one manufacturer - so you can be sure of the best compatibility of materials.
- After the putty dries, it will be necessary to clean all the roughness and pores in order to bring the surface to perfect smoothness. This is done with an abrasive mesh or fine sandpaper. Great if you have a grinding machine. Just do not overdo it and do not remove the layer of freshly putty completely.

The final stage of preparing the ceiling for painting is primering again.But first you need to do a wet cleaning in the room, since the dust that has settled on a freshly painted surface will nullify all your efforts.
Only then can you begin priming the ceiling. The primer is applied in one layer, and after a period of time determined by the manufacturer for the drying of the composition, staining can be performed.