How to prepare walls for painting
Preparing walls for painting is quite an important point. After all, this directly affects the appearance and ensures the durability of the coating. After all, if the most expensive paint without preparation is applied to the plane, it will not last long.
How to prepare for painting walls, we will consider. You can also watch the video in this article and photos that will help you not to miss anything.
The content of the article
Stages of preparing walls for painting
In the manufacture of finishing work, preparing walls for painting is extremely important. If painting is chosen as the finish, then this is an almost universal option, suitable for most possible surfaces.
Conventionally, they can be divided into four groups:
- Surface on which plaster and putty are already applied;
- Textured plaster;
- Facing relief type;
- Facing smooth type (for example, decorative panels made of wood or plastic).
Attention: It will be necessary to prepare a surface in different cases in different ways. However, in most cases, the preparation of wall surfaces for painting will include leveling and putty. The responsible preparatory process is worth considering in more detail.
Step one. Alignment and Processing
The smoother the painted surface of the walls, the easier it will be to apply paint to it and the better the result will be. You can achieve the most even surface, and there are several ways to do this.
It is worth considering the most popular:
- Grinding. This method can only be used if an existing concrete base (or existing plaster (see How to grout plaster)) has high strength, and there are no visible mechanical defects. Then the layer of the existing coating is removed by the grinding bar, as well as ordinary sandpaper. Do not do without the use of an antiseptic and a primer. If areas affected by fungus and / or high humidity are found, they should be cleaned and plastered. After completion of the preparatory work, you need to make sure that the level drops do not exceed 1-2 mm;
- Plastering. The method is suitable in cases of cosmetic repairs or with significant detachment of the existing plaster, when the old coating is applied with a thin layer and / or is easily removed. In addition, plastering is one of the processes carried out during leveling by grinding;
- Drywall sheets. If the walls themselves are extremely uneven, have significant level changes or visible mechanical defects (not affecting the strength of the structure), then the optimal way out is to wall the walls with plasterboard sheets (see Facing walls with plasterboard sheets in different ways).
When choosing a preparation method, one should also be guided by personal preferences and financial capabilities.
Attention: In any case, after leveling the surfaces, they should be carefully primed. Before proceeding, the primer must be completely dry.
Usually it takes about six hours, sometimes with high humidity the process can be delayed. In this case, one should not rush, and preparatory work can only be continued when the surface is completely dry.
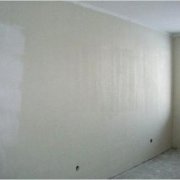
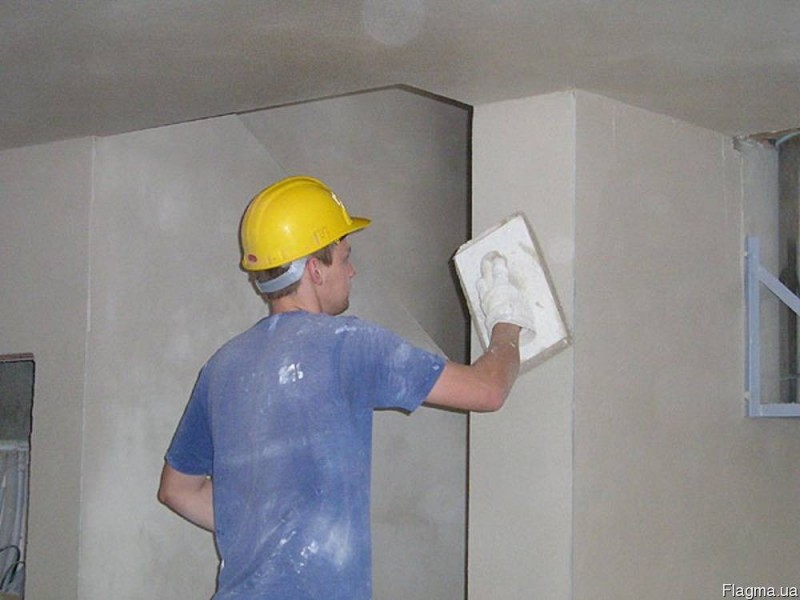
Step Two Starting putty
Plasterboard sheets or a solution of sand and cement are either porous materials or moisture-absorbing materials. Such surfaces cannot be painted, since the paint will not lie evenly, in addition, the most minor irregularities will be clearly visible, and even a slight color change is possible.
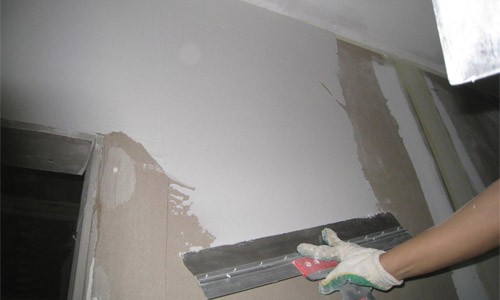
To avoid such troubles, applying a layer of putty.
Here are a few basic rules:
- The choice of starting putty - a very important process. As part of such putty sand must be present, and the smallest fractions. The starting putty layer can be quite thick - about 4 mm;
- For work, you will need two spatulas at once: wide - to apply the solution (its width should be at least 60 centimeters), and narrow - it is useful for distributing the solution and comparing small irregularities (from 20 to 25 cm). It is necessary to spread the putty exactly in accordance with the instructions on the package. This is done immediately before starting work. Such a solution takes about 45 minutes. If it is decided to use ready-made mixtures, then they must also be used immediately after they have been opened;
- An ideal option for preparing walls for painting is putty with reinforcement. To do this, you can use a mesh of nylon fibers with a mesh size of 2 mm. The application technology is as follows: a putty strip is applied with a thickness of not more than 2 mm and a width equal to the width of the mesh, the mesh must be applied to the putty layer and pressed with a spatula (without undue enthusiasm), on top of the mesh is another layer of mortar.
Attention: When working with a spatula, narrow protruding strips of mortar always remain along its edges. It is not worth spending extra time and effort to smooth them, the main thing is to ensure that there are no large recesses or places where there is no solution.
There are several recommendations for applying the solution that will help to achieve good results:
- To even out the transitions between the strips, it is enough to draw a spatula over the surface two to three times, while very thin tubercles may remain, which can be aligned later, before finishing putty;
- Novice masters try to prevent the appearance of these tubercles by applying small portions of the solution using a large spatula. This should not be done, as the quality of the final result will suffer. As a rule, the more experience the master has, the better the result.
Before continuing work, let the putty dry completely. This usually takes from 6 to 8 hours. After making sure that the surface is dry, you can proceed to grinding. A coarse abrasive mesh is quite suitable for these works, the grain size should be 120 mm. Irregularities and visible defects are removed at this stage.
After completion of these works, the surface is still not ready for painting and remains too grainy.
Step Three Finishing putty
This process is needed to get the most even surface into which the paint will not be absorbed. The composition of the finishing putty, as a rule, includes non-coarse components of small fractions, such as sand.
When performing such work, several important recommendations should be kept in mind:
- The finish should be thin (approximately 1.5 mm, but not more than 2 mm), if a thicker layer is applied, the coating may crack. For work, you will need to use a narrow spatula made of metal, the solution needs to be laid out only in small portions. It may be necessary to apply a second layer, but this is permissible only when the first is completely dry;
- Grinding is required as carefully and accurately as possible; a mesh with a grain of 60-80 mm is suitable (see How to grind walls after putty and how to do it right) It is necessary to polish without rushing, with smooth movements, so that the fresh putty is not accidentally cut off;
- The work will need to check.A lamp is useful for this (you can even take a table one). In order to discern possible irregularities or defects, a ray of light must be directed to the surface at an angle. If there are any shortcomings, the site is reprocessed;
- After the putty has completely dried, it is time to begin work on the primer of the surface.
Caution: Dust remaining after grinding will need to be removed. This work can be done using a clean rag or a regular vacuum cleaner. Do not wipe the surface with wet materials.
To carry out the application of the primer, you can use a roller or brush. As a rule, one coat of primer is sufficient. The time it takes for the composition to dry is usually indicated on the package. For mixtures from different manufacturers, the drying period of the primer may be different. It is impossible to paint the surface before it is completely dry.
Step Four The end of the preparatory work
As a rule, a mesh or a skin is used for grinding.
Each of the options has its own advantages and disadvantages, and everyone can choose the most suitable for himself:
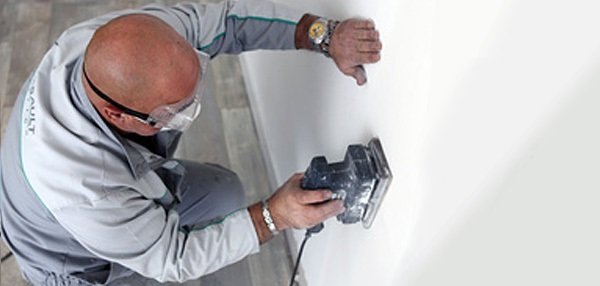
- Sandpaper. It is well known to domestic consumers, it is sold either in rolls, or in sheets, or in pieces cut to the size of a standard grater. The main advantage of sandpaper is its low cost. However, it has a number of disadvantages, including a short lifetime. It wears out too quickly, it can become clogged with dust, which appears during grinding. A piece of mortar may stick to sandpaper, then the smoothed surface may be scratched;
- Abrasive mesh. Its main plus is the perforated structure. Building dust does not accumulate on the surface, but passes freely through the cells. The wear resistance of the mesh is much higher than that of sandpaper. The need to replace the grid will be indicated either by its appearance (it will begin to wear out), or by a decrease in the quality of grinding.
If the choice is made in favor of the first option, then close attention will need to be paid to such an indicator as grain size. It is possible to process the starting layer of putty with sandpaper with coarse grain. For example, indicators P60 - P80 are suitable. Fine sanding paper (from P100) will be required to sand the finish.
Attention: In addition to the grater, a sanding sponge (it should have beveled edges) is useful - this tool will process corners. This auxiliary sponge can be replaced by any auxiliary objects, for example, a fine-grained skin folded in half.
Description of the correct grinding technology process
It may seem that this is a primitive process, however, it has some subtleties and tricks. We will get acquainted with the correct polishing of the wall after the putty is applied:
Wait until the filler coat is completely dry. Check his condition and only then continue to work. He must gain sufficient strength.
- Correctly fasten the abrasive to the grater. Check the availability of necessary protective equipment and their quality. Prepare a stepladder for work. Take a suitable spatula and get started;
- Engage in the removal of visible bumps with a spatula if they are detected;
- Start at the top of any corner. Use circular motions to process small sections of the wall. You can help yourself by highlighting a spotlight;
- Do not exert excessive pressure on the grater, especially during the grinding process of the finishing putty layer. Otherwise, there is a risk of wiping it completely;
- At the time of grinding, pay attention only to the influxes and protrusions. It is not necessary to work on the pits and holes; they will be processed later with putty. Let the work dry. Now bring the surface to an ideal;
- Proceed to the processing of the entire area of walls and internal as well as external corners.
Preparation for painting wooden walls
Preparation for painting wooden walls with your own hands is done a little differently. For them, you can not use different versions of plaster or putty - you just need to properly polish the surfaces, clean out the dust and some excess wood pile after work.
So:
- If you find any recesses or scratches on the wooden wall, fill them with a specialized grout. In most cases, it will have to be used to work with plank versions of walls, since they differ in traces formed by protruding knots. Having performed the necessary treatment, the wooden surface must be treated with protective compounds and stains.
- If there is a need to paint some decorative version of the plaster, some wallpaper (allowed for painting) or the textured finish layer, the wall should only be primed. Plasters are painted using specialized compounds capable of penetrating far into their composition, and non-woven or vinyl wallpapers can be painted using other adhesive solutions diluted to a liquid state.
Attention: It is important to remember that the process of preparing the walls before painting is extremely important and therefore it should be treated very responsibly. Its quality will affect the visual impression created by the entire finish, its resistance to time and environmental influences.
The walls are being prepared for painting with water-based paint, or any other, does not matter. Preparation is done anyway. The price of these works is not high and the instruction will help them to do quickly and efficiently.