How to align the ceiling for painting

The technology of leveling walls for painting provides for consistent and correct execution of work. After all, this is the largest plane and the design of the entire room will depend on its appearance.
How to align the walls for painting and ceiling, we will tell you today. You will also get acquainted with the technology that will help you do everything efficiently and with your own hands.
The content of the article
Progress
Technology leveling walls for painting not complicated, it is important to buy high-quality material to do the work and do everything in a hurry. Below is an instruction on the rules to be followed. You can also get full information on the video in this article. The price of the work will be much cheaper if you do it yourself.
Mandatory tools for leveling the ceiling
Alignment of the ceiling for painting is done with the right tool:
- Several types of spatulas with different sizes.
- A vessel with a capacity of 15-20l.
- Electric drill with nozzle or construction mixer.
- Paint roller and paint brush.
- Sandpaper.
After that, it is advisable to decide on the leveling technology in order to know which primer needs to be acquired (see Types of construction primers and their scope).
Primers can be:
- For water based paints.
- For putty or plaster.
- Universal.
The work carried out on the ceilings is very labor intensive and requires great physical effort. Level ceilings using plastering (see Plaster leveling the ceiling - how to do it right) is possible and necessary in cases where the differences do not exceed 5 cm.
It is possible to apply this method on any surface, including wood and metal. Before starting the plastering work, preparatory work should be carried out on the ceiling.
Training
To begin with, the old plaster, whitewash or paint should be removed from the ceiling. This procedure should be done as qualitatively as possible, since the quality of all work will depend on this.

So:
- In order to remove old paint or plaster, you can use a sharp spatula or scraper. If the surface in dry form does not peel off, then it can be abundantly moistened with water and windows and doors can be opened so that a draft is felt.
- After that, the old coating may fall off on its own, but if this does not happen, you will have to work with your hands. In conclusion, the ceiling should be thoroughly washed with a sponge.
- Floor slabs must be cleaned of dust, dirt and grease stains. Particular attention should be paid to the presence of mold and fungus. If such formations are found, such places are treated with special solutions that are commercially available. If the fungus infects large areas, it should be burned out with open fire, using a blowtorch or gas burner. Old paint or plaster will have to be removed.
- The surface of the floor slabs is treated with a deep-penetrating primer, followed by treatment with a mixture Concrete Contact.
- For better adhesion to the surface of concrete slabs, they should be sandblasted or notched using any available method.
- In the presence of wooden ceilings, as well as elements of metal structures, the first to be mounted on the ceiling is a metal mesh with 10x10 mm cells. It is attached to the tree with the help of nails with a wide hat, and to the metal structure - with the help of metal brackets welded to metal elements.
Beacon Installation
High-quality plastering works are done on lighthouses. From how well the beacons will be installed (see Installation of beacons for plaster without problems), the evenness of the ceiling depends.

What do I need to do:
- First you need to decide on the lowest point of the ceiling. To do this, you will have to use the building level, beating off a horizontal line on the walls around the entire perimeter of the room.
- Then, using a tape measure, is the lowest point. This point will serve as the first lighthouse.
- With a step of 300 mm, throughout the ceiling, the remaining beacons are installed using a quick setting mortar or gypsum mixture.
- In this case, it is necessary to ensure that the height of the beacons does not exceed 50 mm. To control the evenness of installed beacons in a horizontal plane, you can use a long, even rail or a 2-meter rule.
Lighthouse plaster
After the lighthouses are installed, you can start plastering, but before that, you need to give time to strengthen the lighthouses.

Plastering work should be performed using the following technology:
- Mix cement, gypsum or lime based plaster (cm. How to make a mortar for plaster correctly) It is possible that it will be a complex solution made up of all of these components.
- The spray layer is applied first.. It does not even out so that the primer layer adheres well to it. In this case, the first layer must be given time to grasp it well, but it should not be overdried.
- After the spray layer has set, you can begin to apply the primer, which must be constantly aligned and make sure that it is just below the level of lighthouses. At the same time, it is necessary to ensure that various imperfections in the form of sagging or pits do not appear.
- Beacons are removed at this point., and their installation locations are sealed with the same solution.
- After this, you can check how even the primer is laid. To do this, take a flat rail or rule and apply to the ceiling in different directions. In case of detection of serious differences, they are eliminated using a solution. this must be done when the primer has not yet hardened.
- The final stage consists of applying a topcoat (finish) layerwhich is carefully leveled with a stucco grater.
Attention: If much smaller differences are found on the ceiling, then you can trim the ceiling using ready-made plaster mixes. This is due to the fact that with small differences it makes no sense to contact cement and other types of plaster mortars, and the use of dry mixes does not hit the finances much.
After finishing the plastering of the ceiling, you need to leave it so that all layers dry well and only then proceed with further work.
Milestone: ceiling putty
If ceilings made on the basis of concrete floors do not have significant differences, then for their leveling you can use one putty. Putty does not have the granularity that plaster mortars have, and therefore it is excellent for such work, and you can get a fairly smooth surface.
So:
- Putty is applied in a very thin layer, on a clean and durable surface. For greater reliability, before applying the putty, you must attach a paint net to the ceiling, using PVA glue for this. In order not to bother much, you can buy a self-adhesive sickle, but it is somewhat more expensive.
- For mixing use a construction bucket and, about a third, fill it with water. Then, dry putty is poured into the same container. First, mix it with a spatula or trowel, then carefully mix it with a construction mixer, until the consistency of thick sour cream.
Caution: The mixed mixture should be consumed very quickly, as it freezes. You should not immediately knead all 30 kg, because you may not have time to use it before it begins to set. This is only possible if several putty workers are working on large areas at once. If this is a small room with an area of about 20 square meters, then this can not be done.
The technology for applying putty is as follows:
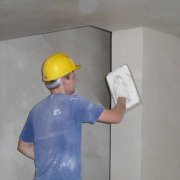
- A wide putty knife is taken in one hand, and in the other with a narrower and narrower putty, putty is loaded onto a wide putty knife, as evenly as possible, after which a wide putty knife with putty is leaned against the surface of the ceiling at an angle of 25-30 degrees and putty is applied with a wide movement along the arc to the ceiling. Each subsequent layer is applied overlapping the previous one.
- You should not spend time at this stage on the alignment of stains and small flows. This will need to be easily done before applying the finish coat, using a coarse grain grout for this.
- In conclusion, the last, finishing layer is applied, which is given the opportunity to dry well before grinding. For high-quality polishing of the finishing layer, you should use finer sandpaper, with grain, the size of 100-120 units. For reliability and quality of work performed, it is better to use materials from one, but well-known company.
Ceiling putty in steps
If the ceilings are planned to be putty with your own hands, then the work can be divided into the following stages:
| Preparatory work | They consist in cleaning the surface of debris, dirt or old plaster, and possibly old paint. You can find ceilings with wallpaper glued on them. All this is carefully stripped off, and the ceiling is washed. The concrete surface must be clean. |
| Primer Ceiling | As a rule, a universal deep penetration primer is also used for this. The primer can be applied with a roller (this is faster) or with a paint brush. It is possible that and that. |
| Starting putty | It is used as a draft layer, the thickness of which can reach up to 2 cm. With its help, the ceiling is leveled and all shells, depressions, cracks, etc. are closed. |
| Finishing putty | The most critical stage, involving the application of two layers of finishing putty, while the thickness of each layer should not exceed 1.5-2 mm. Each subsequent layer is applied only after the previous one dries. How much time is required is indicated on the package. Before you start working with putty, be sure to read the instructions for its use. |
So:
- After applying the last coat, it is necessary to allow time for the layers to dry well before grinding, before the decisive stage of the putty work. It all depends on the ambient temperature and relative humidity.
- Grinding can be done manually or using a grinding machine. It should be noted right away that working on the ceiling with extra weight is very difficult, so it’s better to sand the ceiling manually using a special grater.
- You need to be prepared for the fact that there will be a lot of dust, so it is recommended to use personal protective equipment, such as a respirator, construction glasses, gloves, a hat, etc.
- After that, it is advisable to clean the dust very carefully, especially one that may remain on the ceiling. It is best to use a vacuum cleaner.
- Immediately after complete cleaning, the ceilings are primed with a roller and a paint brush.
Ceiling Putty Technique
The application technique, in part, was mentioned in this article, but it always makes sense to repeat and dwell on the application technique in more detail.
- Many puttyers use wide spatulas to apply putty on the surface. It is very quick to work with them, but their application requires great physical effort, and especially when puttying ceilings. For putty, you can use a small spatula, especially if the ceiling area is small.
- When working on ceilings, it is very important that the solution has the desired density, otherwise it will be very difficult to work. Too thick a solution will require much more effort, and the quality of the layer will not be what you need, but a solution of insufficient density will be difficult to keep on a spatula.
- For convenience, you can take a wide spatula in your left hand and load it with putty, and then gradually remove the putty from a wide spatula as necessary. This will make it possible only from time to time to bend down to take the next batch of putty.
- In your right hand you should hold a working spatula, which will be putty on the ceiling. Using a working spatula, you need to take the required amount of putty and lean it against the ceiling at an angle of 25-30 degrees, and then with a sweeping movement along the arc, apply a layer of putty on the ceiling.
- In order for the putty layer to be the same, the tilt angle of the spatula, as it moves, is reduced. This allows you to evenly distribute the putty on the surface. It may not work out right away, but over time, when experience and mastery come, everything will work out by itself.
Caution: There should be no foreign particles in the finished mixture. It should be flexible and uniform. The dishes in which the mixture is mixed must be absolutely clean, as well as the working tool.
- If grains were found in it after preparation of the mixture, it means that the mixture was stored in violation of the technology, and it already began to set. Such a mixture can no longer be used, especially if a top coat is applied.
- As for the tool, it is better to purchase a high-quality tool and only from stainless material, which has a comfortable rubberized handle. This approach will facilitate the process of applying putty on the ceiling, albeit slightly.
Aligning the walls for painting is a completely feasible task, you just need to see a photo and study the recommendations. Then the coating will serve you for a long time.