Preparing walls for decorative plaster: how to do it yourself

Preparing the walls for decorative plastering is an important point, because the final result will depend on the quality of preparation of the base. Today we will tell you how to prepare the walls for decorative plaster and at the same time provide for everything. Also on the video in this article and photo you can see the individual moments of the work and this will help to carry out the work correctly.
The content of the article
Training Rules
Preparing the wall for plastering is done in a certain order. Everything is time-tested. It must be remembered that the application of plaster is the stage that completes the finishing work. After plastering, all windows and doors are put in place, and the flooring is completely laid (see Ceramic flooring - the right veneer).
Surface preparation is performed in the following sequence:
- First you need to finish the surface clean the old layer of putty and paints, remove the remnants of the previous wallpaper;
- Next, the surface of the wall is treated with a special primer mixture., which performs a restoring and strengthening function;
- If the room humidity is very high, then, along with the priming, it is necessary to additionally treat the walls with a means having an antifungal effect;
- If cracks are present on the walls, then they are embroidered and filled with a special composition for repair. Very large cracks are filled with a repair compound in several approaches;
- Only after completely priming the walls apply putty on them, which completes the stage of their alignment and is the basis for surface finishing with decorative plaster coating.
Attention: If in the future it is planned to apply a thick layer of plaster coating with a clearly formed structure, then the putty of the walls in this case is optional.
- If the decorative coating will be applied in a thin layer, then the preparation should include all stages without exception. Otherwise, it will not be possible to hide all the base errors under the decorative layer. This will also lead to an increase in the consumption of finishing material.
When all putty work is completed, you can begin grinding the surface of the walls (see How to grind walls after putty and how to do it right) using fine sandpaper for this.
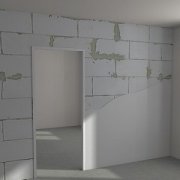
Primed wall surface
Preparation of walls for decorative plaster is done on a primer. It greatly enhances the adhesion of surfaces and ensures durability of the coating. Here, everything is done with your own hands and therefore the price of work will be reduced to the cost of the material.

Attention: This stage is very important, because a good primer mixture can save repairs for a long period of time. In this case, you can not be afraid that the plaster will crumble.
- The primer for performing plastering is an opaque liquid that does not have a characteristic odor; priming is the work of applying and distributing a primer over the surface of the treated area. Having dried, it becomes like a film, which provides a strengthening of the surface, and an improvement in the setting of the plaster.
- The primer penetrates deep into the wall, improving its adhesive properties and preventing metal corrosion.The waterproof film prevents the penetration of moisture, provides protection against bacteria, preventing the formation of mold and rot on a drywall surface. Under it, you can hide small spots and traces of drips. Applying a primer mixture in several layers enhances the properties of the composition.
- It is advisable to buy a mixture of high quality and deep penetration, this will reduce the cost of finishing materials. It is good if the brand of primer will match the brand of plaster mix. Each manufacturer produces its products in whole lines, where all components are perfectly matched to each other.
Which soil to choose
Preparing the walls for plastering the video will show you the entire progress of the work. But the soil must be chosen correctly. According to the structure of the coating. Today on the shelves of construction stores you can find a huge assortment of primers. In order to make the right choice, you need to know which primer is suitable for certain surfaces.
- The alkyd primer is perfectly applied to the untreated wood, leveling its structure, and creates a smooth surface for plastering. The advantages of this mixture include quick drying. You can use a polystyrene primer, it can be applied on plastered surfaces. But it should be noted that its composition includes substances that are harmful to health.
- For metal surfaces, a primer is used, which is specially made based on the type of metal. Usually it is a mixture with zinc additives. It is possible to use an alkyd primer mixture with zinc additives, which provides corrosion protection. The use of glyphthalin mixture is complicated by the fact that it has a long drying period.
- The use of perchlorovinyl primer is recommended for concrete and brick surfaces. It dries quickly, but has a pungent odor. Therefore, it is better to work with open windows.
- Acrylic and emulsion primers can be applied to any surface. They are practically odorless, and their drying period is 5 hours. Acrylic primer can even be applied to the old layer of plaster, due to its composition, it provides its strengthening. Also, the acrylic mixture is perfect for drywall surfaces.
Method of applying a primer mixture
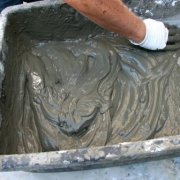
The technology for preparing walls for plastering includes high-quality application of soil. Having bought all the necessary materials, you can start priming the walls before plastering them. It is worth noting that primers are sold in three different conditions: dry, concentrated and diluted.
- Diluted mixtures can be used immediately. Before starting work, the diluted primer is thoroughly mixed so that all the sediment rises from the bottom and is distributed over the entire volume of the mixture.
- Dry and concentrated mixtures are first diluted according to the proportions recommended in the instructions.
- Before starting work on priming, you need to clean the surface of the walls. Stains from grease and oils should be removed, all dust and dirt should be wiped.
- In order to avoid getting the mixture on the painted areas, they need to be sealed with a special film or tape. The primer leaves glossy stains on the paint.
- On drywall surfaces, it is necessary to seal the joints with a special mesh. Work should only be done with gloves, because these mixtures have a detrimental effect on the skin and are not easily washed off.
Now consider the very method of priming.
Preparation for wall plastering with a primer includes the availability of a specific tool and the following equipment will be needed to complete the work: a brush for areas with difficult access, rollers on a long and short handle, a soil container and the primer mixture itself.
- First you need to apply the mixture to easily accessible sections of the wall with a roller on a long handle. Then use a smaller roller to evenly distribute the primer, moving it up, down and to both sides.
- Then you can go to hard-to-reach places, corners and joints. To do this, use a construction brush. After applying the primer, let it dry. Drying time is indicated in the instructions for the solution.
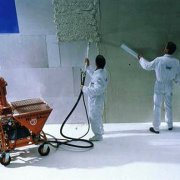
Attention: Preparing the walls for plastering the video will show the rules of work, but if the plane is large, then it is better to purchase a spray gun for work, this will significantly speed up the work and you can make a uniform coating.
You should not be limited to just one coat of primer. To enhance its properties, it is necessary to reapply the mixture. You need to carefully inspect the surface of the walls so as not to miss even a small area. As soon as the second layer of the primer mixture dries, the plastering of the walls can begin.
Useful Tips
When preparing walls for plastering, it is necessary to take into account a number of important points that affect the quality of the work performed:
- All putty coatings must be thoroughly dried. Drying time should not be less than 2 days;
- To prevent the formation of cracks, you can use a special self-adhesive mesh. In another way it is called "sickle";
- after the putty layer has dried, it is recommended that all surfaces of the walls be primed with an acrylic primer mixture, due to penetration deep into the wall, providing good interaction with the decorative coating;
- You can increase the strength of the primer and protect it from separation into layers using special impregnation. It should be noted that the selected putty mixture should have good absorbent properties. Oil and alabaster bases are not allowed.
When applying a primer mixture under decorative plastering, you should use the advice of specialists:
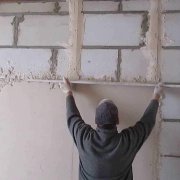
- An undercoat is applied to the wall surface with a thickness of approximately 2 centimeters, its smaller thickness will not allow to obtain a decorative coating of uniform composition and high quality;
- When wiping the primer layer, it is imperative to take measures to compact it;
- Having completed the priming work, it is necessary to moisten the treated surface periodically. This should go on for a week. Moisturize with a sponge moistened with water.
- After carrying out all the above procedures, decorative plaster can be applied to the treated surface.
Decorative coating testing
Having completed the preparatory work, it is necessary to apply a test layer of decorative plaster. This is necessary to check the readiness of the wall surface.
- To do this, choose a small section of the wall, located next to the corner of the room, and apply a layer of plaster. This will provide an opportunity to see what quality a decorative coating will be, its structure and color scheme.
Particular care must be taken to ensure that the transitions between smooth to textured surfaces of the coating are sufficiently smooth. - Also, if you use stamps, then immediately check and stamping, it should be of high quality.
You now know how to prepare a wall for plaster, and preparing walls for decorative plaster video and the above instructions will not allow you to make mistakes when conducting work.