Foam block finishing - work options

Finishing the foam block from the inside is one of the important points in the improvement of the entire room. Therefore, all work should be performed according to certain rules, otherwise you can ruin everything.
The interior decoration of the walls of the foam blocks is done in compliance with the technology and this allows you to create a microclimate in the room and make the living more comfortable. Our article will be devoted to this topic.
After all, this material is cellular and therefore the specificity of the finish lies in the following points.
The content of the article
What to consider
Wall decoration internal foam blocks are based on the structure of the material, it is cellular and porous. Therefore, all work is done on the basis of this feature.
So:
- First of all, it is creating a comfortable environment in the room. There should be fairly high vapor barrier values.
For example, brick and wood are perfect here, which will perfectly allow you to create a microclimate indoors and have a beneficial effect on the human body; - The second is that the material is cellular, which contributes to the accumulation of moisture and this should not be allowed. Therefore, it is necessary to correctly and efficiently carry out work on vapor impermeability and this should be taken into account. Otherwise, the material will wear out quickly.
Attention: Finishing can be carried out by almost any material, just its installation should be done correctly taking into account the properties of this material.
Finish options
Materials for wall decoration of foam blocks should have high vapor permeability and such materials on the sales market are enough.
PVC wall decoration
This is a wireframe finishing method that is effective enough to clad such a surface. In this option, you can provide any features of the finish.
This will solve several problems:
- You do not need to do the long and costly part of wall decoration. Irregularities will hardly interest you;
- Make high-quality surface insulation, and this is extremely important with this base surface;
- You can completely hide all communications;
- Make additional insulation;
- The ability to do all the work with your own hands and thereby reduce the total cost of expenses, this also attracts the consumer;
- The price of decoration is not so high. Here you can choose what will be affordable. The price range is quite large.
Finishing process
The frame system is suitable for many materials. Facing after installation can be performed by various types of panels.
Therefore, we will tell you how to install the frame correctly. And about the skin you can read on our website. There are detailed instructions for attaching various cladding materials.
There are some features when paneling that should be performed:
- For such a base plane, you will need to fix two layers of insulation.
The first should be placed immediately on the wall, it will be waterproofing. The second layer will be vapor barrier.
Attention: When installing the first layer of insulation, it should be noted that it can be applied before mounting the frame and after. This must be resolved immediately.
In the first option, it is more difficult to attach the film to the surface. When choosing the second option, you should not make a joint butt to a bar, you must do an overlap of at least five cm.
- If you are lining the entire plane, then work should begin from the ceiling and only after that go to the walls;
- When using a wooden beam for the frame, it should be brought to the place of work in advance and treated with antiseptics that are available on the market. This will significantly extend the life of the structure. After this, let the material dry completely;
- We determine the level of fastening. This will be the binding of the frame and it largely determines the correct geometric shape of the structure.
Therefore, you should treat the work with full responsibility; - For the ceiling, this is done as follows. First, we put a mark on the surface of the base plane according to which the fastening will be carried out;

Attention: When choosing the installation level, you should immediately take into account the height of the insulation, we are interested in its thickness. The fact is that after installing and fixing the panels, they should not deform the insulation.
Then it just loses its properties. Therefore, it is worth providing a gap of a couple cm.
- After this, this mark must be transferred to other surfaces. To do this, use the hydraulic level.
You need to buy it or make it yourself. With its help, this work can be performed most qualitatively. Transferable; - Now all marks need to be connected. This is done using nylon thread. Just hit the size.
Now we have a plane for placing panels; - We cut the slats to the desired size and fasten. Self-tapping screws are perfect for wood.
If the surface is concrete or brick, then you need to use a puncher and first make holes and then make a connection using dowels;
Caution: Do not use the wall plugs from the kits. They will not ensure the quality of the connection.
And the design has not a small weight. Therefore, it is worth purchasing separately plastic and screws to it, which should be taken a couple of mm less from the hole section. Such fastening will be reliable.
- Now on the diagonals of the plane is to attach a fishing line. It will allow you to make the frame in one plane.
We cut the beam and fasten the transverse elements. The distance between them should be no more than 50 cm.
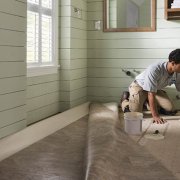
Mounting is performed as described above. Height adjustment is done by gaskets. We follow the correctness of the plane; - After installing the frame, apply a layer of waterproofing. To do this, we cut it to the desired size and fasten between the rails.
For this we use a construction stapler. We make a joint not overlap, but overlap; - After that, the installation of insulation is done .. About the fastening of any kind which you can read on the pages of our website. There is a detailed instruction;
- Now apply another layer of insulation. Mounting is done as described above;
Attention: After installing the frame, do not forget to make the wiring. To do this, correctly determine the connection point of the branch and make the connection only with the help of terminal blocks, which will ensure a high-quality connection.
The connection place should be freely accessible after installing the panels. This will be required in case of repair.
Wallpapering and wall painting
For these types of finishes, we will need to prepare a qualitatively basic plane. Otherwise, you cannot make this kind of separation.
After all, the coating structure itself does not allow this:
- First of all, we apply a primer layer to the surface. It will provide high-quality adhesion of surfaces. We do this with a brush or spray gun;
- Next, determine the roughness of the wall and designate the points of application of materials to the surface. That is, we find the thickness of the plaster layer.
We do this as in the previous case. Only after drawing the lines must be installed beacons on the plane. They will help to navigate the height of the plaster; - After that we make a batch. To do this, you can use both a dry mixture and a solution of cement.
It all depends on your desire. The main thing in the manufacture do not allow lumps and not uniformity of material.Otherwise, the work will be difficult.
Preparation of solution from dry mix
This option is most often used in our time. Only it is perfect for a small plane.
If the scope of work is large, then it is better to use cement mortar, it will turn out cheaper:
- To begin with, you should pass the powder through a sieve and sift out all the garbage and knead the lumps;
- Pour the powder into a container for kneading. To do this, it is best to use containers without stiffeners along the edges and bottom. Then it will be better to achieve mass uniformity;
- Add water and mix at the same time;
- After that, we need to make the composition as homogeneous as possible. To do this, use a drill with a nozzle;
- Apply the solution to the plane with a spatula. For this, it is worth using a wide one, then the solution will be applied more evenly;
- We wait until the material dries and apply the next layer;
- We are waiting for complete drying, then we make a kneading of the finishing finish as described above. It is applied last and applied no more than five mm;
Attention; When the topcoat is applied and errors and sinks are obtained, you should never try to fix them right away.
Let the material dry slightly and then wet the spatula in water and iron the plane. Then it will not stretch and you can achieve quality.
- We are waiting for complete drying and overwrite with a construction grid. If there are sinks, then putty should still be applied to these places. So the plane is fully aligned.
Cement mortar
Here we use a mixture of sand and cement. Apply a 1/3 proportion for the M300.
We prepare the mixture as follows:

- For this type of solution, it is better to use mountain sand, not river sand. Pour it into a container and then mix. We make the composition homogeneous;
- Add water and mix;
- After that, make the mass homogeneous with a drill with a nozzle;
Caution: Before applying the solution, the wall must be dampened. Then the solidification of the solution will take place evenly and you will avoid cracking the surface.
If you use river sand, then the solution will sit quickly, to avoid this, add a pinch of any washing powder to the composition.
- We take the solution with a spatula and apply to the surface. And wait until it dries a little;
- If you have a production room, then it is best to apply the solution with a compressor. Then it will take much less time;
- After that, take a grater and wet it in water and overwrite the plane.
If there are sinks and irregularities, then add the solution with a spatula. So we achieve a completely flat surface.
After plastering can be done wallpaper decoration or tiled.
Most importantly, the plane is prepared with high quality. You can apply a coat of paint.
The most important thing when finishing a surface like this is to remember that this material consumes a lot of water. The solution will dry quickly.
After plastering, do not forget to apply a primer coat. On this subject, you can watch photos and videos and see everything with your own eyes.