The walls get wet: what could be the reason

How to dry a wet wall? Brick or reinforced concrete panels are popular materials for the construction of various objects: garages, houses, office buildings. But sometimes homeowners begin to notice that in one of the rooms the wall becomes wet. Black mold appears on its surface, wallpaper begins to peel off, the stucco dampens. How to get rid of such troubles will tell the article.
The content of the article
What causes dampness and measures to combat it
Before fighting the appearance of moisture in a house or apartment, it is necessary to determine its source.
The table shows the options due to which the walls in the house are wet, signs and methods of dealing with such troubles:
| Signs of dampness | Reasons for the appearance | Wet walls what to do |
| When freezing the outer wall of an apartment or house | ||
| Indoors in the cold season is always damp and cold | In severe frosts, in the wall the dew point approaches the room, and if there is not enough heating, the wall will sweat. In this case, you need to move the dew point closer to the street |
|
| With insufficient waterproofing of the building | ||
| In wet weather, in the fall or during spring snowmelt, very large wet spots appear. In a well-heated room and freezing temperatures, wet spots will slowly dry out. | Typically, such troubles are typical for the first floors of a house:
This results from poor waterproofing in these places.
| It is necessary:
|
| Poor air ventilation throughout the room or in some areas | ||
| A common ventilation problem leads to heavy fogging of the windows. With local ventilation - wet: the corners of the walls, places in the house behind the curtains, or behind some objects that prevent air recirculation in this place near the wall, and the remaining areas remain dry | Inadequate ventilation contributes to the accumulation of moisture on the walls in any case. There is always room moisture, even in dry air |
|
| If the house is after repair | ||
| Very foggy windows in the house | When performing major repairs, using plaster, putty or other materials that contain water, the walls begin to absorb this moisture into themselves, which cannot be avoided.After the repair, when everything is dry, the moisture in the wall remains for some time, and poor ventilation of the room during the repair will allow moisture to accumulate in the air in large quantities. |
During repairs, the room should be ventilated more often, and in winter or in cold weather, it should be well heated. In this case, the walls will dry quickly. |
Tip: In any case, if there is moisture, you should immediately solve the problem, the sooner it is eliminated, the easier and faster it will be possible to remove its consequences.
Features of thermal insulation of your home

To rid yourself of the question of why the walls get wet in winter, you need to provide the house with good thermal insulation.
Tip: When choosing heat-insulating materials, special attention should be paid to their characteristics, which are indicated by the manufacturer.
The greatest effect for a private house is the insulation of the walls from the outside. Insulating the walls outside in an apartment building is often not possible, therefore, the internal processing of the walls is performed. The correct execution of work from materials of good quality, after such processing will give the desired result.
Wherein:
- Particular attention should be paid to the coefficient of water absorption, which determines the ability of the material used for thermal insulation to absorb moisture: with a decrease in this indicator, its water-repellent properties improve, which is very important when the walls are wet outside the house.
- Material layer thicknessused for insulation is selected depending on its density and thermal conductivity.
- The smallest space is taken by the insulation (see Let's consider in detail which insulation is better for walls)having a small coefficient of thermal conductivity.
- Combustible material. The safest insulation is with a class G1 - it does not burn without open flame.
Before insulating a wet wall, a thermal insulation material is selected.
It can be:
- The most popular insulation is mineral wool. But when the wall gets wet, you need to get rid of this problem first, warming the wall with mineral wool, in this case, will not be the best choice. Such material has a too high coefficient of water absorption.
- If the facade is wet, it is better to use polystyrene for a brick wall. It is used for interior and exterior decoration. Moisture absorption is small, but the vapor permeability of the material is low and it does not contribute to the free circulation of air. When burned, it releases toxic substances into the atmosphere.
- «Warm plaster»You can do your own insulation of walls inside and outside the house. It is an excellent soundproofing material that does not absorb moisture and has a low coefficient of thermal conductivity.

The disadvantage of insulation is the large mass, because of its weight, the layer of such plaster should not exceed 5 centimeters, and for a private house a reinforced foundation is required.
- For internal work, cork insulation is used. Its advantages:
- very low coefficient of thermal conductivity, less than that of "warm plaster";
- light weight;
- convenient to use.
Disadvantage: highly susceptible to burning.
How to insulate a house outside

The photo shows a diagram of the insulation of brick walls outside the house, which for a private building gives the best result.
Tip: When carrying out these works, foam or “warm” plaster should be used.
Work Instructions:
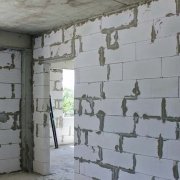
- The brick wall is cleaned of debris, dirt and dust.
- A layer of leveling plaster is applied (see How is masonry plastering done?).
- The surface is primed.
- Foam sheets are prepared, which can be glued, or fixed to the wall with dowels.
- When using glue, each sheet is carefully processed by the composition, attached to the wall and well pressed. The sheets are stacked from below in a checkerboard pattern, moving the rows stacked above, relative to the previous ones. This arrangement of foam reinforces the strength of the structure.
- When fixing the material with dowels, glue is applied to the foam pointwise, preferably around the perimeter and in the center. The sheet is slightly glued to the wall, holes are drilled into it, into which fasteners are inserted.
- After laying all the sheets in any way, the structure is fixed with a reinforcing mesh and plastered.
- Decorative finishes are done by painting or applying decorative plaster.
A simpler option for external wall insulation is the application of “warm” plaster.
In this case:
- The treated surface is cleaned.
- Grounded.
- Plaster grid is attached.
- Thermal insulation material is laid.
- The plaster is left to dry.
- The wall is decorated. To do this, you can apply:
- tile;
- decorative brick;
- paint.
How to insulate walls indoors
This method is preferable for residents of apartment buildings when wet walls appear in the room.
For thermal insulation are taken:
- Bung.
- Mineral wool.
- Styrofoam.
- “Warm” plaster.
When choosing a material are taken into account:
- Wall dimensions.
- Financial opportunities for apartment owners.
- Safety. The use of polystyrene for insulation of the internal surfaces of walls is not recommended, because of its increased fire hazard.
Stages of wall insulation from the inside:
- Wallpaper is removed, the walls are cleaned of dirt.
- Surfaces are impregnated with a primer.
- The frame is mounted from wooden or metal battens with a step of elements of 40-60 centimeters.
- Stacked the selected material. In this case, the sheets should be most suitable for the opening of the frame, if necessary, they are trimmed.
- The resulting design is sheathed with drywall.
- The surface is plastered.
- Wall decoration is in progress:
- glued wallpaper;
- paint is applied.
How to make waterproof plaster
Wetting the walls of the building can be prevented with special drying plasters. This is a fairly simple and cheap method, significantly increasing the waterproofing of the walls. Drying plasters can be used for interior and exterior decoration.
The materials for it, most often, are silicates with a microporous structure, which does not allow salts to penetrate into the plaster, but crystallizes them in the depths of the wall. Because of this, moisture can not rise above the level of the wall, however, without blocking its natural evaporation.
When performing the process:
- Drying plaster can be applied to old plaster, brick, existing mortar. Material is used at any stage when decorating the wall:
- at the first plastering;
- when aligning the walls;
- for waterproofing.
- The wet layer of the existing plaster and an additional approximately 50 centimeters of dry base are removed. For plastering, the surface must be smooth, free from cracks and chips, delamination must not be allowed.
A clean, slightly roughened base is ideal.
- Before application, the wall is wetted with water, then primed.
- Special plaster is laid, as usual, with a layer 2 to 4 centimeters thick.
Tip: Drying plaster should be used with vapor-permeable decorative finishing materials, such as: paper wallpaper, silicate fabrics. In the treated room, it is necessary to provide good ventilation.
How and how to putty on a wet wall, how to protect the home from moisture, all the ways to do the work are shown in the video in this article.