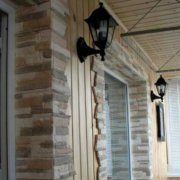
Plastering door slopes and corners

Plastering door slopes is quite important. After all, this is not a simple flat plane, there is also an angle, and it can be different.
Today we will consider how to plaster the slopes of the doors and, accordingly, the adjacent corners. You can watch certain moments of the work on the video in this article and the photo. After that, you can do everything with your own hands.
The content of the article
Pros and cons of plastering slopes
For the decoration of slopes there is a wide selection of materials. This is drywall wood panels and plastic. However, simple plastering is still in demand.
| Benefits | disadvantages |
| Low thermal insulation. Condensation and mold are not ruled out. Gradually, the solution can separate from the frames, which leads to the appearance of cracks. Work takes a long time compared to other types of finishes. There is a lot of litter and dirt during the work. However, the disadvantages can be significantly reduced if the plastering work is performed qualitatively, in compliance with all the rules. |
Choosing the right tool is important.
First of all, it is decided how to plaster the slopes of the front door. After all, starting any business, you must first take care of the tool (seeWall plastering tool: what you need to work) His choice always depends on the materials used.

When plastering slopes, we need:
- Level preferably with two ampoules
- Aluminum rule
- Goniometer
- Yardstick
- Marking pencil
- 5 cm spatula
- Mason Trowel
- Pickaxe Hammer
- Vessel for working solution preparation
- Container under water
In choosing a tool, you will need to consider the following:
- It is not easy to work with a short level, and a long one simply will not enter between the cornice and the jumper. The best option would be a meter level. For secondary work, you will still need a special sealant gun and a construction knife. And for sealing joints and cracks - a cylinder with mounting foam.
- When using cement mortar, additionally prepare grater and grater. And for working with gypsum - a grater with a sponge base, a spatula 45 cm wide and a smoothing polisher for polishing large and small sizes.
Choose work shoes and clothes according to size, it should be comfortable and not hamper movement. You can use medical gloves to protect your hands.
Caution: Do not forget about the safety of work. Remember that a stepladder or stool is not suitable for these purposes. Do not be lazy and make a small construction goat.
The order of work
Plastering the slopes of the doors is done in a certain order. This work is time-tested and should be done in this sequence. The instruction looks in the following order.
Surface preparation
Before proceeding with plastering, it is necessary to carry out preparatory work, the quality and service life of the finish will depend on this. After all, the door slopes of the plaster are exposed to vibration when the door is closed, so the strength indicator is quite important.
It is advisable to insert the box before plastering. This will strengthen the structure in the future and eliminate the need to fill the gaps between it and the slopes.

Caution: It is important to protect it from damage and contamination with the solution. You can cover with unnecessary scraps of drywall or thick paper.
- When installing, be sure to check the horizontal, we do this level;
- We check verticality using a plumb line;
- Adjustment is made with wooden wedges.

- Now you need to evaluate the surfaces: the roughness of the walls and the verticality of the slopes. If a large amount of mortar is required to level the walls, it is advisable to use a mesh with a mesh size of 10x10 mm. Mesh nailed to the wall with carnations. Also note that this process will require more time and solution. If there is no need for additional alignment, then simply do the following in sequence:
- For strong adhesion of the solution to the surface, it must be treated from dust, dirt, old paint (seeHow to remove paint from the walls: the secrets of the masters) and plasters.
- Tighten the door block with tape using masking tape. Take care of protecting accessories and heating batteries. They can also be wrapped with paper.
- For high-quality application of plaster, the surface must be coated with a primer (seePrimer walls and all for that matter) Its type is selected based on the material of the window opening.
- The remaining foam after installing the unit must be cut off with a knife and carry out vapor barrier. For this, the foam is coated with a cold-resistant silicone sealant or vapor barrier film.

Caution: It is important to apply the sealant to a dry surface, immediately removing excess. If this is not done, later the foam will lose its thermal insulation properties and, as a result, fogging of the windows and the appearance of drafts.
A few tips about Malka
The device for creating the same angle when plastering the slopes was called small. In fact, this is a block with a hole, usually made of thick plywood, where a thin rail is inserted in assembled form - the second part of the device.

- One part (a block with a hole) moves along the slope, and the second along a given beacon.
- To prevent chips from plywood during work, you can slightly round off with a file. Thanks to this device you will get absolutely even slopes.
Professionals use aluminum fritters in their work. Without it, it is difficult to achieve the same slope angle.
What you need to know
When choosing a solution, consider the humidity of the room. At elevated, it is better to use a cement mortar, you need to work with it at positive temperatures (+5 ° C will be enough). Work with gypsum or lime-gypsum at t +10 ° С.
Place the solution, following the instructions, in sufficient volume. It can be calculated based on the area of the surface to be treated and the thickness of the applied layer.
So:
- First, set the angle of slope.
- We set the rule and mark the level with a pencil.
- Press the template with force to the window strip and slowly smooth the working mixture from the slope until a smooth surface and a neat angle are obtained.
- Gently remove the rule by moving it around the corner.
- Examine the surface thoroughly. If there are flaws, knead another portion of the solution and repeat the operation.
- After some time, take the iron and remove the unnecessary. Then the rule is perpendicular alignment.
- Grater remove small roughness. If the plaster is gypsum, soak it with a foam sponge. Overwrite in a circular motion slightly pressing the grater. After a few minutes, smooth the plaster with a wide-blade spatula.
- If you plan to trim the slopes, then minor defects are not removed.
Tips for plastic windows
We plaster the slopes of the front door and at the same time do not forget that slots and cavities should not remain. Indeed, between the wall and the inserted structure there are gaps of various sizes. In older houses, they exceed 5 cm. In this case, the slopes before plastering are insulated.

- These gaps are filled with heat-insulating material, which is moistened with gypsum mortar and rammed along its entire length. You need to leave room for the grout. If measurements and installation are carried out correctly, then there are practically no gaps. In this case, you can blow them out with foam.
- Windows made of plastic, and in particular PVC profile, tend to expand under the influence of sunlight. Therefore, as soon as plastering the slope, take a spatula and make a recess between the frame and the slope up to 5 mm wide, then fill it with silicone-based sealant. This will prevent the appearance of cracks in the junction of the slope and the window.
By plastering the surface of the slopes qualitatively, you will not only save heat in the room, but also improve the appearance.
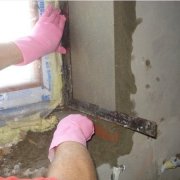
Finishing interior and exterior corners
Plaster door slopes often need to be done along with the corner. After all, these two planes are combined. The corner can be external and internal. Their decoration is different and let's look at each of them.
Interior Corner Finishing
It can be performed in two ways:
- If the second part of the slope is plastered.
- When two adjacent untreated surfaces are plastered
But the procedure is the same in both cases.

- A primer is applied from the corner to the wall and then grouted by the rule. Next, we make out the corner and its surface by scraping the mason's grater with nails.
- We do it this way: we put the edge of the grater to the mating surface at an angle of 30-40 ° C and bringing it to the corner, we alternately move up and down. With the flat side, we lay the tool on a recently wiped surface, and press the edge to the mating one.
- Firmly pressing, with straightforward movements, we release it from the adhering solution. After the primer has hardened with a lacquer, we smooth the surface clean.
- Next, with a grater of wood or polystyrene, with a thin second layer, we equate the recesses and tubercles.
- Finishing out the corner, the grater is taken so that its lower edge is on the seized side, and the corner touches the freshly processed one.
In the second option, the work is performed according to the same algorithm.
Exterior corners
It still has differences from the inside, but accurate angles can also be obtained using two methods.

| The first | An angle is formed with the help of a professional angle. The quality of the angle obtained will depend on the reliability of fixing such an angle and the accuracy of its installation. Mounting is carried out using gypsum-based putty or mortar. |
| Second | The corner is formed in stages. Initially, one side is plastered and only after the final drying the other is processed. |
So:
- Metal corners can easily be made to the desired size. The side parts are cut with special scissors for metal, and the center with a saw. The fixed rail can be used as a beacon when leveling the applied primer. After setting the mixture, it is cut with a steel spatula.
- The coating is applied in the usual way, and its thickness will depend on the angular profile.
In conclusion, the angle is ground with a fine-grained sandpaper.
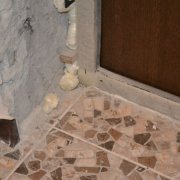
What is the difference when finishing door slopes and errors
The external corners of the door slopes are glued with a special plate, which prevents them from chipping. Then grout them.
- So that cracks do not form at the junction of the door box with the wall, they are filled with acrylic or similar sealant that can be painted. A groove is made at the junction. It is filled with a primer when using a masking tape and a gun. Then the rubber spatula is leveled. When finished, remove the tape.
- Some begin to plaster work without evaluating the state of the surface and the type of material. As a result, due to incompatibility of materials, we will get cracks or complete destruction of the plaster layer. As a result, there is a need for repair.
- When the coating is applied, skipping the primer process. After complete drying, the outlines of the bricks will be visible.
- When applying a gypsum coating to an unprepared concrete surface. In the same way, due to the incompatibility of these materials, we obtain the destruction of the plaster. In such cases, it is suggested to use a special coating with polymeric substances or ready-made gypsum-based putty, with additives already included in its composition.
- Long break after plastering part of the surface. That's right when the stucco adheres the entire area equally.
- Plastering concrete whose moisture content exceeds 4%.
- An important tip for better plastering angle on slopes. Joints of doors and windows with plaster should be formed with expansion joints. Failure to do so will result in cracking.
- If the external corner is often touched, an aluminum or steel profile must be installed on it. Otherwise, as a result of operation, it is likely to be damaged.
- The use of a grinder when cutting profiles of galvanized metal. In this case, the zinc layer is destroyed, which leads to corrosion and the appearance of rust spots on the facing surface. Therefore, it is recommended to cut the profile only with scissors or a hacksaw for metal.
Now you know the details of how to plaster the slopes of the front door. If you do everything yourself, the price will not be significant, and even this will guarantee the quality of the work.