How to make a wall from drywall: from purchase to painting

Today we have to figure out how to make a wall out of drywall. We will analyze all the main stages of work that arise at different stages of the problem and their solutions. Let's start, however, with another: let's think about how correct our choice of building material is.
The content of the article
Drywall Assessment
Does GCR have any convincing advantages over alternative solutions - walls made of aerated concrete blocks or bricks?
pros
- High installation speed due to the solid size of the drywall sheet (120 cm by 2.5-3 meters). Assembling a simple partition from GKL takes a part-time working day with a little experienced builder;
- Minimum load on the floor;
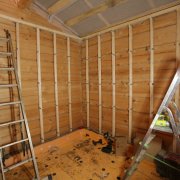
- The ability to assemble a partition in a wooden house (as an option - in a house with wooden floors);

- The ability to use the space inside the wall for the installation of engineering systems (water supply, wiring, local area network, ventilation, sewage, etc.).
Minuses
GKL, in fact, has only one serious drawback. A massive cabinet cannot be hung in a random place on a drywall partition.
If light shelves can be secured with Molly anchors (seeDecorative shelves on the wall: their options and production), for serious loads it is necessary to provide for wooden mortgages in the future place of installation of hinged furniture even at the stage of wall erection.

If this lack of material does not scare you away, we will continue.
Frame
The construction of the wall begins with frame assembly.
Materials
The frame can be assembled from a bar with a cross section of not less than 40x40 mm or from galvanized profiles produced specifically for this purpose. The author strongly advises you to opt for the second option.
There are several reasons:
- Profiles always have flawless geometry. You will have to sort the bar for the rejection of wood with “propellers”, humps, a cross-layer, rot and other defects;

- The profile does not warp with changes in temperature and humidity. A tree is easy;
To clarify: the problem of warping of wood is solved by its impregnation with any hydrophobizing material (for example, drying oil). However, the cost of impregnation will deprive the bar of its only advantage - lower in comparison with the cost profile. In addition, drying the impregnation will take several days.
- Profile is not afraid of rot and woodworms. Wood - is afraid and may well become worthless after 5-7 years.
Which profiles we will need:
| Picture | Profile view |
 Galvanized Guide Profile | Guide. It is attached to the floor, ceiling and walls adjacent to the future partition. The total length of the guide profile should be equal to or slightly greater than the perimeter of the future partition. |
 Rack Profile | Rack. It forms the actual frame to which the drywall will be attached. The length of the profiles (standard - 3 or 4 meters) should be at least equal to the height of the room, and the number of racks in the absence of special requirements for wall stiffness is calculated for a step between them of 600 millimeters. |
Please note: Rack and guide profiles can be 50, 75 and 100 mm wide.The width of the frame is selected depending on the requirements for its strength, sound insulation and cross-section of communications, which will be hidden hidden in the wall.
In addition to profiles, you will have to buy:
- Dowel nails. They attach the rails to adjacent structures. Size - 60x6 mm for concrete and 80x8 for brick or thick plaster;

Captain Evidence suggests: in a wooden house, instead of dowel nails, phosphated or galvanized self-tapping screws with a length of 50 mm or more are used.
- Self-tapping screws for metal. Length - 9 millimeters. Their racks will be connected to the rails.
Installation
Here is a step-by-step instruction for assembling the frame of the future wall:
- Mark the guides. The lines on the floor and ceiling should be located exactly one above the other. In order not to make a mistake with their location, use a plumb line;
- Fasten the guides. Fasteners should have a pitch of no more than half a meter;

- Mark the position of the racks. Recall that they are set in increments of exactly 600 mm. The step between the rack profiles is measured not between their edges, but between the axes of the racks;

- Cut the profiles in place, put them on the marks and fasten with metal screws to the guides on both sides. The frame is ready.
Attention: for cutting galvanizing use only scissors for metal. Abrasive cutting leads to strong heating of the metal. As a result, the zinc coating burns out at the edges, and the steel begins to rust at high humidity.

Problems and Solutions
How to make a drywall wall as rigid as possible with respect to horizontal load without increasing thickness?
Here are some possible solutions:
- Reduce the pitch between the uprights. It can be equal to 400 or 300 millimeters. The main thing is that the width of the drywall sheet (1200 mm) remains a multiple of this step: only then all the edges of the adjacent sheets will fall in the middle of the racks;
- Connect the rack profiles in two. They can be embedded in each other or installed side by side in the form of an H-shaped rack;

- Insert a 50x50 mm block in each rack. In this case, the racks are attached to the guide screws on a tree with a length of 25-45 mm.
How to make drywall walls soundproof?
At the stage of mounting the frame for this it is enough to lay between the rails and the structures to which they are attached, damper tape. It eliminates the transmission of sound from the partition to the ceiling and adjacent walls.

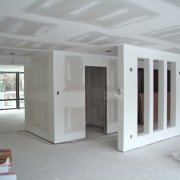
Sheathing
How to make drywall walls on a finished frame yourself?
Materials
First, about what materials will be needed at the stage of sheathing the frame:
| Picture | Description |
 Varieties of wall drywall | Wall drywall (thickness - 12.5 mm). It can be ordinary (white), moisture resistant (blue-green) and fire resistant (red). The first type of GCR is designed for dry rooms; the second is used for assembling walls in bathrooms and bathrooms (see Plasterboard bathroom decoration: work procedure) and kitchens; the third is recommended for wooden houses. The total GCR area should be approximately 20% greater than the doubled area of the future wall with a single-layer sheathing and the quadruple wall area with a two-layer. |
 GKL self-tapping screws differ from wood fasteners in a smaller thread pitch | GCR screws (black, phosphated). With single-layer casing, their length should be equal to 25 millimeters. The second layer of drywall is fixed with 40 mm screws. |
Installation
Each sheet is installed vertically and attached to profiles overlapped by it (all, including guides) in increments of no more than 20 centimeters. Tool - mains or cordless screwdriver.
If you want to learn more about how to make a wall from drywall - the video in this article will help in this.
Additional sheets are cut in place with a conventional knife:
- GCR is cut along a long ruler about a quarter of the thickness;
- Then the sheet is laid notched on the edge of the elevation (table, stack of drywall, etc.) and breaks off;

- Lastly, a knife cuts off kraft paper (sheet sheath) from the back.
Hint: if you need to cut a curved part, you will have to use a jigsaw with a wood file or a narrow hacksaw. When cutting in straight lines they are not used, because in the process of cutting with a saw, gypsum is very dusty.
Drywall fasteners have several subtleties:
- A self-tapping screw can not be screwed closer than 2 centimeters from the edge of the sheet, otherwise it will most likely crumble;

- The hat should be approximately 1 mm deep. Fasteners will be putty during pre-finishing;
- Edges of adjacent sheets should always be fixed to a common profile. An exception can be made only for connection with additional sheets under the ceiling, not experiencing deforming loads during operation;
- In order not to miss the rack hidden by the sheet, screw one self-tapping screw in its upper part (focusing on the mark made during installation of the rack) and hang a plumb bob on it. The rest of the fastener is aligned with the plumb line;
- If the frame is sheathed with drywall in two layers, the second layer is mounted with the offset of all the seams.

Problems and Solutions
How can the soundproofing qualities of the wall be improved at this stage of the work (see Soundproofing Drywall Wall)?
Having sewn the frame on one side, fill it with mineral wool. Use glued boards: their standard size (600x1000 mm) allows you to install insulation between the pillars of the frame without undercutting in width.
If maximum sound insulation is important to you (for example, in the case of building a wall between the bedroom and the living room), the design of the partition should be somewhat non-standard:
- Two independent frameworks are being constructed with a small distance between them;
- Frames are filled with mineral wool;
- The double frame is sheathed with drywall.
")
Why is such a complex design needed? The fact is that the double frame acoustically decouples the two sides of the casing between themselves: the vibration of the drywall sheet on one side is no longer transmitted to the other side.
Putty
The wall is ready in draft. However, open fasteners and seams between the sheets make it absolutely unsuitable for finishing: they will be noticeable under paint or wallpaper. Therefore, the next stage of construction is puttying.
Materials
We will need:
| Picture | Description |
 Exceptionally high quality putty made in Turkey | Gypsum putty. It can be finish or universal. The author was most favorably impressed by the Turkish finishing putty ABS Saten: for a long time (up to an hour) it does not set after mixing and does not give lumps when kneading. |
 Self-adhesive Serpyanka | Serpyanka. This is the name of the reinforcing fiberglass mesh for seams. The fact is that due to fluctuations in humidity and temperature, the joints between the sheets often give cracks; reinforcement completely solves this problem. |
Technology
First of all, you need to sew the seams between the sheets, which were cut in place. If the factory edges are semicircular, then the additional sheets are with rectangular edges, which complicates the sealing of joints. Stitching is the removal from the edges of the chamfer by half - two-thirds of the thickness of the gypsum board.

The next step is the filling putty (seeHow to breed putty with self-repair)The size of a single serving should not be more than 2-3 kilograms, otherwise you may not work out putty before setting it. Gypsum is poured into a container of water (liter per 1.6 kg of dry mixture) and after a five-minute pause for swelling it is mixed with a spatula or mixer.

Filling is performed as follows:
- Serpyanka glued along the seam;
- The seam is filled as tightly as possible with putty directly through the fiberglass mesh;
- After drying the first layer, the seam is repacked with the sliding movements of a wide spatula. The second layer should hide the reinforcement;

- Self-tapping screws are also putty at least twice with a pause to dry: the putty gives a slight shrinkage, and after the first layer dries, the pits are visible at the place of fasteners.
Do I need to putty the entire surface of the GCR?
This is necessary in two cases:
- If you are going to glue wallpaper on the wall, which will be removed in the future. When taking wallpapers, it is easy to tear kraft paper from plaster. Putty creates a separation layer that solves this problem;
- If after puttying the joints they remain noticeable due to the thickness of the reinforcing material. Putty will level the surface.
How to putty on the entire area of the sheet? This is done with a wide spatula. Putty is evenly applied to it with a narrower tool and applied to the wall in two consecutive layers “on the seam”.

After puttying you will have three more stages of finishing treatment:
- Grinding. Putty is ground after drying with a hand grater or grinder (seeHow to grind walls after putty and how to do it right) The author uses for this purpose a vibration grinder with grids No. 80 in the first pass and No. 120 in the second;
Tip: Grind the wall in bright oblique light. It will allow you to see the slightest bumps.
- Removing dust remaining after grinding. This can be done with a vacuum cleaner (preferably an industrial one, its filters retain fine gypsum dust better) or with a whisk;
- Padding. Penetrating soil will glue the remaining dust and improve adhesion to the drywall finish - paint or wallpaper.

Complex walls
We figured out how to make a wall of drywall with our own hands in the simplest case - when it is a blank partition. However, in reality, its design can be noticeably more complicated. Let's look at a few typical situations that you may encounter during construction.
Radius baffle
How to make a semicircular wall from drywall, if you want to give the room a non-standard shape:
- Notch the guides and secure each segment with a dowel-nail;
- Install racks with a minimum step (no more than 40 cm);

- Before installation, cut a sheet of drywall on the outside of the bend in increments of 5-10 cm (depending on the radius of the bend). When fastening, the sheet will break through the incisions. In the future, putty will hide all the damage.

Hint: as an option, you can sheathe the frame with two layers of flexible arch GKL 6.5 mm thick.
Door
How to install a door in a partition?
The assembled door unit is mounted during the assembly of the frame:
- In its lower guide, when it is fastened, a gap is left over the entire width of the opening;
- After mounting one of the racks adjacent to the opening, the door block is installed next to it, after which the rack profile is attracted to the box with self-tapping screws;
- On the opposite side, a second rack is attached to the box and rails;
- The racks are connected by a jumper over the door block.

Tip: the racks adjacent to the opening should be strengthened - made double or provided with wooden mortgages.
Arch
How to make a drywall arch on a wall with an opening?
- The arch of the arch bends from a flexible arched profile. Instead, you can use the notched guide profile UW;

- To file the arch, you can use arched gypsum plasterboard, or bend the wall drywall using segmented incisions. In the latter case, putty will give a perfectly round shape to the arch.
Sockets, switches
How to make a wall outlet from drywall with electrical wiring in it?
Simply simple: the hole for the switch or socket is drilled with a crown with a diameter of 68 mm, after which a plastic socket for drywall is installed in it. Further installation of the equipment is quite common.


Conclusion
We hope that we were able to satisfy the curiosity of a respected reader. Good luck!