Putty for drywall: selection, preparation, application

How to putty GKL? How to cook putty from a dry mix? What tool, and by what technology, is the ready-made putty for drywall applied? Today, together with the reader, we will try to find answers to these and some other questions.
The content of the article
What are we filling
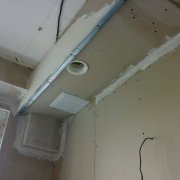
At leveling the walls with drywall and the installation of lightweight internal partitions, putty plays the role of a pre-finish finish: it precedes the painting or sticker of the wallpaper.
Mandatory putty are subject to:
| Picture | Description |
 Seams between adjacent sheets of drywall | Assembly seams between sheets of gypsum plasterboard and adjoining to capital structures (seePutty of drywall joints - how to do it). |
 GKL is fastened with self-tapping screws, the caps of which remain in sight | Hats fasteners (screws for GKL). |
In addition, the entire area of drywall sheets is often putty. Why is this needed?
- Putty creates a separation layer between kraft paper (GKL shell) and wallpaper. This layer allows you to remove old wallpaper, if necessary, without damaging the wall cladding;

- If the factory edges of PLUK (rounded, with thinning to the edge) allow you to hide the reinforcement of the seam flush with the surface of the sheet, then the seams between the additional sheets after reinforcement and putty will be highlighted with a thickness.
- It is worth covering the plane of the wall with a putty about a millimeter thick - and the surface becomes perfectly smooth.
Please note: putty can be used not only for pre-finishing, but also for repairing walls and ceilings.

Choice of putty
Technically, all putties on the modern market are compatible with drywall - cement, adhesive, latex, epoxy, etc. Both the gypsum core and the cardboard sheath have excellent adhesive properties.
However, in practice, only two varieties of this finishing material are massively applied:
- Gypsum putty (finish or universal) It is used for sealing joints and fasteners, as well as for leveling the surface of the finish flush with the seams. Its advantages are its low price and ease of grinding: gypsum is a rather soft material with a low resistance to abrasive wear; Gypsum putties are sold as dry mixes and mixed immediately before use. The life of the solution after mixing does not exceed an hour.

- Acrylic Putty Initially ready for use, and can be stored in sealed containers for several years. It is used for minor repairs of surface defects and, less commonly, for puttying walls all over the plane under stringent requirements for the quality of the coating: due to the exceptionally fine aggregate, the finish is perfectly smooth.

Dry gypsum mixtures differ among themselves, primarily, the life time after mixing. The larger it is, the less often you have to knead new servings, the more productive your work.
In the author’s personal rating for this parameter, dry mixes of different manufacturers are arranged in the following order:
| Picture | Description |
 Universal Eurogips Saten | Eurogips Saten: the mixture is suitable for application at least an hour after mixing. The flip side of the putty's long life is long-term (up to a day) drying. |
 Exceptionally high-quality putty from a Turkish manufacturer | ABS Saten: The solution lives 40-50 minutes. Drying time - up to 18 hours. |
 German "Fugen" in recent years began to be produced in Russia | Knauf Fugen: 30–40 minutes with drying to 12 hours grinding strength. |
In addition to putty
What, in addition to the putty itself, do you need to stock up before starting work?
Tool
For filling gypsum plasterboard and preparing putty from a dry mix, we need:
- Spatula 10-12 cm wide for filling seams and holes from screws;
- A spatula with a width of 30-40 cm for work on planes and smoothing reinforced seams;

- Corner putty knife (trowel) for finishing external and internal corners;
- Knife for jointing (clerical or very sharp kitchen);
- Brush or roller for priming;
- Wide capacity for mixing the mixture. The author uses for this purpose a plastic bucket from a water-dispersion paint with a volume of 11 liters. At the same time, the size of a single serving should not exceed 3-4 liters, otherwise you have a chance not to have time to develop putty before it begins to set;
- When mixing, a construction mixer or drill / screwdriver / puncher with a whisk will be useful. If they are not at hand - not a problem, you can do with a narrow spatula.

Supporting materials
Their short list includes:
- Penetrating primer (acrylic for GCR or universal (seeTypes of construction primers and their scope) intended for all mineral materials);
- Serpyanka (self-adhesive fiberglass mesh in rolls with a width of 50-80 mm) or rolled fiberglass. Serpyanka is easier to use, but fiberglass gives a smaller total thickness of the seam;
- Profiles for reinforcing corners. They can be made of perforated galvanized steel or plastic.

By the way: instead of reinforcing, the author prefers to glue the corners in the openings with a plastic corner on liquid nails or silicone sealant. To knock down the finish from the reinforced corner with, say, carrying furniture, it is quite possible, but damaging plastic is much more difficult.
Putty preparation
Here is a step-by-step guide for mixing gypsum:
- Pour clean cold water at the rate of 1 liter per 1.6 kg of dry mixture into the mixing container;
- Pour the gypsum mixture, if possible, evenly distributing it over the entire area of the water mirror;

Caution: never do the opposite - do not add water to the container with the dry mixture. In this case, you will get dense lumps at its bottom, which will be very difficult to break with subsequent mixing.
- After waiting about five minutes (during which time the mixture should be saturated with water and swell), mix the putty thoroughly until the consistency is uniform. After another 3-5 minutes, it is ready for use.

Application
How do I putty plasterboard the walls or ceiling on my own?
Fixing fasteners
The self-tapping head should be recessed about a millimeter relative to the surface of the sheet. A narrow spatula is enough to seal it. The hole is embedded in two movements: the first (sliding) you fill the hole; second (tear), putty knife removes excess putty.

Note: the termination will have to be repeated at least twice.Modern fillings (even positioned as non-shrinking) when drying still give a little shrinkage.
Stitching
The seams between the additional (cut to size) sheets are devoid of rounding, so they need to be aligned. This is the name of the removal of chamfers from both adjacent edges, at an angle of about 45 degrees to the surface, to a depth of 2/3 of the sheet thickness. Stitching will allow the putty to fill the seam as deep as possible, thereby protecting it from the appearance of cracks in the future.

After jointing, the seams between the additional sheets are treated with penetrating soil. It will stick the remaining gypsum dust and improve the adhesion of the sheet core to the joint seal. For factory edges, a primer is possible but not required.
The method of reinforcing and filling the seam depends on the reinforcing material used.
Serpyanka:
- The fiberglass mesh is glued along the seam;

- It is directly filled with putty through a sickle cell using a narrow spatula;
- After drying the first layer, the second, applied with a wide spatula, hides the texture of the reinforcement.

Fiberglass:
- The seam is flush with the surface of the sheet;
- After the putty dries, the seams are glued with fiberglass, put on a PVA glue diluted with water in a 1: 1 ratio.

The stuck fiberglass is putty with a wide spatula.
Angles
Internal corners are closed in the same way as ordinary seams. The external ones are pre-reinforced with an angular profile; then it hides under two layers of putty applied with intermediate drying. Tool - angular or flat spatula.

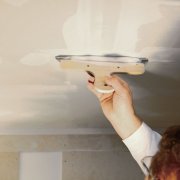
Putty on the surface of GCR
The putty is applied with a wide trowel in one layer about a millimeter thick or, which is much easier for a beginner, with two successively applied layers “on the seam”. In the second case, the layers are superposed perpendicular to each other: so on the surface there will be less bands from the edges of the spatula. When filling, the gypsum mixture is superimposed on a wide spatula with a narrower one.

Important: both mixing utensils and spatulas are washed clean before preparing a new serving. If this simple rule is neglected, the clumps of set gypsum will fall under the spatula and leave ugly furrows in the finish.
Post processing
How to prepare gypsum plaster after puttying for finishing (painting or sticker of wallpaper)?
- Fully dried putty is sanded with a hand grater with sanding nets No. 80 - No. 120 or, which is much more convenient, with a grinder. Polishing requires bright oblique lighting, which will highlight the slightest irregularities in the shadows;

- The next step is dust removal. Enough to brush the walls or ceiling with a brush. If you have an industrial vacuum cleaner - even better;

Tip: vacuuming drywall after grinding with a household vacuum cleaner is undesirable. Fine gypsum dust passes through its filters, which contributes to accelerated wear of bearings on the shaft of the electric motor and the impeller.
- The last stage of preparation for finishing is a primer. The primer is applied in one or several layers (depending on the type of subsequent finishing) with a brush or roller.

Attention: wallpaper can be glued immediately after drying the primer, but painting GKL with a water emulsion is allowed at least 15 days after filling the joints. Hurry - get dark spots and stripes at the seams with any number of layers of paint.
Conclusion
We sincerely hope that our experience will help the reader to complete the drywall finish with their own hands as efficiently as possible. As always, additional material can be found in the video in this article. Good luck!